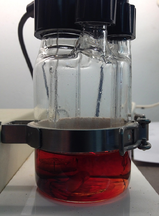
We have all seen it. We’re running a test to see how much moisture is in our sample when inexplicably the liquid inside the Karl Fischer vessel starts to turn from a normal light-yellow color to a dark burnt-red looking color. Sometimes the titrator screen will inform us of the problem with a digital readout stating the dreaded
“OVER-TITRATION!”
Sometimes the digital readout says nothing at all. In either case the operator knows something has gone wrong because the Karl Fischer Titrator is no longer giving moisture results. A panic to figure out the problem and get testing underway again becomes the immediate priority.
But where do you start?
As it turns out “over-titration” is probably one of the top 2 or 3 complaints or issues we hear about from operators. So what is causing this problem to occur? How can we determine the source of this problem, fix it, and more importantly how can we avoid it?
This is a critical question for operators and managers working in a production or QC environment who are concerned with keeping their Karl Fischer Titrator 100% “in-service”, day-in and day-out. Having the ability to identify the problem correctly so appropriate measures can be taken quickly is very important.
So how do we approach the problem of “over-titration”? By knowing the facts. Having a clear understanding of the process can help operators correct the problem faster when time is of the essence.
Important facts you should know about over-titration:
- Over-titration is a state where there is more iodine present in the vessel than water (general definition).
- When over-titration occurs the vessel will become very dark as a result of the abundance of iodine present inside the vessel.
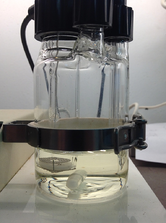
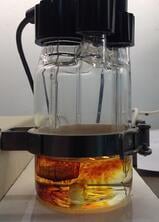
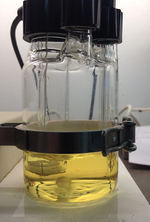
- The reagent inside the vessel should normally have a light-yellow color absent a very dark sample such as oil.
- The Karl Fischer Titrator always attempts to maintain an equilibrium where only enough iodine is introduced to counter and neutralize the water present inside the vessel.
- During a single titration test there should only be enough iodine introduced to counter and neutralize the amount of water present inside the titration vessel during that test – no more, no less.
- Any incident that interferes with the final amount of iodine introduced during the titration test can lead to dis-equilibrium and result in more iodine being introduced than necessary.
Important facts you should know about Karl Fischer Titrator Glassware:
- The Karl Fischer Vessel and Glassware is composed of the following
- Vessel (coulometric and volumetric)
- Generator Electrode (coulometric only) - The Generator Electrode is a precision electrode designed to deliver an electrical current inside the vessel to the reagent – causing the reagent to produce iodine
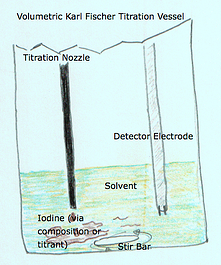
- Titration nozzle (volumetric only) - The titration nozzle delivers precise amounts of iodine (composite or titrant) via a burette driven mechanism using a piston
- Detector Electrode (coulometric and volumetric) - The detector electrode has a sole purpose and probably the most important role in continuously monitoring and determining the conductivity levels within the titration vessel.
So what are the causes that can lead to over-titration?
✓ A damaged Detector Electrode
✓ A "Tricked" or "Fooled" Detector Electrode (no joke)
Since coulometric and volumetric Karl Fischer Titrators handle the delivery of iodine differently it’s worth describing the two methods separately.
In a coulometric system the reagent is a complete system where it is designed to release iodine when the generator electrode delivers an electrical current to it. So what causes the generator electrode to deliver too much current causing the over production of iodine? Another way to say it is, “who or what” is telling the generator electrode to continue to generate a current when it’s not needed?
The detector electrode! So why would the detector electrode do this? 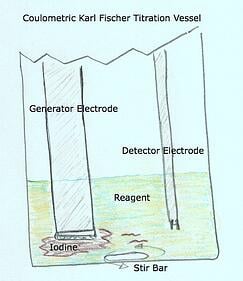
Without getting into too much of the electronics the detector electrode is designed to “detect” conductivity in the vessel. Depending on the amount of conductivity detected the detector electrode will send a message to the titrator telling it to continue producing a current - enough to release the appropriate amount of iodine to counter and neutralize the water present in the vessel. As long as this process is working during a titration an eventual endpoint will be found and a result will be produced.
So it’s really a problem of misinformation. If the Karl Fischer Titrator is not getting the right information from the detector electrode then over-titration is possible.
The problems we see that can effect the proper functioning of the detector electrode include:
- The electrode cable. If the cable becomes cracked or breaks it can cause a situation where the message to the titrator is to continue producing a current – continually. In this case the vessel will become very dark and in most cases the titrator will not even know it is in an over-titration state. The generator electrode will simply continue to produce a current, turning the vessel very dark. There will be no other warning or notice from the titrator for the operator to see.
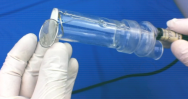
- Cracked electrode. Sometimes mishandling or even a stirrer bar bouncing around inside the vessel can cause a tiny crack near the bottom of the detector electrode that cannot be seen with the naked eye. These cracks can allow small amounts of reagent inside the electrode enough where errors in detection will begin to occur. What ensues is an unstable drift that jumps around giving the titrator a misreading. The jumping around and unstable drift may be picked up by the titrator and an error stating “OVER TITRATION” may be seen on the screen of the titrator.
- Cable connectors. Sometimes the connectors on the titrator itself can become dirty, wet and corroded. Also, some electrodes use multi-plug designs that can also become dirty, wet and corroded. These connectors if not clean and dry can lead to a similar misreading similar to a cracked electrode where the drift begins to jump around and become unstable. The titrator may also state that there is “OVER TITRATION” when this occurs.

A "Tricked" or "Fooled" Detector Electrode you say?
If it’s determined that the problem is not the detector electrode then we need to look at the stirring action inside the vessel. If the iodine being released is not mixing well because the stirrer is off or set too low, then the detector electrode will not realize there is iodine already released inside the vessel. This will cause the detector electrode to continue telling the titrator to produce more current via the generator electrode up to the point where the detector electrode senses a reduction in the conductivity level inside the vessel. Conductivity only reduces as the iodine interacts with the water. So it is important for the detector electrode to sense the true and most accurate “mix or state” of iodine and water during the titration process. If it does not know the true state of the mix it will be fooled into telling the titrator to keep going – causing OVER TITRATION.
 In a volumetric system the reagent setup is different where a composite or titrant is introduced via a burette piston through a titration nozzle. The amount of composite or titrant delivered is based upon the commands of the titrator. The command from the titrator to the burette and piston that push out the “iodine” through the titration nozzle is, yes, given by the detector electrode. For the purposes of this discussion the difference between the coulometric and volumetric setup is that the delivery of iodine is different. But the same problem can occur where the iodine does not mix well and therefore trick the detector electrode in to thinking there is not enough iodine present inside the vessel to counter and neutralize the water. Since both coulometric and volumetric Karl Fischer Titrators use detector electrodes the problems mentioned earlier about the detector electrode will hold true with volumetric titrators also.

7 Thoughts (DOs and DON'Ts) on Problem Solving and Prevention:
1. Don’t abuse the detector electrode! Be very careful with the detector electrode and do not handle it unnecessarily. Small bumps (clanks) here and there can lead to a crack. Do you really need to remove the detector  electrode from the vessel all the time?
2. Don’t turn up the titrator’s stirrer speed to high. This will only cause the stirrer bar to bounce around uncontrollably and possibly hit and damage the detector electrode (crack).
3. Do inspect all connections and connectors on the detector electrode cable and Karl Fischer Titrator to ensure they are dry and clean.
4. Do be careful with the detector electrode cable. Try not to bend it unnecessarily.
5. Do make sure there is enough stirring action inside the vessel to mix the iodine around effectively. A small vortex should be visible. But not too fast to cause the stir bar to bounce around.
6. Do introduce some moisture - Sometimes when you are in an over-titration situation and the vessel is already very dark you can introduce a little moisture to bring the vessel back to equilibrium. This sometimes works and immediately the vessel turns from a dark burnt-red color to a light-yellow.
7. Do have a spare detector electrode on hand. This little electrode seems to get over looked but plays a huge role inside the Karl Fischer Titrator vessel.


 encounter many of the day-to-day problems associated with broken electrodes. In many instances some of the electrodes are destroyed beyond repair but in other circumstances we find that some are in fact capable of being repaired.