<img src="https://secure.leadforensics.com/124134.png" style="display:none;">

Webinar Series: TAN (total acid number) ASTM D664

By Hank Levi on Tue, Feb 07, 2023 @ 02:46 PM

In this short 30 minute webinar we dive into understanding the common titration application known as TAN or "total acid number", also known as,  ASTM D664.  As part of our titration webinar series we have a fun and uncomplicated talk about this titration application known as "total acid number".  

In this short but informative webinar we explore:

  • What is TAN, total acid number, ASTM D664?
  • Why do we test for it?
  • How do we test for it?
  • How do you set up the titration application?
  • What are common problems you need to avoid?
  • Best practices you should know about and try to follow

It only takes a few seconds to register for this highly interactive webinar (recorded).  You will be able to watch, send us emails with questions, download various application resources including the application notes, electrode prep tips, and more.

This is a valuable tool for seasoned experts and first timers.


                               WATCH THE TOTAL ACID NUMBER (TAN) (ASTM D664) WEBINAR NOW


Screenshot 2023-02-07 at 1.47.20 PM


Continue Reading

Salt Titration; How much does it cost per test?

By Hank Levi on Thu, Aug 26, 2021 @ 03:49 PM

We get this question a lot.  So, we decided to try and figure it out the best we can.  In this analysis, we are only going to examine and include the per-unit cost of the titrator (automatic) and the reagents (silver nitrate - AgNO3).  It seems we could include other factors including human resources and electrical power requirements but these can vary greatly so we will leave them out of this analysis.  Additional ancillary costs can always be added later.

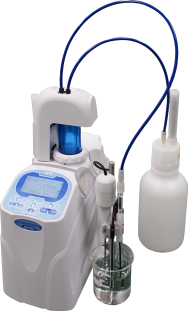
Let's start off by assuming we purchase a basic automatic titrator for $8,500.00  

Next, let's examine our most required consumable.  Silver Nitrate- AgNO3.

Food Lable
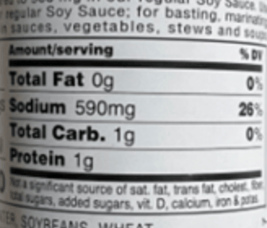
To do this we need to assume a sample with a given amount of sodium.  Sodium is generally expressed in mg on food labels. 


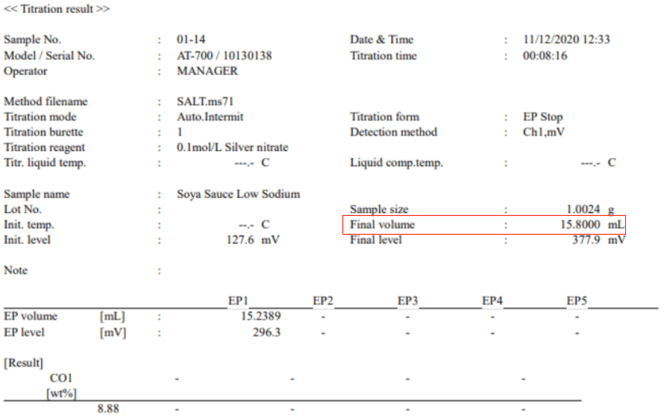
We performed a salt titration on this food product (soy sauce).  On the label, we can see that the amount of sodium is 590mg of sodium per serving.  For this titration (see below), you can see we used 15.8ml of silver nitrate @ (0.1N mol).   

Salt Titration Results

Salt Titration Curve

Note that silver nitrate can come in different strengths so there is a little math we need to consider when deciding on which strength of silver nitrate we should use.

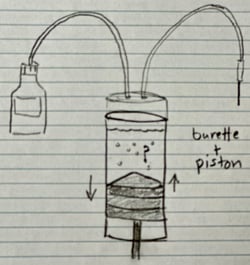
Let's consider using a different strength silver nitrate.  Let's look at using 0.5N mol instead of the 0.1N mol we used in our test.  Initially, we used 0.1N for our titration.  So dividing 15.8mL by 5 helps us see that using a bit stronger silver nitrate will reduce our consumption of silver nitrate.  In this case,  around 3mL per test.   But it's not that simple.  Conversely, we can change the strength of the silver nitrate and make it stronger as long as you don't have other samples that have a lot less sodium.  Otherwise, it would be too strong for the other samples with less sodium and it would not be ideal in those situations (You probably would not find the endpoint).  Bottom line, if you are working with only one burette (doses the silver nitrate), then you are going to need to pick a silver nitrate strength that can be used for all of your samples.  The only alternative would be to refill the burette each time with different strength silver nitrate, or, have a swappable burette on hand.  Having a swappable burette means you can have preloaded burettes with different strength silver nitrate and you can then easily swap them on and off the titrator when needed.  Even better, some titrators can be configured to have two or more onboard burettes which would alleviate the need for manually swapping burettes. 

Let's ignore this for the moment and continue to focus on our cost analysis assuming a single burette.

To give you an idea about pricing for silver nitrate. 

  •  We recently purchased some 0.1N mol Silver Nitrate (strength).  A 1 Liter bottle cost approximately $75.00.  Divide $75.00 by 1,000 and the per mL cost is $0.075 per mL of 0.1N mol silver nitrate.   Assume 15.8mL of 0.1N mol silver nitrate per test => 15.8x$0.075=$1.19 per test.
  • Assume 0.5N mol Silver Nitrate (strength). => 15.8mL divided by 5 = 3.2mL of silver nitrate per test. (e.g. you will use less with stronger).  Some recent pricing for 0.5N mol; $170.00 / 500mL => $0.34 per mL, or Bulk pricing if you buy a larger bottle $1,000.00 / 4L (4,000mL) => $0.25 per mL ~ 3.2mL per test x $0.34 per mL = $1.09 per test or 3.2mL x $.25 per mL = $0.80 per test.

So if you can purchase silver nitrate in bulk you can drive down your per test cost.

When you decide to test for salt (NaCl) using a titrator you are going to have that initial outlay to pay for the titrator.  After that, it's really a question of what strength of silver nitrate you are using and the amount you are using.   Hopefully, from this example, you can see how the price per test can range from about $0.80 per test to almost $1.20 per test.  So if we do some estimating you could say on average it costs about $1.00 per test.  If you are testing 200 samples per day your daily cost for silver nitrate will cost you about $200.00.

Now let's assume depreciation of the titrator using the straight-line method with the useful life of the titrator equal to 5 years (I think this is what a tax accountant would assume for tax purposes).  $8,500 / 5 = $1,700.00 per year.  Let's assume 251 working days per year ==> $1,700 / 251 = $6.73 per working day in depreciation expense.  In this case, divide that by 200 tests today, and that = $0.03 per test.  

I think these numbers (for the most part) provide a good working basis for determining daily operating costs.  They're probably not perfect but they show you how to go about figuring this out. As always we hope you find this information helpful!


Get more information


Continue Reading

How-To set up and run acid & salt titrations

By Hank Levi on Tue, Jun 08, 2021 @ 02:51 PM

This article is not intended to explain a manual titration process but rather how you can configure an automatic titration system to run both acid and salt titrations independently and or as a combined method.

Performing acid and salt titrations is a popular requirement in the food industry.  Some foods like tomatoes for example tend to have naturally occurring acidic properties but also take on a salt component when processed into other intermediary products like pizza sauce or spaghetti sauce.  

Although sodium (Na) is an important element to measure and report on food labels, salt (NaCl) content is also important in measuring to ensure the taste is good and repeatable during the production process.

Performing titrations whether manually or with the use of an automatic titrator involves a burette where specific amounts of titrant are delivered to evaluate the potential and or content of what is being measured. Results are usually reported in % for both acidity and salt content.

Here is an example of how you might set up a titration for testing both acidity and salt.  Below we have 2 scenarios.  The first scenario is configured so that the titration for both acidity and salt can be performed using a single sample.  To accomplish this you will need 3 burettes.  We will first perform the acidity titration using burette #1 with NaOH (Sodium Hydroxide) as our titrant.  In our example, during the acidity titration, the pH will rise to about 8.2.  At the end of the acidity titration, the pH level will be too high for us to run the salt titration so we will need to lower the pH.  We accomplish this task by dosing HNO3 (Nitric Acid) into the sample using the burette on the Automatic Piston Burette (APB ~ we will call this burette #3).  We will dose HNO3 to reduce the pH down to about 4.1.  Once the pH level is reduced the salt titration can begin.  The second burette (burette #2) located on the titrator then performs the salt titration using silver nitrate (AgNO3) as the titrant.  It is worth noting that silver nitrate comes in various strengths and so depending on your sample and the amount of "salt" you expect to find, you may need to adjust the strength (1.0N vs. 0.5N vs 0.1N, etc).

What the setup will look like

Salt and Acid drawing.jpg

Electrodes we will use:

  • pH glass electrode (noted as H171 in the diagram)
  • combined silver electrode (noted as C373 in the diagram)

When running the titration using only one sample to obtain both the acidity % and the salt %, we will use both electrodes as the combined silver electrode will act as a reference electrode for the pH electrode. 

When running a single titration on two different samples in two different beakers, leave both electrodes and nozzles in the samples ensuring to clean the nozzles and electrodes between tests of each sample.  In this scenario, the combined silver electrode (C373) will also work as a reference electrode for the pH electrode (H171) while running the acidity titration.


Summary of key consumable:
  • Silver Nitrate (AgNO3) titrant for salt titrations
  • Sodium Hydroxide (NaOH) titrant for acidity titrations
  • Nitric Acid (HNO3) buffer if combining methods
  • Combined Silver Electrode (C373) for salt titrations
  • pH glass electrode (H171) for acidity titrations

In the video below we show the titration setup described above.


We hope you find this information useful!

                                                    Ask for more information


Continue Reading

Introducing our technical Web Helpers!

By Hank Levi on Mon, Nov 23, 2020 @ 01:58 PM

Hello!  Please meet our new Web Helpers!  Moisture Elle, Karl Fischer, Shaker Sam, Terri Tenso, and Vivian Visco!  Each of our helpers will provide technical information ranging from general topics to more in-depth discussion pertaining to; Moisture testing, Karl Fischer Titration, Particle Size Analysis, Surface Tension, and Viscosity.


HubSpot Video


Continue Reading

Q&A: AT-710 Burette piston won't move

By Hank Levi on Tue, Jun 19, 2018 @ 03:36 PM

Sometimes pressing a button and hearing a beep just drives you crazy.  We know.  Below we received some video of a problem where the operator could not move the piston burette up or down on their automatic titrator.  We decided to replicate the problem and then show how to take corrective action.  We hope you find the video informative even though it is raw footage.  Send us your questions too.  Video, audio, pictures, etc.  We can use any format.


Continue Reading

Electrode Shower Cleaning for Auto Titrator Sample Changers

By Hank Levi on Thu, Feb 25, 2016 @ 12:04 PM


ELECTRODE RINSE WITH SHOWER ACCESSORY:

Sample changers that are connected with automatic titrators generally are there for a reason.  Efficiency. From an operators point of view getting multiple tests done quickly while being able to take on other tasks in the lab is a key productivity booster.  Sample changers offer various sizes ranging from as few as 6 positions for samples up to some of the largest exceeding 50 sample positions.  Sample changers either have rotating carousels or an arm that moves electrodes and nozzles from sample to sample.  Each time a sample test is completed the electrode must be cleaned before moving on to the next test.  Many sample changers offer as standard a dip rinse between sample testing and as the name suggests it's really nothing more then dipping the electrode in clean water or solution.  For some samples this process is sufficent but for others it is not enough to effectively clean the electrode before the next test.  Luckily most manufacturers of sample changers offer additional cleaning power with the use of a shower rinse system.   Below is a video showing how a shower rinse process works.   Water is stored in a container and then is flushd and rinsed in one of the sample positions designated as the cleaning station.  Water is evacuated via tubes to a drain or sink.  


Continue Reading

Automatic Titrator with Mini Sample Changer Video

By Hank Levi on Tue, Nov 20, 2012 @ 11:11 AM

AT-700 Automatic Titrator

The AT-700 automatic titrator provides operators a variety of choices including the use of an Mini Sample Changer CHA-700integrated mini sample changer.  The mini sample changer can hold up to 6 samples.  The design utilizes a rotating arm that holds the electrode(s), dispensing nozzle(s), and propeller stirrer above each sample and maneuvers from sample to sample.  The compact design allows a small footprint on the bench because the titrator sits on top of the sample changer.  Watch the short demo video to learn more about this titration system.


        Get more information here 


Continue Reading

Automatic Titrator AT-700

By Hank Levi on Mon, Nov 05, 2012 @ 02:31 PM

Automatic Titrator AT-700

The AT-700 automatic titrator is a new compact potentiometric titrator.  The unit is ideal for conducting basic end-point titrations all the way up to more complex configurations that can include a sample changer, an additional permanent burette, to a chain of 8 automatic piston burettes (APBs).  The titrator can work stand alone or pair with advanced computer controlled software. 

Watch the video to learn and see more: https://youtu.be/CymMenF1fqA


Continue Reading

Titration: Bromine number vs. Bromine Index

By Hank Levi on Mon, Aug 27, 2012 @ 12:09 PM

BROMINE TITLEDon’t know whether you need to run a Bromine Number or Bromine Index?  Not sure what the difference is between Electrometric or Coulometric?  And just how many approved ASTM methods are there, anyway? 

Well, a good place to start is to check out the comparison table below and evaluate your sample(s) with respect to the scope & limits of products listed for each method.

If you’re trying to decide which of the last two Bromine Index methods to use, remember that the D1492 Coulometric method is most often employed for materials having very low expected values ( > ~20).

Be careful about converting back and forth between the two using that factor of 1000.  You can safely convert a Bromine Index to a Bromine Number by dividing it by 1000, but it’s not OK to derive a Bromine Index from a Bromine Number by multiplying the Number by 1000.

                                         DOWNLOAD A COPY

Need to run Bromine Number or Bromine Index with an AUTOMATIC TITRATOR?

OR

Interested in getting more detailed information on how to do Bromine using your KARL FISCHER TITRATOR

              Get the complete Karl Fischer method here

Find more Coulometric Karl Fischer Titrator information  Bromine Chart

Continue Reading

Karl Fischer Over Titration and 7 things you should know about it

By Hank Levi on Wed, May 02, 2012 @ 06:30 PM

We have all seen it.  We’re running a test to see how much moisture is in our sample when inexplicably the liquid inside the Karl Fischer vessel starts to turn from a normal light-yellow color to a dark burnt-red looking color.  Sometimes the titrator screen will inform us of the problem with a digital readout stating the dreaded

OVER-TITRATION!” 

kfbeforestart resized 600describe the imagedescribe the imagedescribe the image


Sometimes the digital readout says nothing at all.  In either case the operator knows something has gone wrong because the Karl Fischer Titrator is no longer giving moisture results.  A panic to figure out the problem and get testing underway again becomes the immediate priority. 

But where do you start?  

As it turns out “over-titration” is probably one of the top 2 or 3 complaints or issues we hear about from operators.    So what is causing this problem to occur?  How can we determine the source of this problem, fix it, and more importantly how can we avoid it?

 
This is a critical question for operators and managers working in a production or QC environment who are concerned with keeping their Karl Fischer Titrator 100% “in-service”, day-in and day-out.   Having the ability to identify the problem correctly so appropriate measures can be taken quickly is very important.

 
So how do we approach the problem of “over-titration”?   By knowing the facts.  Having a clear understanding of the process can help operators correct the problem faster when time is of the essence.  

Important facts you should know about over-titration:  
  1. Over-titration is a state where there is more iodine present in the vessel than water (general definition).
  2. When over-titration occurs the vessel will become very dark as a result of the abundance of iodine present inside the vessel.
  3. The reagent inside the vessel should normally have a light-yellow color absent a very dark sample such as oil.
  4. The Karl Fischer Titrator always attempts to maintain an equilibrium where only enough iodine is introduced to counter and neutralize the water present inside the vessel.
  5. During a single titration test there should only be enough iodine introduced to counter and neutralize the amount of water present inside the titration vessel during that test – no more, no less.
  6. Any incident that interferes with the final amount of iodine introduced during the titration test can lead to dis-equilibrium and result in more iodine being introduced than necessary.
    Important facts you should know about Karl Fischer Titrator Glassware:  
  1. The Karl Fischer Vessel and Glassware is composed of the following
    1. Vessel (coulometric and volumetric)
    2. Generator Electrode (coulometric only) - The Generator Electrode is a precision electrode designed to deliver an electrical current inside the vessel to the reagent – causing the reagent to produce iodine
    3. Titration nozzle (volumetric only) - The titration nozzle delivers precise amounts of iodine (composite or titrant) via a burette driven mechanism using a piston
    4. Detector Electrode (coulometric and volumetric) - The detector electrode has a sole purpose and probably the most important role in continuously monitoring and determining the conductivity levels within the titration vessel.
  So what are the causes that can lead to over-titration? 

✓ A damaged Detector Electrode

✓ A "Tricked" or "Fooled" Detector Electrode (no joke)

Since coulometric and volumetric Karl Fischer Titrators handle the delivery of iodine differently it’s worth describing the two methods separately.  

A Word About Coulometric Karl Fischer Titration:

In a coulometric system the reagent is a complete system where it is designed to release iodine when the generator electrode delivers an electrical current to it.  So what causes the generator electrode to deliver too much current causing the over production of iodine?  Another way to say it is, “who or what” is telling the generator electrode to continue to generate a current when it’s not needed?  

   
The detector electrode!  So why would the detector electrode do this?   describe the image
Without getting into too much of the electronics the detector electrode is designed to “detect” conductivity in the vessel.  Depending on the amount of conductivity detected the detector electrode will send a message to the titrator telling it to continue producing a current - enough to release the appropriate amount of iodine to counter and neutralize the water present in the vessel.  As long as this process is working during a titration an eventual endpoint will be found and a result will be produced.  


So it’s really a problem of misinformation. If the Karl Fischer Titrator is not getting the right information from the detector electrode then over-titration is possible. 

The problems we see that can effect the proper functioning of the detector electrode include:  
  1. The electrode cable.  If the cable becomes cracked or breaks it can cause a situation where the message to the titrator is to continue producing a current – continually.  In this case the vessel will become very dark and in most cases the titrator will not even know it is in an over-titration state.  The generator electrode will simply continue to produce a current, turning the vessel very dark.  There will be no other warning or notice from the titrator for the operator to see.
  2. Cracked electrode.  Sometimes mishandling or even a stirrer bar bouncing around inside the vessel can cause a tiny crack near the bottom of the detector electrode that cannot be seen with the naked eye.  These cracks can allow small amounts of reagent inside the electrode enough where errors in detection will begin to occur.  What ensues is an unstable drift that jumps around giving the titrator a misreading. The jumping around and unstable drift may be picked up by the titrator and an error stating “OVER TITRATION” may be seen on the screen of the titrator.
  3. Cable connectors.  Sometimes the connectors on the titrator itself can become dirty, wet and corroded.  Also, some electrodes use multi-plug designs that can also become dirty, wet and corroded.   These connectors if not clean and dry can lead to a similar misreading similar to a cracked electrode where the drift begins to jump around and become unstable.  The titrator may also state that there is “OVER TITRATION” when this occurs.

Find more Coulometric Karl Fischer Titrator information 

A "Tricked" or "Fooled" Detector Electrode you say?describe the image

If it’s determined that the problem is not the detector electrode then we need to look at the stirring action inside the vessel.  If the iodine being released is not mixing well because the stirrer is off or set too low, then the detector electrode will not realize there is iodine already released inside the vessel.  This will cause the detector electrode to continue telling the titrator to produce more current via the generator electrode up to the point where the detector electrode senses a reduction in the conductivity level inside the vessel.  Conductivity only reduces as the iodine interacts with the water.  So it is important for the detector electrode to sense the true and most accurate “mix or state” of iodine and water during the titration process.  If it does not know the true state of the mix it will be fooled into telling the titrator to keep going – causing OVER TITRATION.        

A Word About Volumetric Karl Fischer Titration:

   
describe the imageIn a volumetric system the reagent setup is different where a composite or titrant is introduced via a burette piston through a titration nozzle.  The amount of composite or titrant delivered is based upon the commands of the titrator.  The command from the titrator to the burette and piston that push out the “iodine” through the titration nozzle is, yes, given by the detector electrode.  For the purposes of this discussion the difference between the coulometric and volumetric setup is that the delivery of iodine is different.   But the same problem can occur where the iodine does not mix well and therefore trick the detector electrode in to thinking there is not enough iodine present inside the vessel to counter and neutralize the water.  Since both coulometric and volumetric Karl Fischer Titrators use detector electrodes the problems mentioned earlier about the detector electrode will hold true with volumetric titrators also.  

Learn more about Volumetric Karl Fischer Titration 


 7 Thoughts (DOs and DON'Ts) on Problem Solving and Prevention:  

1.  Don’t abuse the detector electrode!  Be very careful with the detector electrode and do not handle it unnecessarily.  Small bumps (clanks) here and there can lead to a crack.   Do you really need to remove the detector thinking dragonelectrode from the vessel all the time?
2.  Don’t turn up the titrator’s stirrer speed to high.  This will only cause the stirrer bar to bounce around uncontrollably and possibly hit and damage the detector electrode (crack).
3.  Do inspect all connections and connectors on the detector electrode cable and Karl Fischer Titrator to ensure they are dry and clean.
4.  Do be careful with the detector electrode cable.  Try not to bend it unnecessarily.
5.  Do make sure there is enough stirring action inside the vessel to mix the iodine around effectively.  A small vortex should be visible.  But not too fast to cause the stir bar to bounce around.
6.  Do introduce some moisture - Sometimes when you are in an over-titration situation and the vessel is already very dark you can introduce a little moisture to bring the vessel back to equilibrium.  This sometimes works and immediately the vessel turns from a dark burnt-red color to a light-yellow.
7.  Do have a spare detector electrode on hand.  This little electrode seems to get over looked but plays a huge role inside the Karl Fischer Titrator vessel.

Created on 05/02/12 at 18:10:44

Continue Reading

Recent Posts