<img src="https://secure.leadforensics.com/124134.png" style="display:none;">

Recent Posts

Do ketones affect moisture readings in Karl Fischer Titration?

By Hank Levi on Mon, Nov 13, 2023 @ 03:40 PM

Yes, ketones can potentially affect moisture readings in Karl Fischer titration. This is because ketones can react with the methanol in common Karl Fischer reagents, forming acetals, which also react with the reagent and produce water. This additional water is then titrated and can cause the moisture reading to be too high. In order to avoid this, it is important to ensure that the titration cell is cleaned thoroughly after each analysis to remove any traces of ketones that may be present. If traces of ketones are left in the cell, it can cause erroneous readings and affect the overall accuracy of the moisture measurement.  Additionally, there are some specialty reagents, Coulomat AK and Coulomat CGK,  that can be used to help limit this side reaction....and also you have the option of using a Volumetric Karl Fischer Titrator to get around this problem.


                                               Learn more about Karl Fischer Titration

Continue Reading

Benefits of Using Karl Fischer Moisture Titration vs. Other Methods

By Hank Levi on Thu, Jun 22, 2023 @ 04:33 PM

Accurate measurement of moisture content is essential to ensure the quality and consistency of your products. There are several methods available for measuring moisture content, but one of the most reliable and accurate methods is Karl Fischer moisture titration.

Karl Fischer moisture titration is a widely used method for measuring moisture content in a variety of materials, including solids, liquids, and gases. This method is based on the reaction between water and a Karl Fischer reagent, which produces a measurable electrical signal. The amount of water present in the sample can be calculated from the electrical signal, providing a precise measurement of moisture content.

One of the main benefits of using Karl Fischer moisture titration is its high accuracy. This method can detect moisture levels as low as 0.001%, making it ideal for applications where even small amounts of moisture can have a significant impact on product quality. In addition, Karl Fischer moisture titration is highly selective, meaning that it only reacts with water and not other substances in the sample. This makes it an excellent choice for measuring moisture content in complex mixtures.

Another advantage of Karl Fischer moisture titration is its versatility. This method can be used to measure moisture content in a wide range of materials, including pharmaceuticals, food products, and industrial chemicals. It can also be used to measure moisture content in gases, making it an essential tool for applications such as natural gas processing and semiconductor manufacturing.

Compared to other methods for measuring moisture content, Karl Fischer moisture titration is also relatively fast and easy to perform. The titration process can be automated, reducing the risk of human error and increasing efficiency. This makes it an excellent choice for high-throughput applications where speed and accuracy are essential.

Share this with associates who may find  an analysis of Karl Fischer titration useful.

Learn More or request a quote

Get more Karl Fischer Info (technical)

Request a quote for a Karl Fischer Titrator

Continue Reading

Total Base Number (TBN), ASTMD2896-21, ASTMD4739-17 - WEBINAR SERIES

By Hank Levi on Fri, Apr 28, 2023 @ 02:56 PM

If you want to know more about Total Base Number (TBN) then this is for you.  In this webinar we cover both of the popular ASTM methods, ASTM D2896-21 and ASTM D4739-17.  This is a great training webinar for those who are just learning about it and for those seasoned pros who need a little refresher training.

We will do our best to answer:

  • What is TBN (Total Base Number)?
  • Why do we test for TBN (Total Base Number)?
  • How do we test for TBN (Total Base Number)?
  • How to setup the titration application on an automatic titrator
  • Common problems to avoid
  • Best practices you should follow

This is an on-demand webinar where you will be able to download information as well as the presentation.  You can communicate with us in real time via email while you watch the webinar.  The webinar is about 45 minutes long and even has a short quiz at the end.

WATCH THE TOTAL BASE NUMBER (TBN) (ASTMD2896-21, ASTMD4739-17) WEBINAR NOW

Screenshot 2023-04-10 at 3.14.17 PM


Continue Reading

Webinar Series: TAN (total acid number) ASTM D664

By Hank Levi on Tue, Feb 07, 2023 @ 02:46 PM

In this short 30 minute webinar we dive into understanding the common titration application known as TAN or "total acid number", also known as,  ASTM D664.  As part of our titration webinar series we have a fun and uncomplicated talk about this titration application known as "total acid number".  

In this short but informative webinar we explore:

  • What is TAN, total acid number, ASTM D664?
  • Why do we test for it?
  • How do we test for it?
  • How do you set up the titration application?
  • What are common problems you need to avoid?
  • Best practices you should know about and try to follow

It only takes a few seconds to register for this highly interactive webinar (recorded).  You will be able to watch, send us emails with questions, download various application resources including the application notes, electrode prep tips, and more.

This is a valuable tool for seasoned experts and first timers.


                               WATCH THE TOTAL ACID NUMBER (TAN) (ASTM D664) WEBINAR NOW


Screenshot 2023-02-07 at 1.47.20 PM


Continue Reading

How to measure salt in potato chips using an automatic titrator

By Hank Levi on Fri, Nov 25, 2022 @ 12:06 PM


There are still many who test salt content by hand and so the thought of using an automatic titrator might sound intimidating.  It's not. Really.  So we thought it would help if we made some videos to explain some of the basic steps involved and show for those who have never seen one what a titrator looks like.  To be sure there are many capable titrators that can do the job so don't get completely caught up in which one is best but think more about the benefits of automating a test that is repeated many times daily.  

In the following videos we provide a step by step look at how a sample (potato chips) would be prepared and tested using an automatic titrator with the help of a 6 position sample changer.  

VIDEO DEMONSTRATION:  Testing Salt in Potato Chips with Titrator


WHAT YOUR GOING TO NEED IN ADDITION TO THE TITRATOR:

1. Silver Nitrate; 1.0 or 0.1 normal strength (This is the titrant that you will use)

2. Combined silver electrode (it's a silver and pH electrode combined)

THINGS YOU SHOULD KNOW:

1.  How do you currently prep your sample.  This process should not really change.  Sample prep is important though and should be considered.

2. Know the ingredients of your sample.  You should have a pretty good idea about the types of chlorides and sodium that may be found in your sample.

Get More Information on Salt Testing Equipment.  Click here

Salt Testing  


Continue Reading

Salt Titration; How much does it cost per test?

By Hank Levi on Thu, Aug 26, 2021 @ 03:49 PM

We get this question a lot.  So, we decided to try and figure it out the best we can.  In this analysis, we are only going to examine and include the per-unit cost of the titrator (automatic) and the reagents (silver nitrate - AgNO3).  It seems we could include other factors including human resources and electrical power requirements but these can vary greatly so we will leave them out of this analysis.  Additional ancillary costs can always be added later.

Let's start off by assuming we purchase a basic automatic titrator for $8,500.00  

Next, let's examine our most required consumable.  Silver Nitrate- AgNO3.

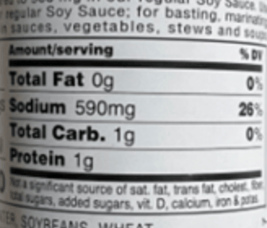
Food LableTo do this we need to assume a sample with a given amount of sodium.  Sodium is generally expressed in mg on food labels. 


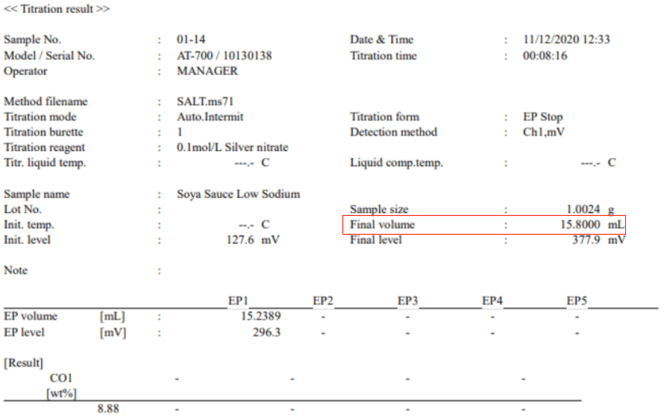
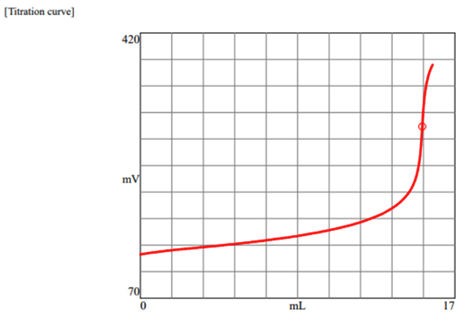
We performed a salt titration on this food product (soy sauce).  On the label, we can see that the amount of sodium is 590mg of sodium per serving.  For this titration (see below), you can see we used 15.8ml of silver nitrate @ (0.1N mol).   

Salt Titration Results

Salt Titration Curve

Note that silver nitrate can come in different strengths so there is a little math we need to consider when deciding on which strength of silver nitrate we should use.

Let's consider using a different strength silver nitrate.  Let's look at using 0.5N mol instead of the 0.1N mol we used in our test.  Initially, we used 0.1N for our titration.  So dividing 15.8mL by 5 helps us see that using a bit stronger silver nitrate will reduce our consumption of silver nitrate.  In this case,  around 3mL per test.   But it's not that simple.  Conversely, we can change the strength of the silver nitrate and make it stronger as long as you don't have other samples that have a lot less sodium.  Otherwise, it would be too strong for the other samples with less sodium and it would not be ideal in those situations (You probably would not find the endpoint).  Bottom line, if you are working with only one burette (doses the silver nitrate), then you are going to need to pick a silver nitrate strength that can be used for all of your samples.  The only alternative would be to refill the burette each time with different strength silver nitrate, or, have a swappable burette on hand.  Having a swappable burette means you can have preloaded burettes with different strength silver nitrate and you can then easily swap them on and off the titrator when needed.  Even better, some titrators can be configured to have two or more onboard burettes which would alleviate the need for manually swapping burettes. 

Let's ignore this for the moment and continue to focus on our cost analysis assuming a single burette.

To give you an idea about pricing for silver nitrate. 

  •  We recently purchased some 0.1N mol Silver Nitrate (strength).  A 1 Liter bottle cost approximately $75.00.  Divide $75.00 by 1,000 and the per mL cost is $0.075 per mL of 0.1N mol silver nitrate.   Assume 15.8mL of 0.1N mol silver nitrate per test => 15.8x$0.075=$1.19 per test.
  • Assume 0.5N mol Silver Nitrate (strength). => 15.8mL divided by 5 = 3.2mL of silver nitrate per test. (e.g. you will use less with stronger).  Some recent pricing for 0.5N mol; $170.00 / 500mL => $0.34 per mL, or Bulk pricing if you buy a larger bottle $1,000.00 / 4L (4,000mL) => $0.25 per mL ~ 3.2mL per test x $0.34 per mL = $1.09 per test or 3.2mL x $.25 per mL = $0.80 per test.

So if you can purchase silver nitrate in bulk you can drive down your per test cost.

When you decide to test for salt (NaCl) using a titrator you are going to have that initial outlay to pay for the titrator.  After that, it's really a question of what strength of silver nitrate you are using and the amount you are using.   Hopefully, from this example, you can see how the price per test can range from about $0.80 per test to almost $1.20 per test.  So if we do some estimating you could say on average it costs about $1.00 per test.  If you are testing 200 samples per day your daily cost for silver nitrate will cost you about $200.00.

Now let's assume depreciation of the titrator using the straight-line method with the useful life of the titrator equal to 5 years (I think this is what a tax accountant would assume for tax purposes).  $8,500 / 5 = $1,700.00 per year.  Let's assume 251 working days per year ==> $1,700 / 251 = $6.73 per working day in depreciation expense.  In this case, divide that by 200 tests today, and that = $0.03 per test.  

I think these numbers (for the most part) provide a good working basis for determining daily operating costs.  They're probably not perfect but they show you how to go about figuring this out. As always we hope you find this information helpful!


Get more information


Continue Reading

How-To set up and run acid & salt titrations

By Hank Levi on Tue, Jun 08, 2021 @ 02:51 PM

This article is not intended to explain a manual titration process but rather how you can configure an automatic titration system to run both acid and salt titrations independently and or as a combined method.

Performing acid and salt titrations is a popular requirement in the food industry.  Some foods like tomatoes for example tend to have naturally occurring acidic properties but also take on a salt component when processed into other intermediary products like pizza sauce or spaghetti sauce.  

Although sodium (Na) is an important element to measure and report on food labels, salt (NaCl) content is also important in measuring to ensure the taste is good and repeatable during the production process.

Performing titrations whether manually or with the use of an automatic titrator involves a burette where specific amounts of titrant are delivered to evaluate the potential and or content of what is being measured. Results are usually reported in % for both acidity and salt content.

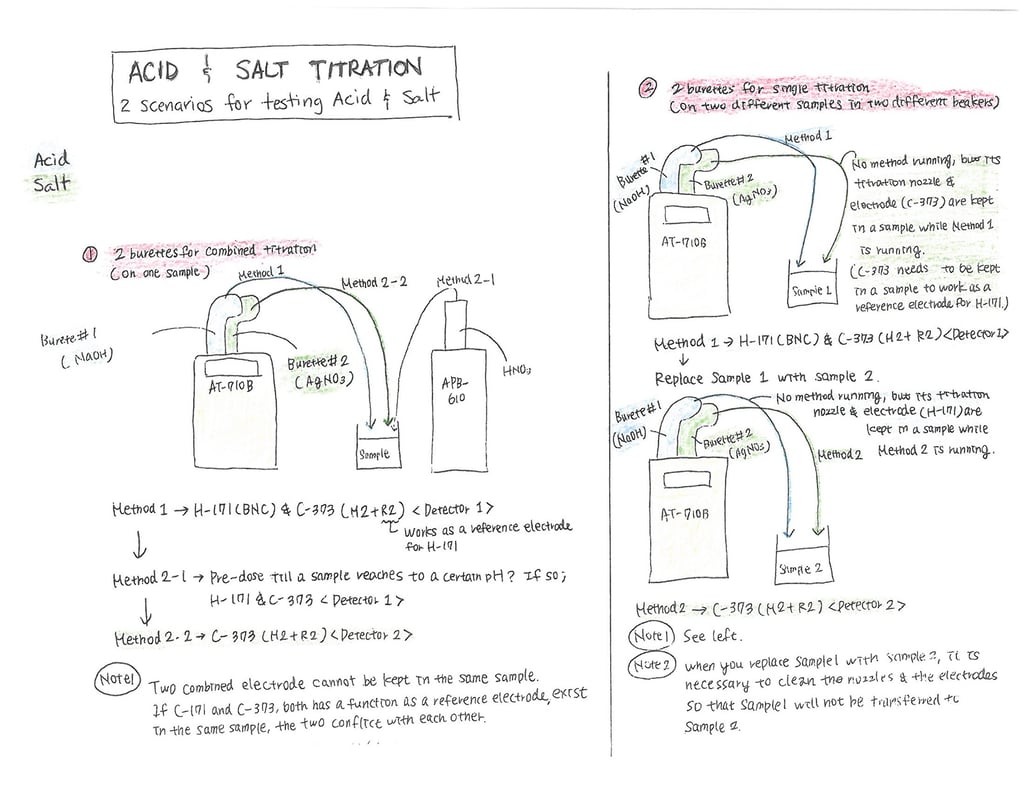
Here is an example of how you might set up a titration for testing both acidity and salt.  Below we have 2 scenarios.  The first scenario is configured so that the titration for both acidity and salt can be performed using a single sample.  To accomplish this you will need 3 burettes.  We will first perform the acidity titration using burette #1 with NaOH (Sodium Hydroxide) as our titrant.  In our example, during the acidity titration, the pH will rise to about 8.2.  At the end of the acidity titration, the pH level will be too high for us to run the salt titration so we will need to lower the pH.  We accomplish this task by dosing HNO3 (Nitric Acid) into the sample using the burette on the Automatic Piston Burette (APB ~ we will call this burette #3).  We will dose HNO3 to reduce the pH down to about 4.1.  Once the pH level is reduced the salt titration can begin.  The second burette (burette #2) located on the titrator then performs the salt titration using silver nitrate (AgNO3) as the titrant.  It is worth noting that silver nitrate comes in various strengths and so depending on your sample and the amount of "salt" you expect to find, you may need to adjust the strength (1.0N vs. 0.5N vs 0.1N, etc).

What the setup will look like

Salt and Acid drawing.jpg

Electrodes we will use:

  • pH glass electrode (noted as H171 in the diagram)
  • combined silver electrode (noted as C373 in the diagram)

When running the titration using only one sample to obtain both the acidity % and the salt %, we will use both electrodes as the combined silver electrode will act as a reference electrode for the pH electrode. 

When running a single titration on two different samples in two different beakers, leave both electrodes and nozzles in the samples ensuring to clean the nozzles and electrodes between tests of each sample.  In this scenario, the combined silver electrode (C373) will also work as a reference electrode for the pH electrode (H171) while running the acidity titration.


Summary of key consumable:
  • Silver Nitrate (AgNO3) titrant for salt titrations
  • Sodium Hydroxide (NaOH) titrant for acidity titrations
  • Nitric Acid (HNO3) buffer if combining methods
  • Combined Silver Electrode (C373) for salt titrations
  • pH glass electrode (H171) for acidity titrations

In the video below we show the titration setup described above.


We hope you find this information useful!

                                                    Ask for more information


Continue Reading

Introducing our technical Web Helpers!

By Hank Levi on Mon, Nov 23, 2020 @ 01:58 PM

Hello!  Please meet our new Web Helpers!  Moisture Elle, Karl Fischer, Shaker Sam, Terri Tenso, and Vivian Visco!  Each of our helpers will provide technical information ranging from general topics to more in-depth discussion pertaining to; Moisture testing, Karl Fischer Titration, Particle Size Analysis, Surface Tension, and Viscosity.


Continue Reading

DA-130N Portable Density Meter Review

By Hank Levi on Tue, Sep 24, 2019 @ 04:17 PM

Watch this video to learn more about the very capable DA-130N Portable Density Meter.

Continue Reading

How an oil evaporator works with a Karl Fischer Titrator

By Hank Levi on Mon, Aug 26, 2019 @ 11:13 AM

Evaporators configured for use with Karl Fischer moisture testers can provide added benefit when testing for moisture in samples that are not easily solubilized in the titration cell.  In some cases even if it's possible to solubilize the sample in the titration cell you may find that it is better to use an evaporator to improve repeat testing by keeping the cell clean.  While traditonal Karl Fischer moistutre testing is performed using a direct injection method where a syringe and needle is used to introduce the liquid sample into the titration cell, the use of evaporators follow a different approach. 

Within the evaporator family there are SOLIDS EVAPORATORS that can range from 0 to 300 degree C as well as high heat solids evaporators that can range from 0 to 1,000 degree C. 

A typical OIL EVAPORATOR will have a range from 0 to 300 degree C. 

Solids evaporators will typically be used to measure moisture in these types of samples:

  • plastic pellets (pte, etc)
  • plastic parts (you can cut into smaller pieces with a pair of scissors)
  • paper material (transformers)
  • thick grease samples
  • thick petroleum based samples like heavy paints, etc
  • and the list goes on

Oil evaporators will generally be used when working with heavy crude oil samples with high turnover testing (keeping the cell clean).

In this video we will discuss and show how the oil evaporator works with a Karl Fischer Titrator.


Talking points include:

  • Karl Fischer Titrator
  • Oil Evaporator
  • Base Oil
  • Bubbler Tube
  • Nitrogen Gas Source
  • Regulator
  • Thermocouple
Continue Reading

Recent Posts