5 ways we use liquid density information

Some background:
Simply put density is a physical property of matter. Density is expressed as a ratio of
mass to a given volume mathematically as Density = Mass / Volume. For our industrial
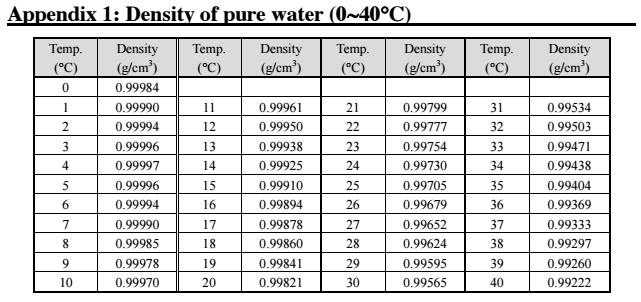
purposes and earth’s known gravitational pull we will define Mass as weight. For liquids, temperature is an important factor that can affect a liquids density. Therefore we generally will always describe density at a given temperature for comparison purposes. In general, as liquid temperature increases, density decreases.
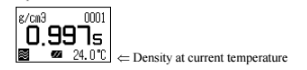
Knowing the density of a liquid serves numerous purposes and can provide valuable information for making decisions. Understanding what density is, what affects density, and how density affects other physical properties is important in using and translating this information into an everyday useful tool. We can use either a hand-held density meter or benchtop density meter to evaluate a liquids density or specific gravity.
1. We live in a physical world

We live in a physical world and so it would make sense that we would want to be able
to define these physical properties around us. Having a way to define these physical
properties is helpful to those who need to use the information.
- >How much space does it take up?
- >How heavy is it?
- >How much of this can we put into that?
- >What is it?
- >Many everyday products are packaged by volume but sold by weight.
- >Predictive correlations can be made if you know the density.
- >If we change some of the ingredients that make up the fluid property will it change the weight?
The neat thing about understanding liquid density is that it can answer not only the three basic questions;
 >What is the mass of the liquid?,
- >what is the volume of the liquid?
- >What is the density of the liquid?
But also, What is the liquid?
2. You can use a liquids density to predict
Fluid properties are probably even more telling where predictive
correlations can be made with density measurement information. Liquid
density changes as ingredients change. A soft-drink containing more sugar for example will have a different (higher) density than a diet soft-drink. Yes,
sugar not only increases a liquid’s density but can also be inversely measured
by knowing the liquids density in a given liquid solution. Understanding these
correlations provides useful information in the production of many beverages.
3. Density helps us better understand how to transport fluids
Moving fluids from point A to point B. Knowing the volume and the density
helps determine the best way of transporting those fluids. The answer might
be a bigger tanker truck, or for a pipeline it may be a larger transfer pump.
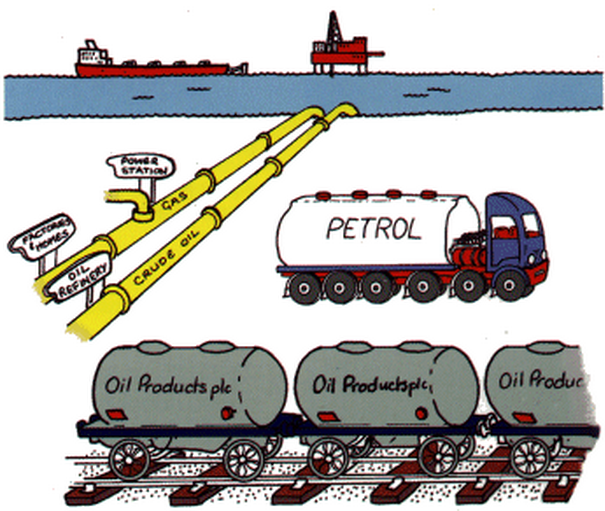
4. Density helps set petroleum prices

Petroleum is used mostly by volume for the production of fuel, gasoline and
other energy sources. Density is used in petroleum production to give an
estimation of the gasoline or kerosene present thereby helping to determine
the price of the gasoline, for example.
In the oil industry quantities of crude oil are measured in metric tons.
Understanding the density allows one to calculate using API gravity the
number of barrels per metric ton –a common term of measure in the industry.
5. Density as it relates to gravity
To further explore and expand the usefulness of density measurement we focus our attention on two types of gravity.
Specific gravity
Specific gravity is another way of saying density relative to a given reference material.
In this case we usually mean relative density with respect to water. Water has a
density of 1,000 kg/m cubed at 4 degrees C. We say that water therefore has a specific
gravity of 1 (1,000/1,000). Specific gravity is the heaviness of a substance compared
to that of water. Have you ever noticed how common everyday automotive oil floats
on top of water? Automotive oil has an average density of 905 kg/m cubed at 15

degrees C. We can calculate the specific gravity of the automotive oil by dividing 905
by 1,000 = 0.905. You can see that the number 0.905 is less than 1.0 and therefore is
lighter than water and is why this oil floats.
Looking at specific gravity another way, for those working in the production of wine, the density of
wine increases as you add sugar but falls as the yeast eats the sugar- finished wine should
have a specific gravity somewhere between .99 and 1.01. Who knew?
API gravity
The American Petroleum Institute (API) came up with their own gravity term referred
to as API gravity. API gravity is simply a measure of how heavy or light a petroleum
liquid is compared to water. By definition, if the petroleum’s API gravity is greater
than 10 then it is lighter than water and will float on water. If the API gravity is less
than 10 then it is heavier than water and will sink. The API gravity scale does not
have a unit of measure per say but is referred to in “degrees” with a scale from 10 to
70. This API gravity scale allows relative densities of petroleum liquids to be
compared. Why is this important? Why do we want to be able to compare petroleum
liquids? Well, the answer has to do with classifying the petroleum by quality. In the
oil industry crude oil is classified as either light, medium or heavy, according to it’s
measured API gravity! The measured API gravity will determine the class of oil and
therefore determine the value of the product.
⇒
Light crude oil has an API gravity higher than 31.1 degrees API
⇒
Medium oil has an API gravity between 22.3 degrees API and 31.1 degrees API
⇒
Heavy oil has an API gravity below 22.3 degree API
⇒
Extra Heavy oil has an API gravity less than 10 degree API
CONCLUSION:
It is not always easy to understand how density may apply to a given circumstance but
you can hopefully see from this brief introduction that it plays a very important role in
many or our industrial and production processes.

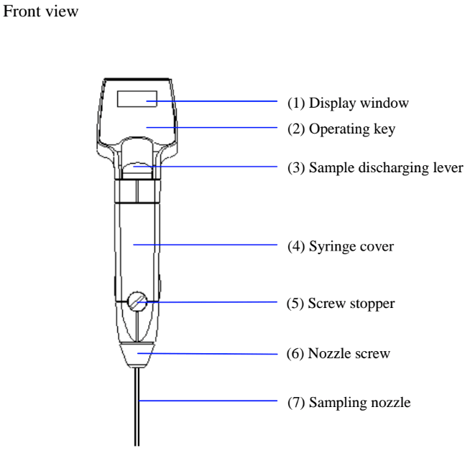
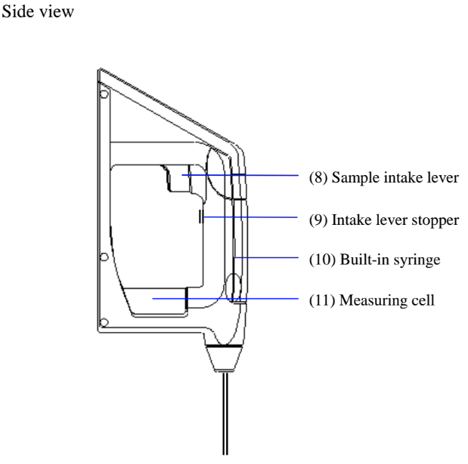
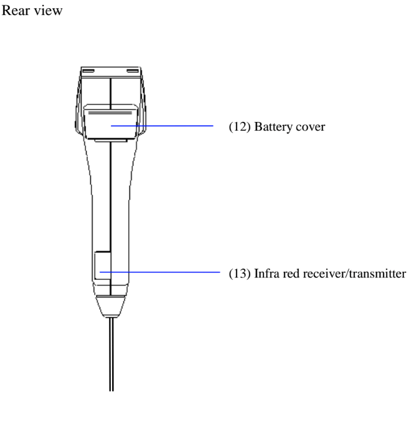
 As a provider of Karl Fischer testing instruments and support services, we regularly encounter a wide range of moisture analysis issues that affect operators, laboratory managers, and entire organizations. Over time, it has become clear that strengthening operator understanding of “the small details” significantly improves confidence, enhances performance and efficiency, and safeguards the accuracy of test results. Whether you are new to Karl Fischer titration and just beginning to work with moisture testing, or you are returning to the technique after not using your Karl Fischer titrator for some time, it is essential to regain proficiency quickly. The sooner you are fully up to speed, the sooner you can run reliable tests and deliver moisture results to the stakeholders who depend on them.


 A well-known company called Honeywell purchased and now controls the Hydranal line of Karl Fischer Reagents. You can still order Hydranal brand


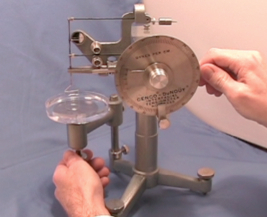
 Consistometer and are familiar with it's operation. Pressing down the gate and loading the trigger is step one. Pouring in your sample and scraping off the top to a clean and even surface is important to getting repeatable results. With a stopwatch in one hand, "popping" the trigger and letting the sample flow out and down the trough comes next. Some tests are designed to see how far a sample will flow in say, 10 seconds. Another testing approach might be to time the movement of the sample until it reaches a pre-determined point (bostwick). If you have ever noticed in the bottom of the tray there are lines with numbers ranging from 0 to 24 (you really can't see a number 24 because the tray stops exactly at what would be 24). Over the years these lines with numbers have affectionatly become to be known as "bostwicks".
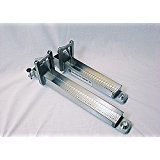

 thermodynamic measure of water expressed as the vapor pressure of water in a sample divided by vapor pressure of pure water at a given temperature.


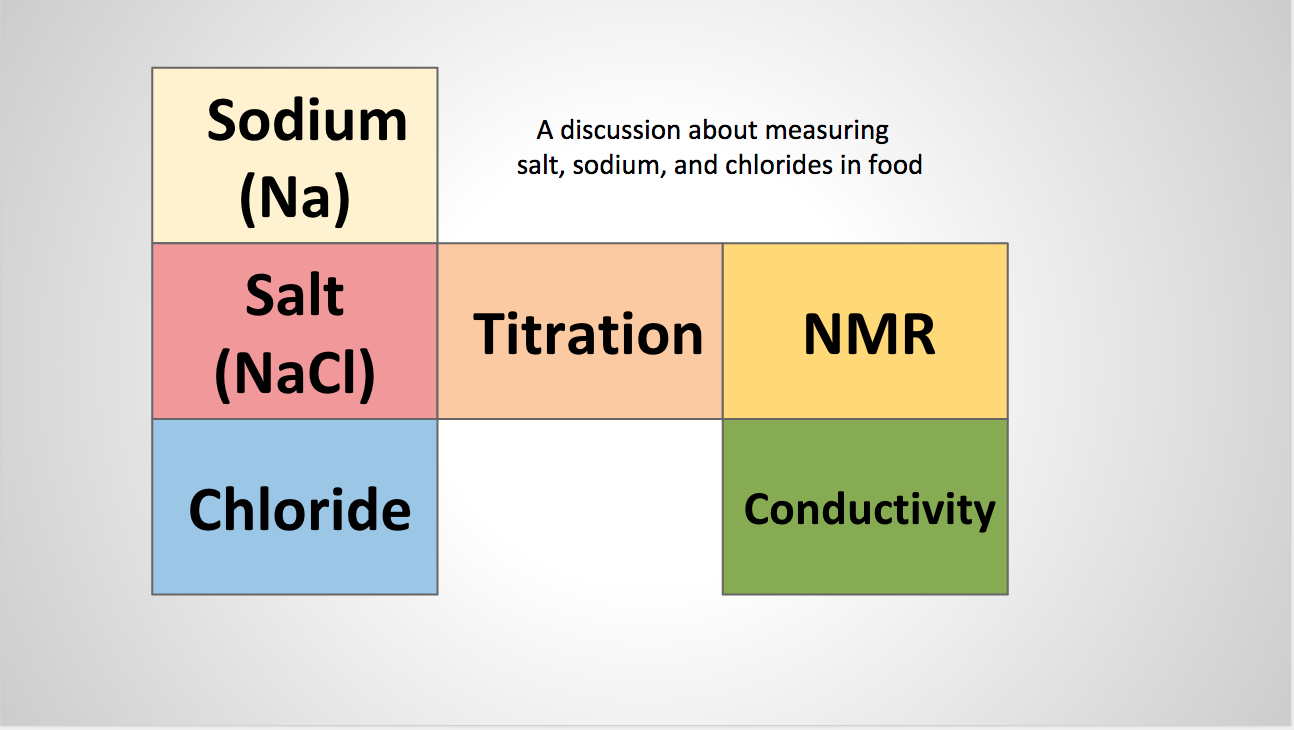

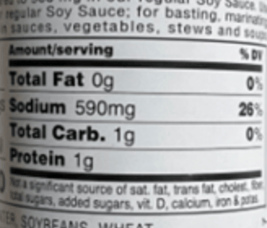
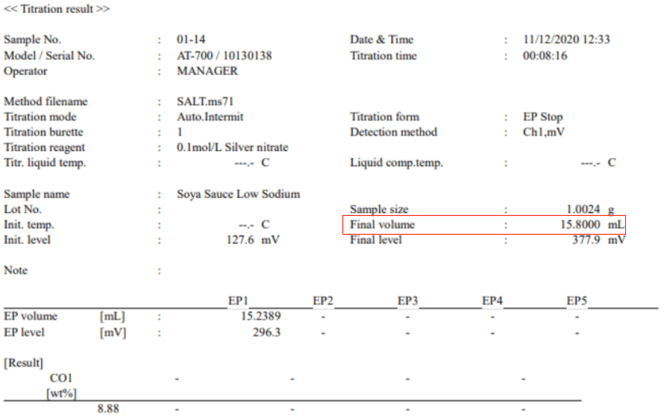
 with the more well known negative effects we associate with sodium (Na) and high blood pressure.
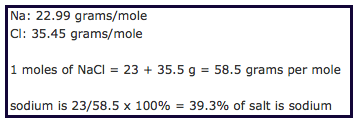

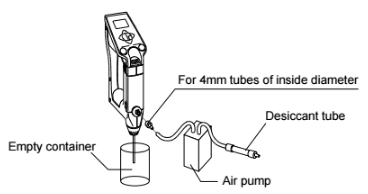
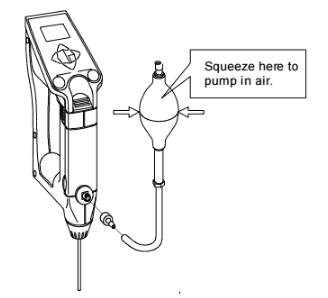
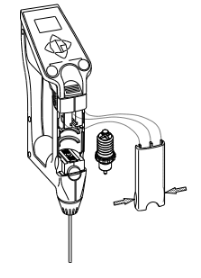
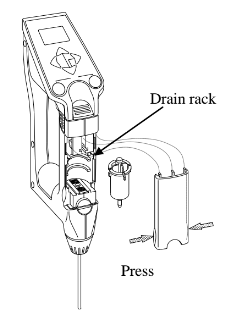
 Certain types of Karl Fischer vessels require the use of Karl Fischer grease. Vessels with smooth port openings need a thin layer of the grease applied to plugs, electrodes, dessicant tubes, bubbler tubes and injection port plugs to help form a snug fit. Decreasing or limiting "ambient moisture" from getting into the vessel - otherwise known as "drift" - is the key benefit of using Karl Fischer grease. Another benefit of Karl Fischer grease is that it also helps prevent chipping of glass on glass fittings. Watch this short video to see how Karl Fischer Grease should be applied.
 What are the side-effects?


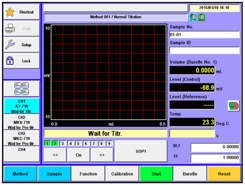
 integrated mini sample changer. The mini sample changer can hold up to 6 samples. The design utilizes a rotating arm that holds the electrode(s), dispensing nozzle(s), and propeller stirrer above each sample and maneuvers from sample to sample. The compact design allows a small footprint on the bench because the titrator sits on top of the sample changer. Watch the short demo video to learn more about this titration system.
 Don’t know whether you need to run a Bromine Number or Bromine Index? Not sure what the difference is between Electrometric or Coulometric? And just how many approved ASTM methods are there, anyway?


 Most of us know about the Heat Index (HI) and might have even seen a sling psychrometer used by a coach or trainer. How heat measurements were taken before tended to limit the amount of measurements taken due to the separate actions required to determine humidity levels and related temperature readings along with other factors. A confusing process. In many cases measurements were done before and after a practice session - and that was it.
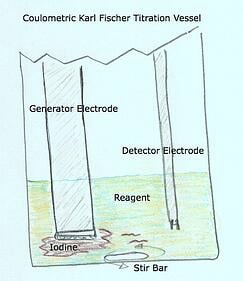

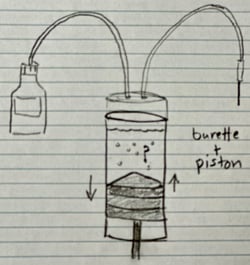
 In a volumetric system the reagent setup is different where a composite or titrant is introduced via a burette piston through a titration nozzle. The amount of composite or titrant delivered is based upon the commands of the titrator. The command from the titrator to the burette and piston that push out the “iodine” through the titration nozzle is, yes, given by the detector electrode. For the purposes of this discussion the difference between the coulometric and volumetric setup is that the delivery of iodine is different. But the same problem can occur where the iodine does not mix well and therefore trick the detector electrode in to thinking there is not enough iodine present inside the vessel to counter and neutralize the water. Since both coulometric and volumetric Karl Fischer Titrators use detector electrodes the problems mentioned earlier about the detector electrode will hold true with volumetric titrators also.
  electrode from the vessel all the time?


 If your operating a dual-reagent


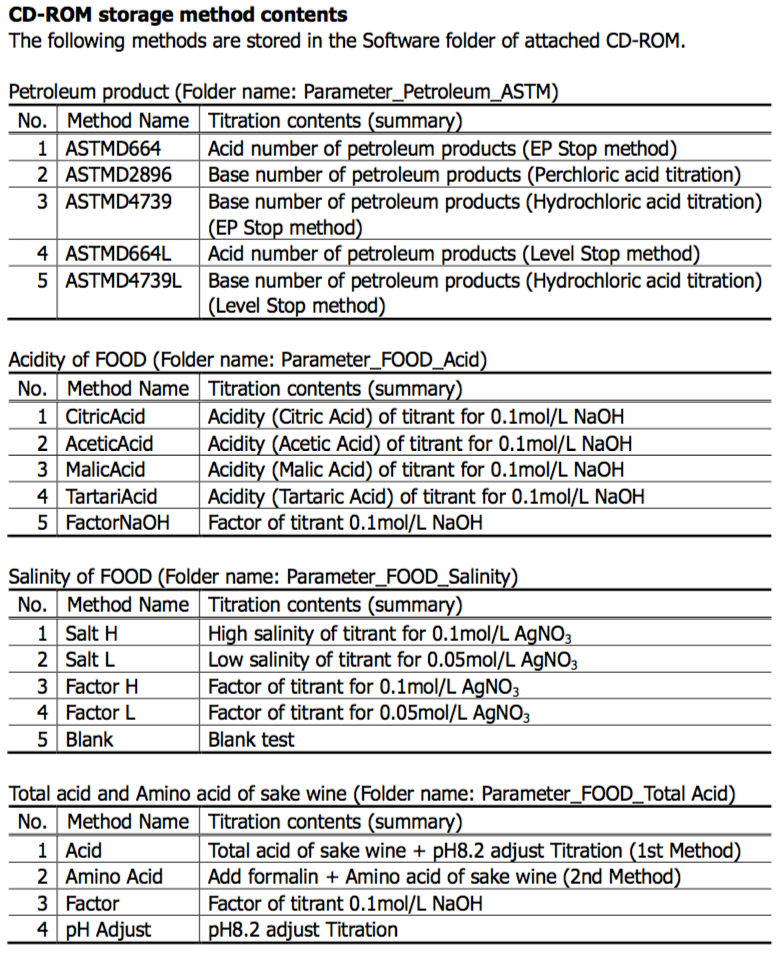
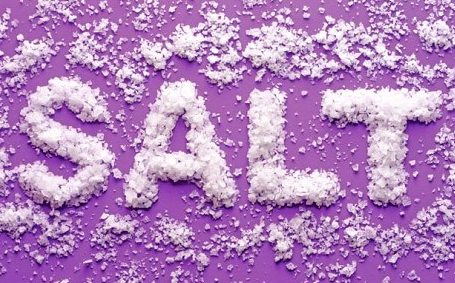
 Many companies produce the foods we eat. Do you ever wonder why or how they test for salt during the production process?


 encounter many of the day-to-day problems associated with broken electrodes. In many instances some of the electrodes are destroyed beyond repair but in other circumstances we find that some are in fact capable of being repaired.
 On July 5th, 2008, a workplace rule designed to protect workers from outdoor heat exposure took effect in Washington State. This rule was passed on June 4 after six public hearings were conducted on heat stress and its causes. The hearings confirmed what officials already knew: working outside in hot weather is a health hazard. The three requirements for employers with employees who work outside are to:
 using a Volumetric Karl Fischer Titrator tend to have difficulty in 3 areas. Unlike
 In this presentation we discuss the basic Karl Fischer Water Standards and talk about some of their uses for both Coulometric and Volumetric Karl Fischer Titration. We also describe some of the related problems that can be identified and overcome by using Karl Fischer Water Standards.
 Simply put, drift is background moisture that the
 There are multiple methods of moisture determination, including loss on drying, Karl Fischer titration, piezoelectric sorption, spectroscopy, and chilled mirrors among others. However, it is advantageous to use Karl Fischer (KF) titration in moisture analysis for the following reasons:
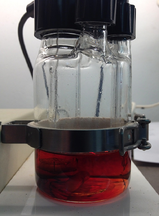
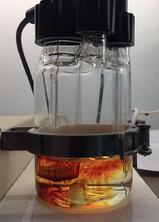
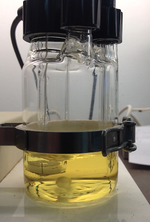
 Karl Fischer titrator. So let's get started. There are two things to consider. First, you have the chemical limitations of the reagents themselves. Second, you have the user/operator variable. Sometimes changing the reagent has more to do with the condition of the reagent sitting in the vessel. How full is the vessel after running numerous test? How long has the reagent been sitting in the vessel? How messy is the reagent and sample residue inside the vessel? Sometimes the user may simply want to replace the reagents because they look dirty/messy or their vessel is too full from adding samples during previous tests.
 What most operators are attempting to do is determine whether their Karl Fisher titrator is measuring moisture accurately.

 A Word About Karl Fischer Water Standards
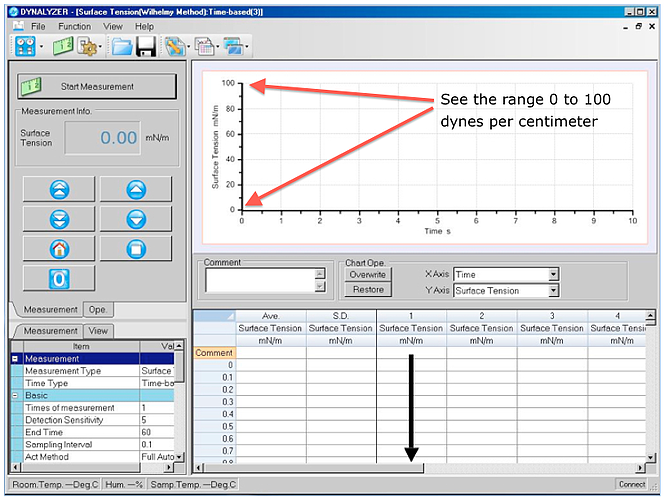
 We all know that surface tension affects our daily lives thru everyday applications like the ink you use in a pen, detergents for washing clothes, soap to clean your hands, paint for the house, just to name a few. But Surface tension is more involved in your life than you may think.
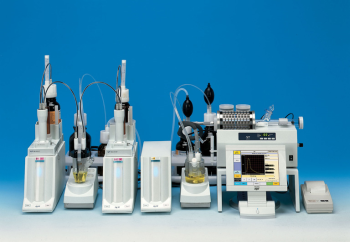 Most people know about Karl Fisher as a method for determining moisture content. After that there seems to be confusion when the words “Coulometric” and “Volumetric” are mentioned. It goes something like this: