<img src="https://secure.leadforensics.com/124134.png" style="display:none;">

How to measure salt in potato chips using an automatic titrator

By Hank Levi on Fri, Nov 25, 2022 @ 12:06 PM


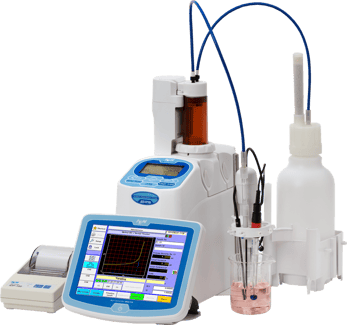
There are still many who test salt content by hand and so the thought of using an automatic titrator might sound intimidating.  It's not. Really.  So we thought it would help if we made some videos to explain some of the basic steps involved and show for those who have never seen one what a titrator looks like.  To be sure there are many capable titrators that can do the job so don't get completely caught up in which one is best but think more about the benefits of automating a test that is repeated many times daily.  

In the following videos we provide a step by step look at how a sample (potato chips) would be prepared and tested using an automatic titrator with the help of a 6 position sample changer.  

VIDEO DEMONSTRATION:  Testing Salt in Potato Chips with Titrator


WHAT YOUR GOING TO NEED IN ADDITION TO THE TITRATOR:

1. Silver Nitrate; 1.0 or 0.1 normal strength (This is the titrant that you will use)

2. Combined silver electrode (it's a silver and pH electrode combined)

THINGS YOU SHOULD KNOW:

1.  How do you currently prep your sample.  This process should not really change.  Sample prep is important though and should be considered.

2. Know the ingredients of your sample.  You should have a pretty good idea about the types of chlorides and sodium that may be found in your sample.

Get More Information on Salt Testing Equipment.  Click here

Salt Testing  


Continue Reading

Salt Titration; How much does it cost per test?

By Hank Levi on Thu, Aug 26, 2021 @ 03:49 PM

We get this question a lot.  So, we decided to try and figure it out the best we can.  In this analysis, we are only going to examine and include the per-unit cost of the titrator (automatic) and the reagents (silver nitrate - AgNO3).  It seems we could include other factors including human resources and electrical power requirements but these can vary greatly so we will leave them out of this analysis.  Additional ancillary costs can always be added later.

Let's start off by assuming we purchase a basic automatic titrator for $8,500.00  

Next, let's examine our most required consumable.  Silver Nitrate- AgNO3.
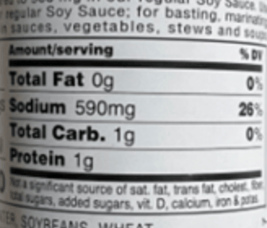
Food LableTo do this we need to assume a sample with a given amount of sodium.  Sodium is generally expressed in mg on food labels. 


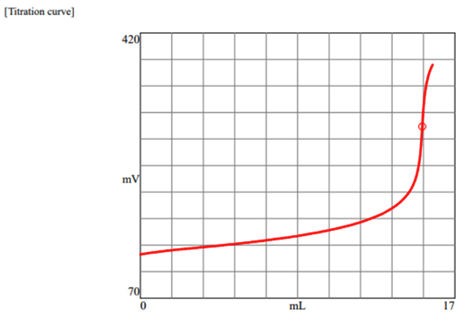
We performed a salt titration on this food product (soy sauce).  On the label, we can see that the amount of sodium is 590mg of sodium per serving.  For this titration (see below), you can see we used 15.8ml of silver nitrate @ (0.1N mol).   
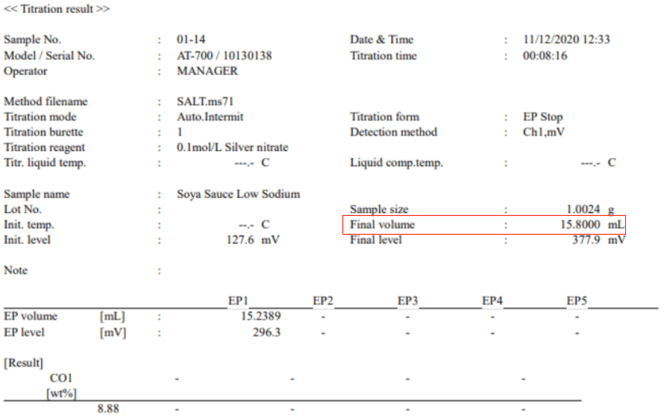
Salt Titration Results

Salt Titration Curve

Note that silver nitrate can come in different strengths so there is a little math we need to consider when deciding on which strength of silver nitrate we should use.

Let's consider using a different strength silver nitrate.  Let's look at using 0.5N mol instead of the 0.1N mol we used in our test.  Initially, we used 0.1N for our titration.  So dividing 15.8mL by 5 helps us see that using a bit stronger silver nitrate will reduce our consumption of silver nitrate.  In this case,  around 3mL per test.   But it's not that simple.  Conversely, we can change the strength of the silver nitrate and make it stronger as long as you don't have other samples that have a lot less sodium.  Otherwise, it would be too strong for the other samples with less sodium and it would not be ideal in those situations (You probably would not find the endpoint).  Bottom line, if you are working with only one burette (doses the silver nitrate), then you are going to need to pick a silver nitrate strength that can be used for all of your samples.  The only alternative would be to refill the burette each time with different strength silver nitrate, or, have a swappable burette on hand.  Having a swappable burette means you can have preloaded burettes with different strength silver nitrate and you can then easily swap them on and off the titrator when needed.  Even better, some titrators can be configured to have two or more onboard burettes which would alleviate the need for manually swapping burettes. 

Let's ignore this for the moment and continue to focus on our cost analysis assuming a single burette.

To give you an idea about pricing for silver nitrate. 

  •  We recently purchased some 0.1N mol Silver Nitrate (strength).  A 1 Liter bottle cost approximately $75.00.  Divide $75.00 by 1,000 and the per mL cost is $0.075 per mL of 0.1N mol silver nitrate.   Assume 15.8mL of 0.1N mol silver nitrate per test => 15.8x$0.075=$1.19 per test.
  • Assume 0.5N mol Silver Nitrate (strength). => 15.8mL divided by 5 = 3.2mL of silver nitrate per test. (e.g. you will use less with stronger).  Some recent pricing for 0.5N mol; $170.00 / 500mL => $0.34 per mL, or Bulk pricing if you buy a larger bottle $1,000.00 / 4L (4,000mL) => $0.25 per mL ~ 3.2mL per test x $0.34 per mL = $1.09 per test or 3.2mL x $.25 per mL = $0.80 per test.

So if you can purchase silver nitrate in bulk you can drive down your per test cost.

When you decide to test for salt (NaCl) using a titrator you are going to have that initial outlay to pay for the titrator.  After that, it's really a question of what strength of silver nitrate you are using and the amount you are using.   Hopefully, from this example, you can see how the price per test can range from about $0.80 per test to almost $1.20 per test.  So if we do some estimating you could say on average it costs about $1.00 per test.  If you are testing 200 samples per day your daily cost for silver nitrate will cost you about $200.00.

Now let's assume depreciation of the titrator using the straight-line method with the useful life of the titrator equal to 5 years (I think this is what a tax accountant would assume for tax purposes).  $8,500 / 5 = $1,700.00 per year.  Let's assume 251 working days per year ==> $1,700 / 251 = $6.73 per working day in depreciation expense.  In this case, divide that by 200 tests today, and that = $0.03 per test.  

I think these numbers (for the most part) provide a good working basis for determining daily operating costs.  They're probably not perfect but they show you how to go about figuring this out. As always we hope you find this information helpful!


 

Get more information


Continue Reading

How-To set up and run acid & salt titrations

By Hank Levi on Tue, Jun 08, 2021 @ 02:51 PM

This article is not intended to explain a manual titration process but rather how you can configure an automatic titration system to run both acid and salt titrations independently and or as a combined method.

Performing acid and salt titrations is a popular requirement in the food industry.  Some foods like tomatoes for example tend to have naturally occurring acidic properties but also take on a salt component when processed into other intermediary products like pizza sauce or spaghetti sauce.  

Although sodium (Na) is an important element to measure and report on food labels, salt (NaCl) content is also important in measuring to ensure the taste is good and repeatable during the production process.

Performing titrations whether manually or with the use of an automatic titrator involves a burette where specific amounts of titrant are delivered to evaluate the potential and or content of what is being measured. Results are usually reported in % for both acidity and salt content.

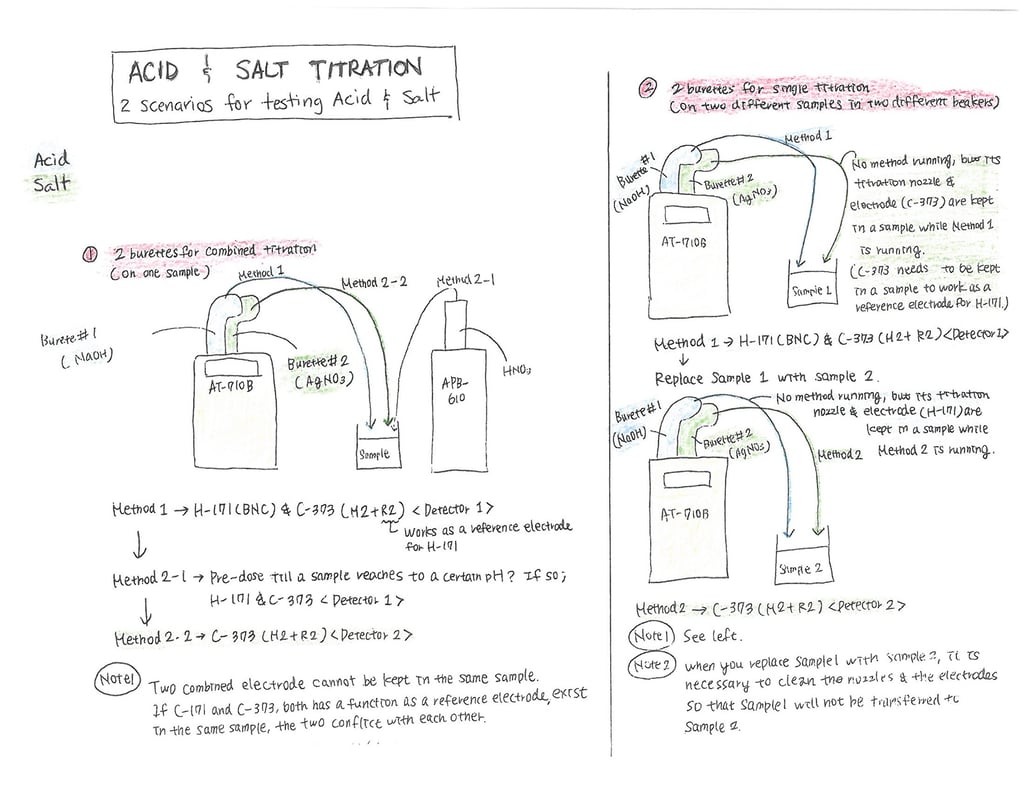
Here is an example of how you might set up a titration for testing both acidity and salt.  Below we have 2 scenarios.  The first scenario is configured so that the titration for both acidity and salt can be performed using a single sample.  To accomplish this you will need 3 burettes.  We will first perform the acidity titration using burette #1 with NaOH (Sodium Hydroxide) as our titrant.  In our example, during the acidity titration, the pH will rise to about 8.2.  At the end of the acidity titration, the pH level will be too high for us to run the salt titration so we will need to lower the pH.  We accomplish this task by dosing HNO3 (Nitric Acid) into the sample using the burette on the Automatic Piston Burette (APB ~ we will call this burette #3).  We will dose HNO3 to reduce the pH down to about 4.1.  Once the pH level is reduced the salt titration can begin.  The second burette (burette #2) located on the titrator then performs the salt titration using silver nitrate (AgNO3) as the titrant.  It is worth noting that silver nitrate comes in various strengths and so depending on your sample and the amount of "salt" you expect to find, you may need to adjust the strength (1.0N vs. 0.5N vs 0.1N, etc).

What the setup will look like

Salt and Acid drawing.jpg

Electrodes we will use:

  • pH glass electrode (noted as H171 in the diagram)
  • combined silver electrode (noted as C373 in the diagram)

When running the titration using only one sample to obtain both the acidity % and the salt %, we will use both electrodes as the combined silver electrode will act as a reference electrode for the pH electrode. 

When running a single titration on two different samples in two different beakers, leave both electrodes and nozzles in the samples ensuring to clean the nozzles and electrodes between tests of each sample.  In this scenario, the combined silver electrode (C373) will also work as a reference electrode for the pH electrode (H171) while running the acidity titration.


Summary of key consumable:
  • Silver Nitrate (AgNO3) titrant for salt titrations
  • Sodium Hydroxide (NaOH) titrant for acidity titrations
  • Nitric Acid (HNO3) buffer if combining methods
  • Combined Silver Electrode (C373) for salt titrations
  • pH glass electrode (H171) for acidity titrations

In the video below we show the titration setup described above.


We hope you find this information useful!

                                                    Ask for more information


Continue Reading

Introducing our technical Web Helpers!

By Hank Levi on Mon, Nov 23, 2020 @ 01:58 PM

Hello!  Please meet our new Web Helpers!  Moisture Elle, Karl Fischer, Shaker Sam, Terri Tenso, and Vivian Visco!  Each of our helpers will provide technical information ranging from general topics to more in-depth discussion pertaining to; Moisture testing, Karl Fischer Titration, Particle Size Analysis, Surface Tension, and Viscosity.


Continue Reading

Q&A: AT-710 Burette piston won't move

By Hank Levi on Tue, Jun 19, 2018 @ 03:36 PM

Sometimes pressing a button and hearing a beep just drives you crazy.  We know.  Below we received some video of a problem where the operator could not move the piston burette up or down on their automatic titrator.  We decided to replicate the problem and then show how to take corrective action.  We hope you find the video informative even though it is raw footage.  Send us your questions too.  Video, audio, pictures, etc.  We can use any format.


Continue Reading

Electrode Shower Cleaning for Auto Titrator Sample Changers

By Hank Levi on Thu, Feb 25, 2016 @ 12:04 PM


ELECTRODE RINSE WITH SHOWER ACCESSORY:

Sample changers that are connected with automatic titrators generally are there for a reason.  Efficiency. From an operators point of view getting multiple tests done quickly while being able to take on other tasks in the lab is a key productivity booster.  Sample changers offer various sizes ranging from as few as 6 positions for samples up to some of the largest exceeding 50 sample positions.  Sample changers either have rotating carousels or an arm that moves electrodes and nozzles from sample to sample.  Each time a sample test is completed the electrode must be cleaned before moving on to the next test.  Many sample changers offer as standard a dip rinse between sample testing and as the name suggests it's really nothing more then dipping the electrode in clean water or solution.  For some samples this process is sufficent but for others it is not enough to effectively clean the electrode before the next test.  Luckily most manufacturers of sample changers offer additional cleaning power with the use of a shower rinse system.   Below is a video showing how a shower rinse process works.   Water is stored in a container and then is flushd and rinsed in one of the sample positions designated as the cleaning station.  Water is evacuated via tubes to a drain or sink.  


Continue Reading

Review of KEM's new titration line

By Hank Levi on Tue, Jun 09, 2015 @ 04:11 PM


Review of KEM's new titration line 

AT-710S_M Automatic Titrator

I don't know about you but I have to admit that I enjoy learning about new technology.  Whether it's smart phones, cars, or kitchen appliances I think it's fun to find out about how a product has changed (hopefully for the better). For the most part a lot of consumer products see a change or upgrade about once every year. This is not really the case for titrators where maybe it's only every 6 to 8 years before we see a new generation unveiled.  I guess that's why I thought maybe it would be a good idea to take a look at this new 710 series that came out in February 2015.  I haven't actually ever written a "review" before so I decided to start by comparing what I know about some of the current titrator models and identify the things that pop out with the new titration line.   Here are my observations and comments.


1. There are now three model levels; entry, mid-level, and flagship within each category (volumetric Karl Fischer, coulometric Karl Fischer, and automatic potentiometric titrator) 

Find more Coulometric Karl Fischer Titrator information

My comment: I like the scale of the models as it can be helpful for those with varied budgets and needs.  I like the concept that you can start with getting only the basic model at first and then later bring in the flagship model and tie them all together into one system.  It will be interesting to see how people approach these options and whether the ability to expand a system is desirable or not.
710_series_titrator_with_2_burettes

2. All of the automatic titrators now can accommodate two burette drives

 AT-710 AutomaticTitrator information

My comment: The automatic titrators come with one burette drive but being able to add a second burette drive allows an operator to run two separate titrations (titrants) without having to use an automatic piston burette.  Historically most titrator manufacturers offered only a single burette drive but it seems like this is changing.  It's kind of a big deal for those who run two different titrations and don't want to purchase an automatic piston burette.  I like this new capability.

3.  A new burette design for the automatic titrators and volumetric Karl Fischer titrators.

SmartBuretteUnit

My comment: The burettes appear they will be easier to store and swap as the titrant bottle, burette and nozzles all go together as one smaller unit.   The burettes are now "smart" burettes and can store all of the reagent information within the head of the burette.  I like this.

Learn more about Volumetric Karl Fischer Titration

4.  More Input/Output options for operators to move  and store data.  I/O options include LAN connectivity/URL, USB hubs, USB thumb drive ports, .CSV file format, .PDF file format, barcode readers, foot switches, and keyboards.710seriesUSB

My comment:  More technology is built into these units. I think it was overdue so I am glad to see it finally arrive.

AT710_w_propeller_or_magnetic_stirrer

5.  Automatic Titrators now come with a propeller stirrer by default but can swap for a magnetic stirrer instead.

My comment: I like the option to do both but I think maybe the magnetic stirrer should have been the default and the propeller as the option.


6.  A new Wireless/ Wired 8.4 inch color touch panel controller (MCU).

MCU_screen_view_with_multiple_units

My comment: This only comes with the mid-range and the flagship models.  The controller can sit next to the titrator or be carried around like a clipboard.  Operators can control the titrator through protective glass if necessary.  I'm not sure how many people will elect to use the wireless vs. the wired connection but it's nice to have the added capability.  Nice.

7.  Multi-titrator integration.  The wireless/wired MCU can control up to 4 different titrators simultaneously (any combination of Karl Fischer or automatic titrator) 

MCU_controller for 710 series titrators

My comment: This feature is reserved for the flagship model.  I can see this being useful for those needing to run both moisture and acid for example.  Unfortunately the mid-level model MCU cannot be upgraded to the MCU flagship model so if you think you might expand later don't go with the S model.  Your better off getting the basic "B" model and then later tying them all together from the flagship model.

 710seriesmulticontrol

8.  Free method making software.

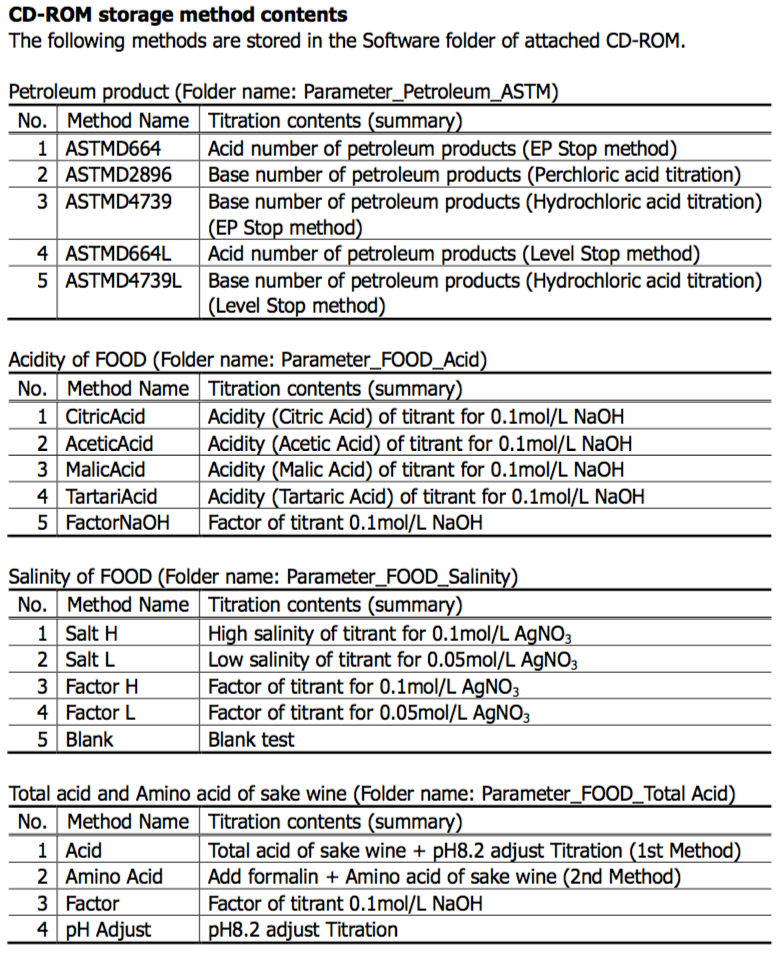
My comment:  All of the titrators now come with a CD that allows you to create methods on your PC and then transfer methods to the titrator.  You can also pull methods off of the titrator and edit it in the PC.  The software also comes with various popular methods pre-loaded to help get methods setup quicker.  I'm not so sure how robust this software is but free is nice.

CDstoredmethods


CONCLUSION:

Well I hope this was helpful in finding out quickly what the updates are for the new 710 series.  At this point since it's so new we will have to wait to evaluate how customers feel about their user experience and get their feedback on what they liked most and what they liked least.  If you have any questions or comments you can email me at info@scientificgear.com


Continue Reading

Automatic Titrator with Mini Sample Changer Video

By Hank Levi on Tue, Nov 20, 2012 @ 11:11 AM

AT-700 Automatic Titrator

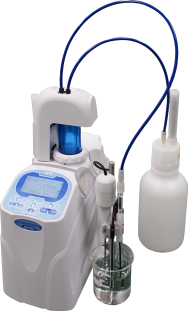
The AT-700 automatic titrator provides operators a variety of choices including the use of an Mini Sample Changer CHA-700integrated mini sample changer.  The mini sample changer can hold up to 6 samples.  The design utilizes a rotating arm that holds the electrode(s), dispensing nozzle(s), and propeller stirrer above each sample and maneuvers from sample to sample.  The compact design allows a small footprint on the bench because the titrator sits on top of the sample changer.  Watch the short demo video to learn more about this titration system.
 

        Get more information here 


Continue Reading

Automatic Titrator AT-700

By Hank Levi on Mon, Nov 05, 2012 @ 02:31 PM

Automatic Titrator AT-700

The AT-700 automatic titrator is a new compact potentiometric titrator.  The unit is ideal for conducting basic end-point titrations all the way up to more complex configurations that can include a sample changer, an additional permanent burette, to a chain of 8 automatic piston burettes (APBs).  The titrator can work stand alone or pair with advanced computer controlled software. 

Watch the video to learn and see more: https://youtu.be/CymMenF1fqA


Continue Reading

Titration: Bromine number vs. Bromine Index

By Hank Levi on Mon, Aug 27, 2012 @ 12:09 PM

BROMINE TITLEDon’t know whether you need to run a Bromine Number or Bromine Index?  Not sure what the difference is between Electrometric or Coulometric?  And just how many approved ASTM methods are there, anyway? 

Well, a good place to start is to check out the comparison table below and evaluate your sample(s) with respect to the scope & limits of products listed for each method.

If you’re trying to decide which of the last two Bromine Index methods to use, remember that the D1492 Coulometric method is most often employed for materials having very low expected values ( > ~20).

Be careful about converting back and forth between the two using that factor of 1000.  You can safely convert a Bromine Index to a Bromine Number by dividing it by 1000, but it’s not OK to derive a Bromine Index from a Bromine Number by multiplying the Number by 1000.

                                         DOWNLOAD A COPY

Need to run Bromine Number or Bromine Index with an AUTOMATIC TITRATOR?

OR

Interested in getting more detailed information on how to do Bromine using your KARL FISCHER TITRATOR

              Get the complete Karl Fischer method here

Find more Coulometric Karl Fischer Titrator information  Bromine Chart

Continue Reading

Recent Posts