
Watch this video to learn more about the very capable DA-130N Portable Density Meter.
DA-130N Portable Density Meter Review
Topics:
Density Measurement
DA-130N
ASTM D777
ASTM D7777
Portable density meter
portable specific gravity meter
alcohol meter
DA-130N portable density meter
Portable brix meter
density meter
Continue Reading
The DA-130N portable density meter has twelve measurement modes and includes density of alcohol
Hand held density meters are very useful tools. You can take them with you and perform any of these 12 tasks.
| 1) | Density | 5) | API | 9) | Baume |
| 2) | Comp. Density | 6) | Brix | 10) | Plato |
| 3) | SG(t/t) | 7) | Alcohol | 11) | Proof |
| 4) | SG | 8) | H2SO4 | 12) | Conc. |
(1) Measurement of density
(2) Measurement of temperature compensated density
(3) Measurement of specific gravity; Measurement of true specific gravity at displayed measurement temperature
(4) Measurement of specific gravity temperature compensated; Measurement of true specific gravity at preset temperature
(5) Measurement of API degree; Measurement of density or API degree compensated in temperature to 15 degree C or 60 degree F for the product group A, B or D.
Selection of temperature, 15 degree C or 60 degree F, will be automatically made when setting the temperature unit. Product group A: Crude oil
[Measurement of density: API A (Density) Product group B: Fuel, Petroleum products
[Measurement of density: API B (Density) Product group D: Lubricant
[Measurement of density: API D (Density)
(6) Measurement of Brix concentration
Measurement of API degree: API A (Degree)] Measurement of API degree: API B (Degree)] Measurement of API degree: API D (Degree)]
Measurement of Brix concentration (sucrose concentration expressed in weight %) based on density at 20 degree C

(7) Measurement of Alcohol concentration
Measurement of alcohol concentration of Ethanol/Water mixed system in wt % or vol % at 15 degree C or 20 degree C calculated from the density at the measurement temperature. When setting of temperature unit is Fahrenheit
Measurement of alcohol concentration of Ethanol/Water mixed system in wt % or vol % at 60 degree F calculated from the density at the measurement temperature.
(8) Measurement of sulfuric acid concentration
Measurement of sulfuric acid concentration in weight % from density measured at 20 degree C
(9) Measurement of Baume degree
Measurement of Baume degree at converted temperature from density value measured at the measurement temperature
(10) Measurement of Plato degree
Measurement of Plato degree at 20 degree C from density obtained at measurement temperature
(11) Measurement of Proof degree
Measurement of Proof degree at 60 degree F from density obtained at measurement temperature Proof degree is one of the units for alcohol content, and there is US Proof and British Proof
Proof (US) : Measure in US Proof unit (100v/v%=200 US Proof)
Proof (IP) : Measure in UK Proof unit (100v/v%=175 British Proof)
(12) Concentration measurement by setting desired concentration conversion formula

Topics:
Surface Tension
Density Measurement
DA-130N
ASTM D7777
Portable density meter
portable specific gravity meter
alcohol meter
DA-130N portable density meter
Portable brix meter
density meter
Continue Reading
DA-130N portable density meter General Maintenance Guidelines
This is a quick guide to getting started and running your first test. We thought it would be helpful for those getting started and checking their first calibration before running tests with actual samples. We will also continue to explore and share more information about calibration options, general maintenance, and data export methods using the DA-130N portable density meter.
O.K. Let's install three 'AAA' batteries to get started.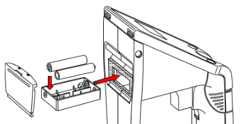
And then attach the sampling nozzle. 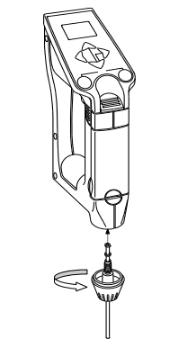
A few words about precautions when taking test measurements.
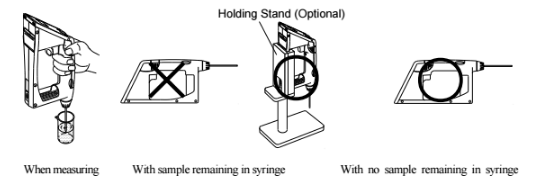
When measuring a sample make sure to hold the instrument so that the sampling nozzle is vertical to the ground. When laying down the instrument between or after measurements make sure to drain the remaining sample from the built-in syring (the built-in syringe is located inside the meter right above the sampling nozzle).
Now let's run a preliminary test using water.
Leave the temperature unit (Celsius), measurement unit (g/cm3) and mode (Field) as initial values. Sample pure water using the built-in syringe. After the measurement cell is filled with sample liquid make sure there are no air bubbles in the cell. If no air bubbles are visible then let's proceed.
Example procedure for running first test.
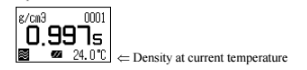
The display changes as above and after confirming it is in the automatic stability sense mode. Press [Meas.] key. When the displayed density is stabalized the value will automatically change reversed as below. Read the data at this point as well as the temperature degree.

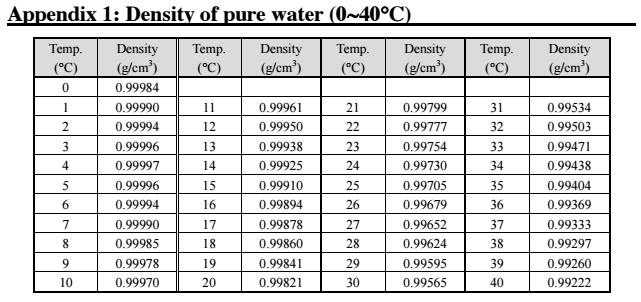
Look up to the pure water density table (appendix 1 in the manual). If the results agree within +-0.001g/cm3, you can proceed to making your sample measurements!
Note: If the results are not within the acceptable range then the measuring cell requires calibration.
Calibration of the measuring cell using pure water
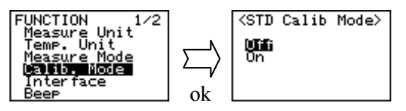
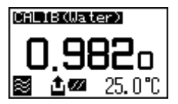
Set calibration mode to OFF. Press the [esc] key 2 times to return to the main menu. Sample pure water making sure no air bubbles are visible. The measuring cell with pure water can be calibrated automatically with the key entries as follows: Press [cal.] key for more than 2 seconds to show CALIB(Water) (inversed colo on the display) showing calibration with pure water in progress.
After calibration is over the deviation from the theoretical value will be shown so that you can check if the calibration has been successfully completed.

Note: if after attempting re-calibration of the measuring cell and results are still not within specifications it is possible the measuring cell itself is contaminated. In this case ensure to carefully clean the measuring cell and then re-calibrate again.
Note 1: You can also calibrate with a standard liquid that has a known density. Sometimes calibrating with a liquid that has a similar density to your test samples will help improve precision.
Note 2: You can also calibrate with air.
General maintenance - How to clean and dry the measuring cell and replace the built-in syringe
Step 1: Clean the measuring cell
You can thoroughly clean the measuring cell with just pure water. You can also improve the cleaning of the measuring cell by using Ethyl Alcohol. Ethyl Alcohol gets rid of dirt that cannot be removed with pure water and also reduces the amount of time to dry the measuring cell.
- Estimate 5 to 10 minutes for the measuring cell to dry after cleaning with pure water
- Estimate 3 to 5 minutes for the measuring cell to dry after cleaning with Ethyl Alcoho
Step 2: Purge air to dry the cell thoroughly and completely
option using an air pump:
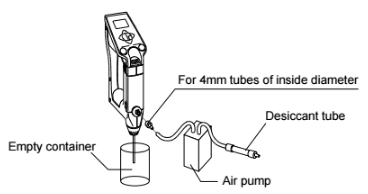
OR use the optional manual pump to dry the cell:
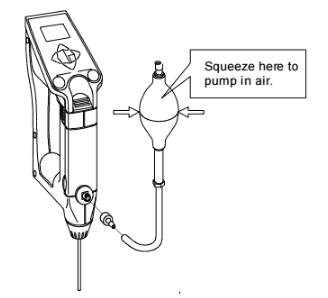
When using the optional manual pump to dry the cell make sure to clean the cell first and then press the sample discharging lever all the way down, and push the sample intake lever upward to lock it. With the adapter for the syringe attached connect the kit as illustrated above and feed air forcefully using the manual bulb.
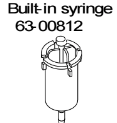
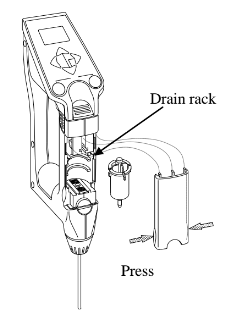
How to replace the built-in syringe.
- Press down the sample discharging lever all the way and remove the syringe cover by pulling it toward you as illustrated.
- Turn the syringe 45degrees counter clockwise to release it from the o-ring.
- Slightly pull the sample drain-out lever toward you to pull out the syringe from the o-ring.
- Remove the syringe from the drain rack and replace it with a new one.
- Pull down the drain rack and insert the o-ring and turn it back clockwise until it stops.
- Place the syringe cover back on the unit.
Data Processing and Storage
The maximum number of data which can be stored in the DA-130N memory is 1,100 samples. Data can be set to be saved automatically or manually after each test. You can recall stored measurement data on the DA-130N display again or output the data to a printer or PC.
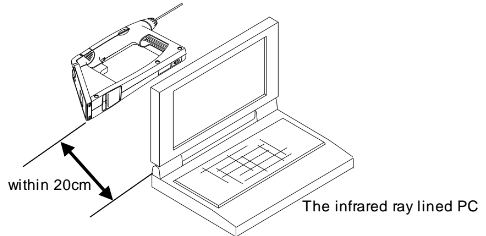
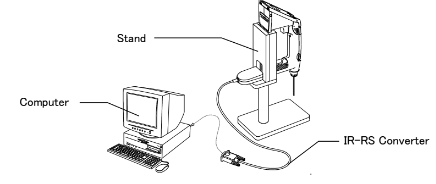
Exporting data to a PC via Infrared:
Exporting data to a PC via RS-232
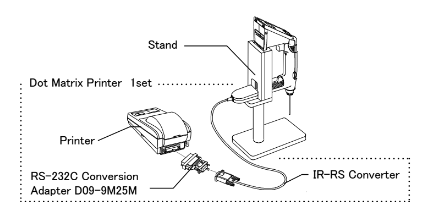
Sending data to a printer:
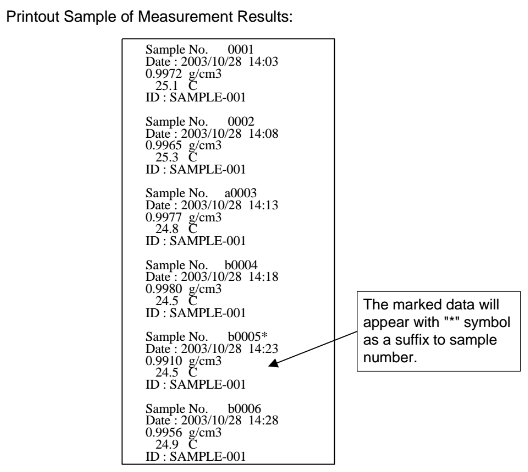
Example printout of data:
We hope this information about this particula density meter is helpful. If you need other capabilities beyond a traditional portable density meters refer to other bench top density meter models for increased accuracy.
Topics:
Density Measurement
Continue Reading
Using the DA-130N portable density meter for the first time
This is a quick guide to getting started and running your first test. We thought it would be helpful for those getting started and checking their first calibration before running tests with actual samples. We will also continue to explore and share more information about calibration options, general maintenance, and data export methods using the DA-130N portable density meter in future posts.
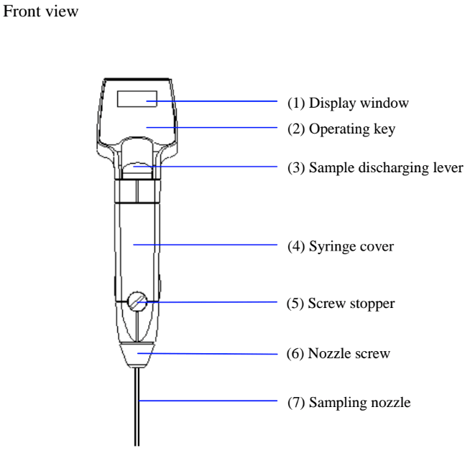
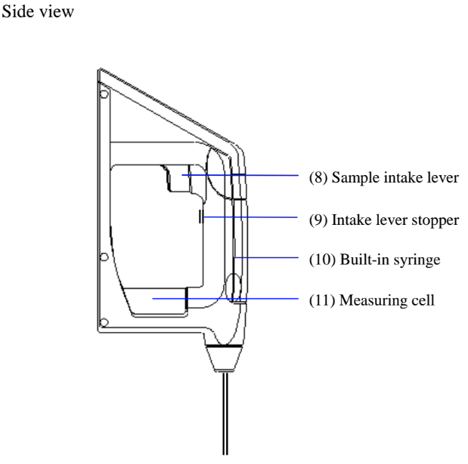
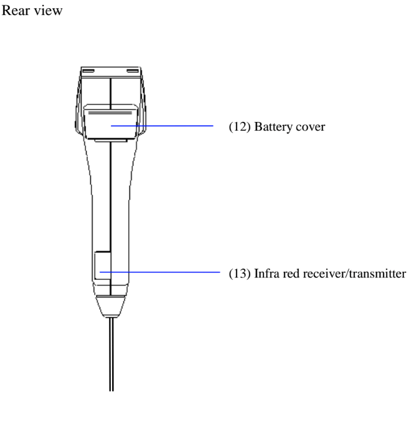
First, lets review and identify the parts of the DA-130N Portable Density Meter:

O.K. Now let's get started and install three 'AAA' batteries...
...And then attach the sampling nozzle.
A few words about precautions when taking test measurements.
When measuring a sample make sure to hold the instrument so that the sampling nozzle is vertical to the ground. When laying down the instrument between or after measurements make sure to drain the remaining sample from the built-in syring (the built-in syringe is located inside the meter right above the sampling nozzle).
Now let's run a preliminary test using water.
Leave the temperature unit (Celsius), measurement unit (g/cm3) and mode (Field) as initial values. Sample pure water using the built-in syringe. 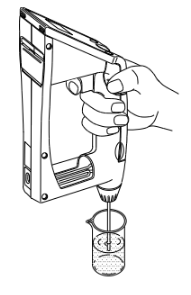
- Make sure the sample discharging lever is pushed down to the bottom.
- If not, slowly push it down with your thumb.
- Dip the sampling nozzle in the sample liquid.
- Slowly pull the sampling lever with the forefinger. When the cell is filled with sample, release your finger.
After the measurement cell is filled with sample liquid make sure there are no air bubbles in the cell. If no air bubbles are visible then let's proceed.
Example procedure for running first test.
The display changes as above and after confirming it is in the automatic stability sense mode. Press [Meas.] key. When the displayed density is stabalized the value will automatically change reversed as below. Read the data at this point as well as the temperature degree.
Look up to the pure water density table (appendix 1 in the manual). If the results agree within +-0.001g/cm3, you can proceed to making your sample measurements!
Note: If the results are not within the acceptable range then the measuring cell requires calibration.
Calibration of the measuring cell using pure water
Set calibration mode to OFF. Press the [esc] key 2 times to return to the main menu. Sample pure water making sure no air bubbles are visible. The measuring cell with pure water can be calibrated automatically with the key entries as follows: Press [cal.] key for more than 2 seconds to show CALIB(Water) (inversed colo on the display) showing calibration with pure water in progress.
After calibration is over the deviation from the theoretical value will be shown so that you can check if the calibration has been successfully completed.
Note: if after attempting re-calibration of the measuring cell and results are still not within specifications it is possible the measuring cell itself is contaminated. In this case ensure to carefully clean the measuring cell and then re-calibrate again.
Note 1: You can also calibrate with a standard liquid that has a known density. Sometimes calibrating with a liquid that has a similar density to your test samples will help improve precision.
Note 2: You can also calibrate with air.
Some other useful things to know when working with different types of samples:
For more viscous samples over 2,000mPa.s it's a good idea to use the optional syringe adapter set. Almost any commerciall available syringe (plastic works great) will work. You just need to order the female adapter to make it work (Adapter part number is 12-04428-02)

When working with samples under 2,000mPa.s of viscosity but where samples contain particles or grains that may crystallize when dry we suggest you use the supplied bellows pump (swap out the built-in syringe for this).
We hope this information has been helpful!
Topics:
Density Measurement
Continue Reading
5 ways we use liquid density information
5 ways we use liquid density information

Some background:
Simply put density is a physical property of matter. Density is expressed as a ratio of
mass to a given volume mathematically as Density = Mass / Volume. For our industrial
purposes and earth’s known gravitational pull we will define Mass as weight. For liquids, temperature is an important factor that can affect a liquids density. Therefore we generally will always describe density at a given temperature for comparison purposes. In general, as liquid temperature increases, density decreases.
Knowing the density of a liquid serves numerous purposes and can provide valuable information for making decisions. Understanding what density is, what affects density, and how density affects other physical properties is important in using and translating this information into an everyday useful tool. We can use either a hand-held density meter or benchtop density meter to evaluate a liquids density or specific gravity.
1. We live in a physical world

We live in a physical world and so it would make sense that we would want to be able
to define these physical properties around us. Having a way to define these physical
properties is helpful to those who need to use the information.
- >How much space does it take up?
- >How heavy is it?
- >How much of this can we put into that?
- >What is it?
- >Many everyday products are packaged by volume but sold by weight.
- >Predictive correlations can be made if you know the density.
- >If we change some of the ingredients that make up the fluid property will it change the weight?
The neat thing about understanding liquid density is that it can answer not only the three basic questions;
 >What is the mass of the liquid?,
- >what is the volume of the liquid?
- >What is the density of the liquid?
But also, What is the liquid?
2. You can use a liquids density to predict
Fluid properties are probably even more telling where predictivecorrelations can be made with density measurement information. Liquid
density changes as ingredients change. A soft-drink containing more sugar for example will have a different (higher) density than a diet soft-drink. Yes,
sugar not only increases a liquid’s density but can also be inversely measured
by knowing the liquids density in a given liquid solution. Understanding these
correlations provides useful information in the production of many beverages.
3. Density helps us better understand how to transport fluids
Moving fluids from point A to point B. Knowing the volume and the density
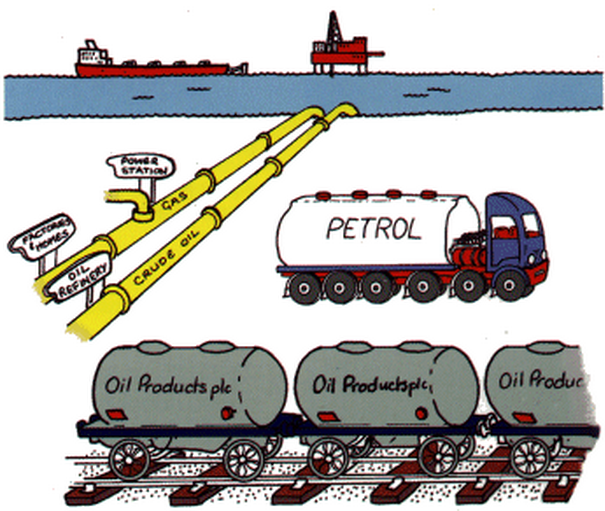
helps determine the best way of transporting those fluids. The answer might
be a bigger tanker truck, or for a pipeline it may be a larger transfer pump.
4. Density helps set petroleum prices
 Petroleum is used mostly by volume for the production of fuel, gasoline and
other energy sources. Density is used in petroleum production to give an
estimation of the gasoline or kerosene present thereby helping to determine
the price of the gasoline, for example.
In the oil industry quantities of crude oil are measured in metric tons.
Understanding the density allows one to calculate using API gravity the
number of barrels per metric ton –a common term of measure in the industry.
5. Density as it relates to gravity
To further explore and expand the usefulness of density measurement we focus our attention on two types of gravity.
Specific gravity
Specific gravity is another way of saying density relative to a given reference material.
In this case we usually mean relative density with respect to water. Water has a
density of 1,000 kg/m cubed at 4 degrees C. We say that water therefore has a specific
gravity of 1 (1,000/1,000). Specific gravity is the heaviness of a substance compared
to that of water. Have you ever noticed how common everyday automotive oil floats
on top of water? Automotive oil has an average density of 905 kg/m cubed at 15

degrees C. We can calculate the specific gravity of the automotive oil by dividing 905
by 1,000 = 0.905. You can see that the number 0.905 is less than 1.0 and therefore is
lighter than water and is why this oil floats.
Looking at specific gravity another way, for those working in the production of wine, the density of
wine increases as you add sugar but falls as the yeast eats the sugar- finished wine should
have a specific gravity somewhere between .99 and 1.01. Who knew?
API gravity
The American Petroleum Institute (API) came up with their own gravity term referred
to as API gravity. API gravity is simply a measure of how heavy or light a petroleum
liquid is compared to water. By definition, if the petroleum’s API gravity is greater
than 10 then it is lighter than water and will float on water. If the API gravity is less
than 10 then it is heavier than water and will sink. The API gravity scale does not
have a unit of measure per say but is referred to in “degrees” with a scale from 10 to
70. This API gravity scale allows relative densities of petroleum liquids to be
compared. Why is this important? Why do we want to be able to compare petroleum
liquids? Well, the answer has to do with classifying the petroleum by quality. In the
oil industry crude oil is classified as either light, medium or heavy, according to it’s
measured API gravity! The measured API gravity will determine the class of oil and
therefore determine the value of the product.

⇒ Medium oil has an API gravity between 22.3 degrees API and 31.1 degrees API
⇒ Heavy oil has an API gravity below 22.3 degree API
⇒ Extra Heavy oil has an API gravity less than 10 degree API
CONCLUSION:
It is not always easy to understand how density may apply to a given circumstance but
you can hopefully see from this brief introduction that it plays a very important role in
many or our industrial and production processes.
Topics:
Density Measurement
Continue Reading