<img src="https://secure.leadforensics.com/124134.png" style="display:none;">

How to measure salt in potato chips using an automatic titrator

By Hank Levi on Fri, Nov 25, 2022 @ 12:06 PM


There are still many who test salt content by hand and so the thought of using an automatic titrator might sound intimidating.  It's not. Really.  So we thought it would help if we made some videos to explain some of the basic steps involved and show for those who have never seen one what a titrator looks like.  To be sure there are many capable titrators that can do the job so don't get completely caught up in which one is best but think more about the benefits of automating a test that is repeated many times daily.  

In the following videos we provide a step by step look at how a sample (potato chips) would be prepared and tested using an automatic titrator with the help of a 6 position sample changer.  

VIDEO DEMONSTRATION:  Testing Salt in Potato Chips with Titrator


WHAT YOUR GOING TO NEED IN ADDITION TO THE TITRATOR:

1. Silver Nitrate; 1.0 or 0.1 normal strength (This is the titrant that you will use)

2. Combined silver electrode (it's a silver and pH electrode combined)

THINGS YOU SHOULD KNOW:

1.  How do you currently prep your sample.  This process should not really change.  Sample prep is important though and should be considered.

2. Know the ingredients of your sample.  You should have a pretty good idea about the types of chlorides and sodium that may be found in your sample.

Get More Information on Salt Testing Equipment.  Click here

Salt Testing  


Continue Reading

Salt Titration; How much does it cost per test?

By Hank Levi on Thu, Aug 26, 2021 @ 03:49 PM

We get this question a lot.  So, we decided to try and figure it out the best we can.  In this analysis, we are only going to examine and include the per-unit cost of the titrator (automatic) and the reagents (silver nitrate - AgNO3).  It seems we could include other factors including human resources and electrical power requirements but these can vary greatly so we will leave them out of this analysis.  Additional ancillary costs can always be added later.

Let's start off by assuming we purchase a basic automatic titrator for $8,500.00  

Next, let's examine our most required consumable.  Silver Nitrate- AgNO3.

Food LableTo do this we need to assume a sample with a given amount of sodium.  Sodium is generally expressed in mg on food labels. 


We performed a salt titration on this food product (soy sauce).  On the label, we can see that the amount of sodium is 590mg of sodium per serving.  For this titration (see below), you can see we used 15.8ml of silver nitrate @ (0.1N mol).   

Salt Titration Results

Salt Titration Curve

Note that silver nitrate can come in different strengths so there is a little math we need to consider when deciding on which strength of silver nitrate we should use.

Let's consider using a different strength silver nitrate.  Let's look at using 0.5N mol instead of the 0.1N mol we used in our test.  Initially, we used 0.1N for our titration.  So dividing 15.8mL by 5 helps us see that using a bit stronger silver nitrate will reduce our consumption of silver nitrate.  In this case,  around 3mL per test.   But it's not that simple.  Conversely, we can change the strength of the silver nitrate and make it stronger as long as you don't have other samples that have a lot less sodium.  Otherwise, it would be too strong for the other samples with less sodium and it would not be ideal in those situations (You probably would not find the endpoint).  Bottom line, if you are working with only one burette (doses the silver nitrate), then you are going to need to pick a silver nitrate strength that can be used for all of your samples.  The only alternative would be to refill the burette each time with different strength silver nitrate, or, have a swappable burette on hand.  Having a swappable burette means you can have preloaded burettes with different strength silver nitrate and you can then easily swap them on and off the titrator when needed.  Even better, some titrators can be configured to have two or more onboard burettes which would alleviate the need for manually swapping burettes. 

Let's ignore this for the moment and continue to focus on our cost analysis assuming a single burette.

To give you an idea about pricing for silver nitrate. 

  •  We recently purchased some 0.1N mol Silver Nitrate (strength).  A 1 Liter bottle cost approximately $75.00.  Divide $75.00 by 1,000 and the per mL cost is $0.075 per mL of 0.1N mol silver nitrate.   Assume 15.8mL of 0.1N mol silver nitrate per test => 15.8x$0.075=$1.19 per test.
  • Assume 0.5N mol Silver Nitrate (strength). => 15.8mL divided by 5 = 3.2mL of silver nitrate per test. (e.g. you will use less with stronger).  Some recent pricing for 0.5N mol; $170.00 / 500mL => $0.34 per mL, or Bulk pricing if you buy a larger bottle $1,000.00 / 4L (4,000mL) => $0.25 per mL ~ 3.2mL per test x $0.34 per mL = $1.09 per test or 3.2mL x $.25 per mL = $0.80 per test.

So if you can purchase silver nitrate in bulk you can drive down your per test cost.

When you decide to test for salt (NaCl) using a titrator you are going to have that initial outlay to pay for the titrator.  After that, it's really a question of what strength of silver nitrate you are using and the amount you are using.   Hopefully, from this example, you can see how the price per test can range from about $0.80 per test to almost $1.20 per test.  So if we do some estimating you could say on average it costs about $1.00 per test.  If you are testing 200 samples per day your daily cost for silver nitrate will cost you about $200.00.

Now let's assume depreciation of the titrator using the straight-line method with the useful life of the titrator equal to 5 years (I think this is what a tax accountant would assume for tax purposes).  $8,500 / 5 = $1,700.00 per year.  Let's assume 251 working days per year ==> $1,700 / 251 = $6.73 per working day in depreciation expense.  In this case, divide that by 200 tests today, and that = $0.03 per test.  

I think these numbers (for the most part) provide a good working basis for determining daily operating costs.  They're probably not perfect but they show you how to go about figuring this out. As always we hope you find this information helpful!


Get more information


Continue Reading

How-To set up and run acid & salt titrations

By Hank Levi on Tue, Jun 08, 2021 @ 02:51 PM

This article is not intended to explain a manual titration process but rather how you can configure an automatic titration system to run both acid and salt titrations independently and or as a combined method.

Performing acid and salt titrations is a popular requirement in the food industry.  Some foods like tomatoes for example tend to have naturally occurring acidic properties but also take on a salt component when processed into other intermediary products like pizza sauce or spaghetti sauce.  

Although sodium (Na) is an important element to measure and report on food labels, salt (NaCl) content is also important in measuring to ensure the taste is good and repeatable during the production process.

Performing titrations whether manually or with the use of an automatic titrator involves a burette where specific amounts of titrant are delivered to evaluate the potential and or content of what is being measured. Results are usually reported in % for both acidity and salt content.

Here is an example of how you might set up a titration for testing both acidity and salt.  Below we have 2 scenarios.  The first scenario is configured so that the titration for both acidity and salt can be performed using a single sample.  To accomplish this you will need 3 burettes.  We will first perform the acidity titration using burette #1 with NaOH (Sodium Hydroxide) as our titrant.  In our example, during the acidity titration, the pH will rise to about 8.2.  At the end of the acidity titration, the pH level will be too high for us to run the salt titration so we will need to lower the pH.  We accomplish this task by dosing HNO3 (Nitric Acid) into the sample using the burette on the Automatic Piston Burette (APB ~ we will call this burette #3).  We will dose HNO3 to reduce the pH down to about 4.1.  Once the pH level is reduced the salt titration can begin.  The second burette (burette #2) located on the titrator then performs the salt titration using silver nitrate (AgNO3) as the titrant.  It is worth noting that silver nitrate comes in various strengths and so depending on your sample and the amount of "salt" you expect to find, you may need to adjust the strength (1.0N vs. 0.5N vs 0.1N, etc).

What the setup will look like

Salt and Acid drawing.jpg

Electrodes we will use:

  • pH glass electrode (noted as H171 in the diagram)
  • combined silver electrode (noted as C373 in the diagram)

When running the titration using only one sample to obtain both the acidity % and the salt %, we will use both electrodes as the combined silver electrode will act as a reference electrode for the pH electrode. 

When running a single titration on two different samples in two different beakers, leave both electrodes and nozzles in the samples ensuring to clean the nozzles and electrodes between tests of each sample.  In this scenario, the combined silver electrode (C373) will also work as a reference electrode for the pH electrode (H171) while running the acidity titration.


Summary of key consumable:
  • Silver Nitrate (AgNO3) titrant for salt titrations
  • Sodium Hydroxide (NaOH) titrant for acidity titrations
  • Nitric Acid (HNO3) buffer if combining methods
  • Combined Silver Electrode (C373) for salt titrations
  • pH glass electrode (H171) for acidity titrations

In the video below we show the titration setup described above.


We hope you find this information useful!

                                                    Ask for more information


Continue Reading

Electrode Shower Cleaning for Auto Titrator Sample Changers

By Hank Levi on Thu, Feb 25, 2016 @ 12:04 PM


ELECTRODE RINSE WITH SHOWER ACCESSORY:

Sample changers that are connected with automatic titrators generally are there for a reason.  Efficiency. From an operators point of view getting multiple tests done quickly while being able to take on other tasks in the lab is a key productivity booster.  Sample changers offer various sizes ranging from as few as 6 positions for samples up to some of the largest exceeding 50 sample positions.  Sample changers either have rotating carousels or an arm that moves electrodes and nozzles from sample to sample.  Each time a sample test is completed the electrode must be cleaned before moving on to the next test.  Many sample changers offer as standard a dip rinse between sample testing and as the name suggests it's really nothing more then dipping the electrode in clean water or solution.  For some samples this process is sufficent but for others it is not enough to effectively clean the electrode before the next test.  Luckily most manufacturers of sample changers offer additional cleaning power with the use of a shower rinse system.   Below is a video showing how a shower rinse process works.   Water is stored in a container and then is flushd and rinsed in one of the sample positions designated as the cleaning station.  Water is evacuated via tubes to a drain or sink.  


Continue Reading

Review of KEM's new titration line

By Hank Levi on Tue, Jun 09, 2015 @ 04:11 PM


Review of KEM's new titration line 

AT-710S_M Automatic Titrator

I don't know about you but I have to admit that I enjoy learning about new technology.  Whether it's smart phones, cars, or kitchen appliances I think it's fun to find out about how a product has changed (hopefully for the better). For the most part a lot of consumer products see a change or upgrade about once every year. This is not really the case for titrators where maybe it's only every 6 to 8 years before we see a new generation unveiled.  I guess that's why I thought maybe it would be a good idea to take a look at this new 710 series that came out in February 2015.  I haven't actually ever written a "review" before so I decided to start by comparing what I know about some of the current titrator models and identify the things that pop out with the new titration line.   Here are my observations and comments.


1. There are now three model levels; entry, mid-level, and flagship within each category (volumetric Karl Fischer, coulometric Karl Fischer, and automatic potentiometric titrator) 

Find more Coulometric Karl Fischer Titrator information

My comment: I like the scale of the models as it can be helpful for those with varied budgets and needs.  I like the concept that you can start with getting only the basic model at first and then later bring in the flagship model and tie them all together into one system.  It will be interesting to see how people approach these options and whether the ability to expand a system is desirable or not.
710_series_titrator_with_2_burettes

2. All of the automatic titrators now can accommodate two burette drives

 AT-710 AutomaticTitrator information

My comment: The automatic titrators come with one burette drive but being able to add a second burette drive allows an operator to run two separate titrations (titrants) without having to use an automatic piston burette.  Historically most titrator manufacturers offered only a single burette drive but it seems like this is changing.  It's kind of a big deal for those who run two different titrations and don't want to purchase an automatic piston burette.  I like this new capability.

3.  A new burette design for the automatic titrators and volumetric Karl Fischer titrators.

SmartBuretteUnit

My comment: The burettes appear they will be easier to store and swap as the titrant bottle, burette and nozzles all go together as one smaller unit.   The burettes are now "smart" burettes and can store all of the reagent information within the head of the burette.  I like this.

Learn more about Volumetric Karl Fischer Titration

4.  More Input/Output options for operators to move  and store data.  I/O options include LAN connectivity/URL, USB hubs, USB thumb drive ports, .CSV file format, .PDF file format, barcode readers, foot switches, and keyboards.710seriesUSB

My comment:  More technology is built into these units. I think it was overdue so I am glad to see it finally arrive.

AT710_w_propeller_or_magnetic_stirrer

5.  Automatic Titrators now come with a propeller stirrer by default but can swap for a magnetic stirrer instead.

My comment: I like the option to do both but I think maybe the magnetic stirrer should have been the default and the propeller as the option.


6.  A new Wireless/ Wired 8.4 inch color touch panel controller (MCU).

MCU_screen_view_with_multiple_units

My comment: This only comes with the mid-range and the flagship models.  The controller can sit next to the titrator or be carried around like a clipboard.  Operators can control the titrator through protective glass if necessary.  I'm not sure how many people will elect to use the wireless vs. the wired connection but it's nice to have the added capability.  Nice.

7.  Multi-titrator integration.  The wireless/wired MCU can control up to 4 different titrators simultaneously (any combination of Karl Fischer or automatic titrator) 

MCU_controller for 710 series titrators

My comment: This feature is reserved for the flagship model.  I can see this being useful for those needing to run both moisture and acid for example.  Unfortunately the mid-level model MCU cannot be upgraded to the MCU flagship model so if you think you might expand later don't go with the S model.  Your better off getting the basic "B" model and then later tying them all together from the flagship model.

 710seriesmulticontrol

8.  Free method making software.

My comment:  All of the titrators now come with a CD that allows you to create methods on your PC and then transfer methods to the titrator.  You can also pull methods off of the titrator and edit it in the PC.  The software also comes with various popular methods pre-loaded to help get methods setup quicker.  I'm not so sure how robust this software is but free is nice.

CDstoredmethods


CONCLUSION:

Well I hope this was helpful in finding out quickly what the updates are for the new 710 series.  At this point since it's so new we will have to wait to evaluate how customers feel about their user experience and get their feedback on what they liked most and what they liked least.  If you have any questions or comments you can email me at info@scientificgear.com


Continue Reading

What are the best ways to measure salt and sodium in food?

By Hank Levi on Tue, Feb 17, 2015 @ 03:00 PM

Salt_and_Sodium_

What are the best ways to measure salt and sodium in food?

We have written other articles about salt testing including the Top 3 methods for measuring salt in food products and How to test for salt during food production.  But we felt this blog post was necessary to further explain how the popular methods differ during testing and why you might use one method instead of another. We also thought it was important to further explain the difference between Salt (NaCl) and Sodium (Na) and how it can impact your test results.

First thing you should know is "what are you trying to measure?"

  1. Salt (NaCl)
  2. Sodium (Na)
  3. Chloride (Cl)

The second thing is knowing your samples ingredients.

Knowing the component ingredients that make up a given food sample is very important!  If we randomly chose a method to test for salt for example without knowing the component ingredients we may discover we are way off with our answer.  Why?  Because without a clear understanding of the types of sodium and or chlorides that may be present in a sample it is possible to calculate an incorrect value either because the method of testing is incomplete for a given sample, or simple interference from other ingredients is occurring.  

Each method has it's own way of finding an answer.  Some methods look for chlorides in food, others look for sodium in food, while others measure indirectly the change in conductivity of a liquid as chlorides dissolve.  Each method has it's place and can be used effectively as long as the user knows it's capabilities and it's drawbacks. 

Understand your test objectives and choose an appropriate test method

We put together a presentation that goes into more detail on this and hope you watch it.

Watch the Full Presentation

Topics: Salt Testing
Continue Reading

Top 3 methods for measuring salt in food products

By Hank Levi on Thu, Jul 10, 2014 @ 04:41 PM

You may be saying to yourself, "Wait a minute! Last time you wrote about salt testing you said there were really only 2 popular methods being used.  What's going on and what is this 3rd method all about?"

Well, you are right.  Historically we have written about and discussed 2 popular methods where operators used either conductivity meters and, or, titration for testing salt in food products.  But recently we have seen a new development for testing salt levels in food products and thought it should be shared with you.  Before we do, let's review.

A quick overview on Salt:salt

When we talk about salt we need to agree on the terminology. 

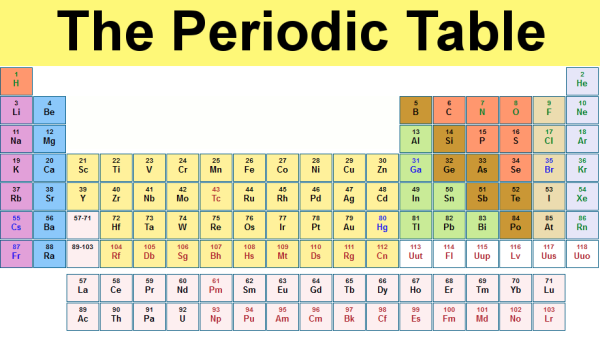
Table salt or "salt" that we think about in our foods is known as sodium chloride (NaCl).  Although you cannot find NaCl on the periodic table of elements shown below, you can see both sodium (Na) and chlorine (Cl).   What's the deal with chlorine you say?  Well, chlorine under standard conditions is actually a yellow-green gas but when chlorine atoms gain one electron they become a chloride ion (Cl-).  Since an ion cannot remain in a free state all by itself it must combine with another element(s) to form a compound.  Chloride (Cl-) is therefore a by-product of the reaction between chlorine (Cl) and an electrolyte such as sodium (Na).  Hence, sodium chloride (NaCl) is known as an Ionic Compound.  There are other "related" chlorides (Ionic Compounds) but not as common and they are; calcium chloride, magnesium chloride and potassium chloride (we will save a discussion about these chlorides for another blog post).

Sodium chloride (NaCl) is naturally occurring in much of the earth's crust and can be found in places like the Great Salt Lake Basin in Utah.  A gift to this earth, nature, and our bodies!  You see, the human body needs both sodium and chloride to function properly although it's worth mentioning that there is still debate about the effects of chloride levels in the body as comparedNa with the more well known negative effects we associate with sodium (Na) and high blood pressure. 

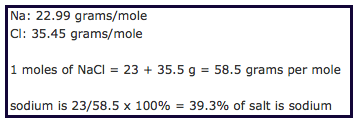
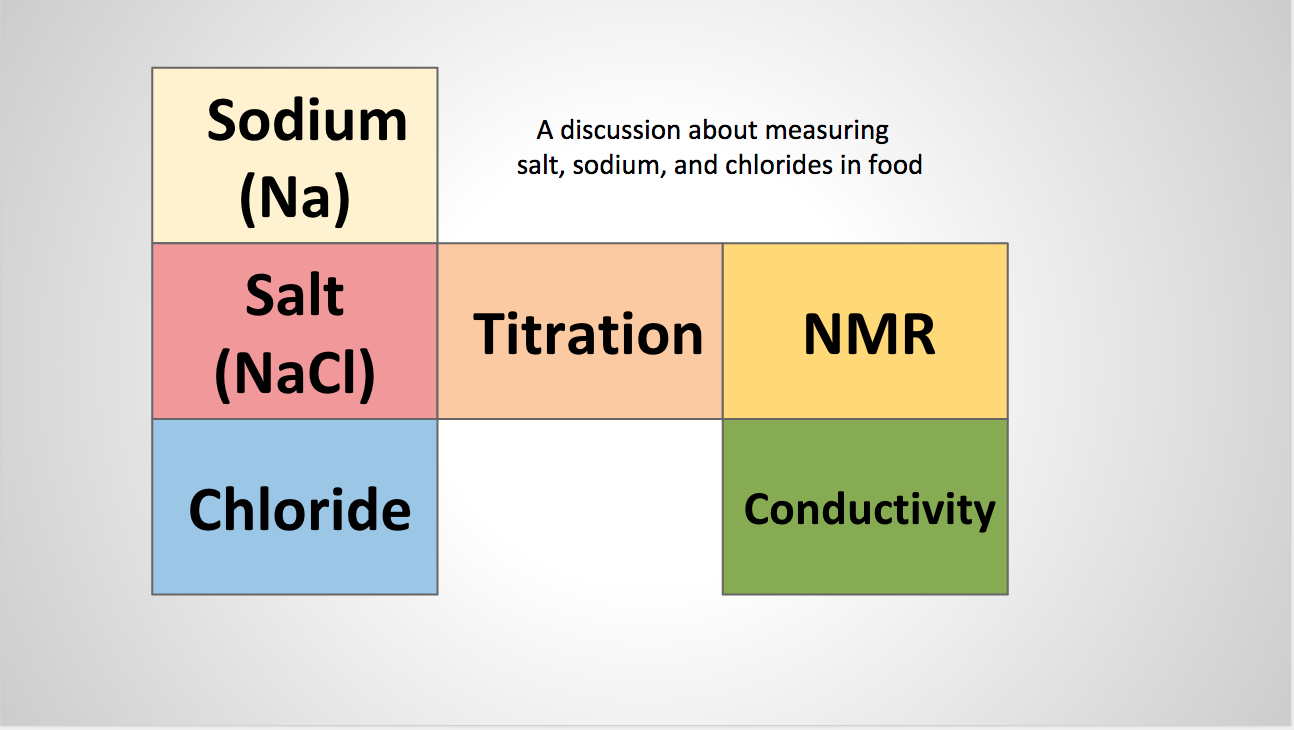
So, when we talk about measuring and monitoring salt levels we generally are saying that we want to know how much sodium (Na) is present.  Since table salt is Na+Cl- (NaCl) then, we approach our testing for NaCl accordingly based on the ratios of each elements atomic weight and mass percent:

[NaCl = 39.3372% Na + 60.6628% Cl]

These numbers are significant because if we look for (Cl) then we can determine (Na) and or (NaCl) by doing simple math, e.g. if you can find (Cl) then you can back into (NaCl) or determine (Na).

example


So that's it for the salt review, lets move on to the testing methods.


Method #1 - A review of the Conductivity Method:

"Conductivity meters" are based on the conductivity of water and is a measure of the waters ability to pass an electrical current.  Water with more ions present will conduct more electrical current.  Seawater has more ions and is more conductive than fresh water.  In our example for testing salt (NaCl) the chloride (Cl) readily dissolves in water.  The fact that chloride (Cl) dissolves in water is key.  The more chlorides (Cl) that dissolve, the greater the number of conductive ions that will be present and therefore increase the conductivity of the water, and vice versa for lesser amounts.  The conductivity levels measured then are compared with known standards and tables like seawater.  These numbers can then be reported in micro Siemens per centimeter or other conversion scales.

The conductivity method is an indirect measurement but it is easy and fast (several seconds).  It tends to be less accurate than other methods and has some limitations with the range of measurement.


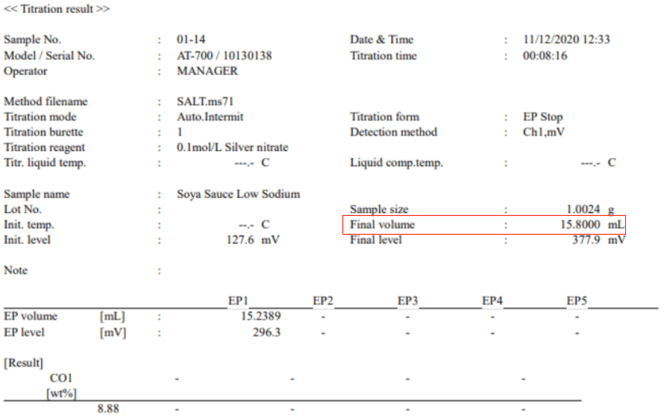
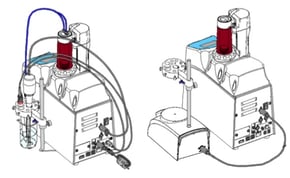
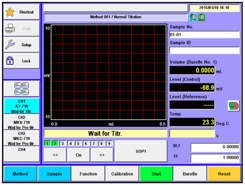
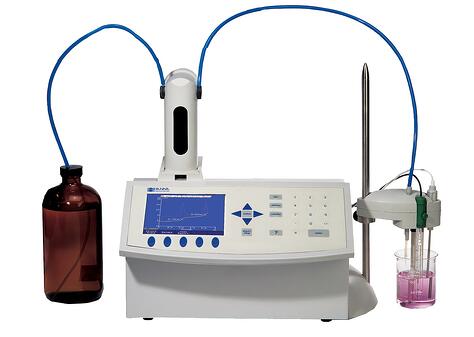
Method #2 - A review of the popular titration method (mohr's method):

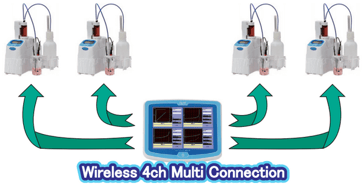
Titration can be performed manually or by using an automatic titrator.  This popular titration method determines the chloride ion concentration.  Silver nitrate is used as the indicator and is added until all of the chloride ions are precipitated.  So, this method also measures the amount of chloride (Cl) and uses the mass percent weights to determine sodium chloride (NaCl) and or sodium (Na).

This method for measuring salt is more involved, takes a little more time (3 to 6 minutes usually), but is very accurate to the parts per million (PPM) level.  The titration method does require the use of a silver electrode/ph electrode (or combined silver electrode), silver nitrate, and someone who understands how to run the method (manual or via automatic titrator).


Method #3 - A new method?  Nuclear Magnetic Resonance (NMR):

Nuclear Magnetic Resonance (NMR)?  Huh?  Nuclear Magnetic Resonance (NMR) has been around since 1938 and has benefited the field of chemistry and medicine in important ways, helping researchers and chemist to identify and measure certain elements found on the periodic table.


The Periodic Table


It's only now that technology has allowed for the miniaturization of the components (magnets, etc) necessary for making a benchtop NMR device.  This greater access and ease of use with NMR technology has the potential not only for researchers and chemist but for main-stream industry to find new and useful applications for testing materials with NMR. 

So, if you can see where this is going then, YES, you guessed it.  NMR can identify and measure sodium (Na) directly with part per million (PPM) accuracy.  I will say it again, this method measures total sodium (Na) directly with part per million (PPM) accuracy.  (NaCl) and (Cl) can be determined also as we know the mass percentages for these elements.  

Although it's a new concept for the food industry this new approach for measuring sodium could prove promising because it is easy, accurate to the part per million (PPM) level, and quick too (about 30 seconds per test).  


                      Learn more about salt testing using (NMR)

Continue Reading

About Scientificgear

By Hank Levi on Fri, Aug 31, 2012 @ 10:20 AM

describe the image

Scientificgear LLC provides several targeted areas of service including:

  • Karl Fischer Moisture Titration
  • Titration
  • Surface Tension (Tensiometers and Du Nouy Rings)
  • Contact Angle Analyzers for surface analysis
  • Thermal instruments (WBGT, Conductivity, Heat Flow)
  • Liquid Density Instruments (Benchtop and handheld)
  • Refractometers, Brix Meters

We support companies and organizations in select industries by providing:

  • Technical Support
  • Sales of Instruments
  • In-house and field repair service on select instruments
  • Calibration Service
  • Training and Installation
  • Some in-house testing
  • Manufacture and repair of Du Nouy Rings

Continue Reading

How to use a titrator to measure % sodium chloride in food products

By Hank Levi on Sun, Dec 18, 2011 @ 03:57 PM

Automatic Titrator

Titration

So you need to measure the amount of sodium chloride in your food products. While we have written about this topic previously in other posts and addressed some of the approaches used to test for % sodium chloride (including the use of hand-held salt meters) we have found that it is a more common practice to use an automatic titrator to accomplish this task.  In fact we think it is the preferred instrument and method of choice.  To be sure there are pros and cons to using different methods but we still find that titration is accepted as the primary method for getting the most accurate results.


How it's used

Although salt meters using the conductive method are faster (3 seconds vs. 2 to 3 mintues) and can be employed quickly in a production line process, titrators can also be implemented in the same testing environment with modest effort.  Additionally and regardless of how the tests were performed on the production line, titrators are generally put to work in the Quality Control/Quality Assurance Lab as a final check against periodic production line testing.

Supporting the use of titration as an accepted method includes some well known documented techniques including Mohr's and Volhard's methods making titration a recognized and trusted approach.


What's next...

Once you have made the decsion to use titration as the testing method it's just a matter of knowing:

  • What items you need

  • How to prep your sample

  • How to setup the titrator

Luckily we have already thought about this and put together a list of 8 items your going to need.  We also created an application-note providing step-by-step instructions for you to follow to conduct a titration.


                                         Created on 12/18/11 at 12:16:27  


                                           Created on 12/18/11 at 13:00:41

Continue Reading

How to test for Salt during food production

By Hank Levi on Mon, Oct 31, 2011 @ 12:53 PM

Salt
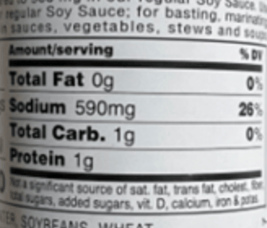
Many companies produce the foods we eat.  Do you ever wonder why or how they test for salt during the production process?

Examples by Manufacturing Type

Frozen Vegetable Processor

The salt content of the blanching water is important for maintaining the bright colors of vegetables

A Condiment Manufacturer

Testing Sauces and dressings

A Cheese Maker

Measure the salinity of saltwater that the cheese is soaked in

A Potato Chips Manufacturer

Checking for salt sprinkled on fried potato slices

A fresh Cut Fruit Processor

Use a 2% saline solution with a small amount of ascorbic acid to prevent discoloration of fruits

A Deli Food Supplier

Measure foods with a salt meter vs. by taste

A Canned Food Manufacturing Plant

Measure the brine for canned tuna

A Pickles Manufacturer

Measure the salinity of the brine for salt-packed products

A Cold Cut Meat Manufacturer

Measure salt concentration of ham and deli slices

A Baker

Measure and monitor the salinity of bread dough to around 1%-2%


Salt which is made up of 40% sodium and 60% Chloride is an important ingredient found in food.  While salt can make food taste better, control color, and maintain food texture, it is also considered a health-risk factor (mostly due to the sodium).  Measuring and controlling the levels of salt between the extremes is a constant battle.  Producers of processed foods generally have the biggest need for identifying and controlling salt levels to address not only the taste, color, and texture of foods but also to address some of the healthier eating lifestyles more and more consumers are demanding.

For these reasons it is paramount that salt is measured accurately.  So how do we do that?

Food comes in a variety of forms.  Solid, Liquids, pastes, creams, pieces, chunks, wafers, crackers, gooey, sauces, liquids with chunks in them...let's see what else..Anyway, you get the idea.  There are a lot of ways food can be produced and consumed!

So what device or devices can we use to measure the salt found in these numerous forms of processed foods?

Well, there are a number of "salt meters" out there that can measure salt.  However, not all salt meters can measure the particular salt you are looking for in the same way.  In fact some "salt meters" can only measure salt under certain conditions and or in certain substances like water or sea water.  For this reason it is important to first consider what your going to be testing.  For example, If your food sample includes "food stuff particles" that you can grind into a paste form, then you can probably use a salt meter that utilizes the conductivity method.  On the other hand if you have a brine that you immerse food into and your only concerned with the liquid then perhaps a different salt meter will work.  

The point is this.  The form of the food at the instant you are going to perform the test is key.  Many types of foods can be formed into pastes and diluted with water.  If the food you need to test is like this then a simple salt meter utilizing the conductivity method may be able to perform the test to your satisfaction.  I say may because % salt levels and other accuracy factors may require that you use an entirely different method of titration known as silver nitrate titration instead.

Salt Meter vs. Titration?

describe the image               Titrator

A brief explanation and description of the two measurement approaches:

The Mohr method, also known as a silver nitrate titration method, utilizes the characteristics of silver nitrate that reacts with chloride ions to measure the salinity %. 

Created on 10/31/11 at 10:37:41

Conversley, some of the more popular salt meters emloy the electric conductivity method.  Both methods measure the salinity but operate on different measurement principles.  However, by creating a conversion table between the two testing methods, correlation between the set of results can be seen.

Created on 10/31/11 at 10:41:32  

Aside from the measurement capabilities of each approach there are pros and cons to each.

 
 Pro's and Con's


Salt Meter

Titration

 Measurement Range

Less..maybe

More

 Accuracy

Less

 More

 Ease of Use

More

 Less

 Time to test

Less

 More

 Cost

 Less

 More


While each method has benefits we have recently found through some informal surveying that some food processors are choosing to use both methods.  These companies are finding that it is easier to use the hand held devices and perform quick spot checks on the production line.  If any problems are identified on the production line then further verification and testing can be performed using the titration approach.  Some think using this collaborative approach is ideal.smiley2


ALSO READ OUR MOST RECENT UPDATES TO THIS BLOG POST : Salt related posts

Continue Reading

Recent Posts