<img src="https://secure.leadforensics.com/124134.png" style="display:none;">

Introducing our technical Web Helpers!

By Hank Levi on Mon, Nov 23, 2020 @ 01:58 PM

Hello!  Please meet our new Web Helpers!  Moisture Elle, Karl Fischer, Shaker Sam, Terri Tenso, and Vivian Visco!  Each of our helpers will provide technical information ranging from general topics to more in-depth discussion pertaining to; Moisture testing, Karl Fischer Titration, Particle Size Analysis, Surface Tension, and Viscosity.


Continue Reading

How an oil evaporator works with a Karl Fischer Titrator

By Hank Levi on Mon, Aug 26, 2019 @ 11:13 AM

Evaporators configured for use with Karl Fischer moisture testers can provide added benefit when testing for moisture in samples that are not easily solubilized in the titration cell.  In some cases even if it's possible to solubilize the sample in the titration cell you may find that it is better to use an evaporator to improve repeat testing by keeping the cell clean.  While traditonal Karl Fischer moistutre testing is performed using a direct injection method where a syringe and needle is used to introduce the liquid sample into the titration cell, the use of evaporators follow a different approach. 

Within the evaporator family there are SOLIDS EVAPORATORS that can range from 0 to 300 degree C as well as high heat solids evaporators that can range from 0 to 1,000 degree C. 

A typical OIL EVAPORATOR will have a range from 0 to 300 degree C. 

Solids evaporators will typically be used to measure moisture in these types of samples:

  • plastic pellets (pte, etc)
  • plastic parts (you can cut into smaller pieces with a pair of scissors)
  • paper material (transformers)
  • thick grease samples
  • thick petroleum based samples like heavy paints, etc
  • and the list goes on

Oil evaporators will generally be used when working with heavy crude oil samples with high turnover testing (keeping the cell clean).

In this video we will discuss and show how the oil evaporator works with a Karl Fischer Titrator.


Talking points include:

  • Karl Fischer Titrator
  • Oil Evaporator
  • Base Oil
  • Bubbler Tube
  • Nitrogen Gas Source
  • Regulator
  • Thermocouple
Continue Reading

Top 3 methods for measuring salt in food products

By Hank Levi on Thu, Jul 10, 2014 @ 04:41 PM

You may be saying to yourself, "Wait a minute! Last time you wrote about salt testing you said there were really only 2 popular methods being used.  What's going on and what is this 3rd method all about?"

Well, you are right.  Historically we have written about and discussed 2 popular methods where operators used either conductivity meters and, or, titration for testing salt in food products.  But recently we have seen a new development for testing salt levels in food products and thought it should be shared with you.  Before we do, let's review.

A quick overview on Salt:salt

When we talk about salt we need to agree on the terminology. 

Table salt or "salt" that we think about in our foods is known as sodium chloride (NaCl).  Although you cannot find NaCl on the periodic table of elements shown below, you can see both sodium (Na) and chlorine (Cl).   What's the deal with chlorine you say?  Well, chlorine under standard conditions is actually a yellow-green gas but when chlorine atoms gain one electron they become a chloride ion (Cl-).  Since an ion cannot remain in a free state all by itself it must combine with another element(s) to form a compound.  Chloride (Cl-) is therefore a by-product of the reaction between chlorine (Cl) and an electrolyte such as sodium (Na).  Hence, sodium chloride (NaCl) is known as an Ionic Compound.  There are other "related" chlorides (Ionic Compounds) but not as common and they are; calcium chloride, magnesium chloride and potassium chloride (we will save a discussion about these chlorides for another blog post).

Sodium chloride (NaCl) is naturally occurring in much of the earth's crust and can be found in places like the Great Salt Lake Basin in Utah.  A gift to this earth, nature, and our bodies!  You see, the human body needs both sodium and chloride to function properly although it's worth mentioning that there is still debate about the effects of chloride levels in the body as comparedNa with the more well known negative effects we associate with sodium (Na) and high blood pressure. 

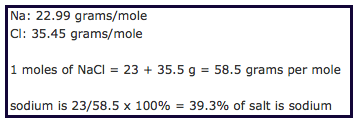
So, when we talk about measuring and monitoring salt levels we generally are saying that we want to know how much sodium (Na) is present.  Since table salt is Na+Cl- (NaCl) then, we approach our testing for NaCl accordingly based on the ratios of each elements atomic weight and mass percent:

[NaCl = 39.3372% Na + 60.6628% Cl]

These numbers are significant because if we look for (Cl) then we can determine (Na) and or (NaCl) by doing simple math, e.g. if you can find (Cl) then you can back into (NaCl) or determine (Na).
example


So that's it for the salt review, lets move on to the testing methods.


Method #1 - A review of the Conductivity Method:

"Conductivity meters" are based on the conductivity of water and is a measure of the waters ability to pass an electrical current.  Water with more ions present will conduct more electrical current.  Seawater has more ions and is more conductive than fresh water.  In our example for testing salt (NaCl) the chloride (Cl) readily dissolves in water.  The fact that chloride (Cl) dissolves in water is key.  The more chlorides (Cl) that dissolve, the greater the number of conductive ions that will be present and therefore increase the conductivity of the water, and vice versa for lesser amounts.  The conductivity levels measured then are compared with known standards and tables like seawater.  These numbers can then be reported in micro Siemens per centimeter or other conversion scales.

The conductivity method is an indirect measurement but it is easy and fast (several seconds).  It tends to be less accurate than other methods and has some limitations with the range of measurement.


Method #2 - A review of the popular titration method (mohr's method):

Titration can be performed manually or by using an automatic titrator.  This popular titration method determines the chloride ion concentration.  Silver nitrate is used as the indicator and is added until all of the chloride ions are precipitated.  So, this method also measures the amount of chloride (Cl) and uses the mass percent weights to determine sodium chloride (NaCl) and or sodium (Na).

This method for measuring salt is more involved, takes a little more time (3 to 6 minutes usually), but is very accurate to the parts per million (PPM) level.  The titration method does require the use of a silver electrode/ph electrode (or combined silver electrode), silver nitrate, and someone who understands how to run the method (manual or via automatic titrator).


Method #3 - A new method?  Nuclear Magnetic Resonance (NMR):

Nuclear Magnetic Resonance (NMR)?  Huh?  Nuclear Magnetic Resonance (NMR) has been around since 1938 and has benefited the field of chemistry and medicine in important ways, helping researchers and chemist to identify and measure certain elements found on the periodic table.

 

The Periodic Table


It's only now that technology has allowed for the miniaturization of the components (magnets, etc) necessary for making a benchtop NMR device.  This greater access and ease of use with NMR technology has the potential not only for researchers and chemist but for main-stream industry to find new and useful applications for testing materials with NMR. 

So, if you can see where this is going then, YES, you guessed it.  NMR can identify and measure sodium (Na) directly with part per million (PPM) accuracy.  I will say it again, this method measures total sodium (Na) directly with part per million (PPM) accuracy.  (NaCl) and (Cl) can be determined also as we know the mass percentages for these elements.  

Although it's a new concept for the food industry this new approach for measuring sodium could prove promising because it is easy, accurate to the part per million (PPM) level, and quick too (about 30 seconds per test).  


                      Learn more about salt testing using (NMR)

Continue Reading

How to use Karl Fischer Grease

By Hank Levi on Sun, Jan 19, 2014 @ 01:57 PM

Karl Fischer GreaseCertain types of Karl Fischer vessels require the use of Karl Fischer grease. Vessels with smooth port openings need a thin layer of the grease applied to plugs, electrodes, dessicant tubes, bubbler tubes and injection port plugs to help form a snug fit.  Decreasing or limiting "ambient moisture" from getting into the vessel - otherwise known as "drift" - is the key benefit of using Karl Fischer grease.  Another benefit of Karl Fischer grease is that it also helps prevent chipping of glass on glass fittings.  Watch this short video to see how Karl Fischer Grease should be applied.
Learn more about Karl Fischer Titration
If you find this information helpful please consider subscribing to our blog.  Once you subscribe you will get notified when we post a new article.

Continue Reading

Karl Fischer Over Titration and 7 things you should know about it

By Hank Levi on Wed, May 02, 2012 @ 06:30 PM

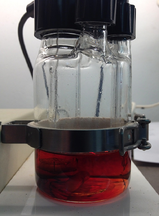
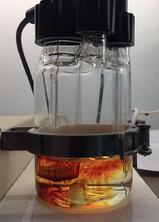
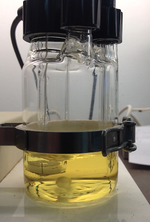
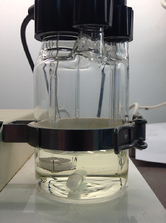
We have all seen it.  We’re running a test to see how much moisture is in our sample when inexplicably the liquid inside the Karl Fischer vessel starts to turn from a normal light-yellow color to a dark burnt-red looking color.  Sometimes the titrator screen will inform us of the problem with a digital readout stating the dreaded

OVER-TITRATION!” 

kfbeforestart resized 600describe the imagedescribe the imagedescribe the image


Sometimes the digital readout says nothing at all.  In either case the operator knows something has gone wrong because the Karl Fischer Titrator is no longer giving moisture results.  A panic to figure out the problem and get testing underway again becomes the immediate priority. 

But where do you start?  

As it turns out “over-titration” is probably one of the top 2 or 3 complaints or issues we hear about from operators.    So what is causing this problem to occur?  How can we determine the source of this problem, fix it, and more importantly how can we avoid it?

 
This is a critical question for operators and managers working in a production or QC environment who are concerned with keeping their Karl Fischer Titrator 100% “in-service”, day-in and day-out.   Having the ability to identify the problem correctly so appropriate measures can be taken quickly is very important.

 
So how do we approach the problem of “over-titration”?   By knowing the facts.  Having a clear understanding of the process can help operators correct the problem faster when time is of the essence.  

Important facts you should know about over-titration:  
  1. Over-titration is a state where there is more iodine present in the vessel than water (general definition).
  2. When over-titration occurs the vessel will become very dark as a result of the abundance of iodine present inside the vessel.
  3. The reagent inside the vessel should normally have a light-yellow color absent a very dark sample such as oil.
  4. The Karl Fischer Titrator always attempts to maintain an equilibrium where only enough iodine is introduced to counter and neutralize the water present inside the vessel.
  5. During a single titration test there should only be enough iodine introduced to counter and neutralize the amount of water present inside the titration vessel during that test – no more, no less.
  6. Any incident that interferes with the final amount of iodine introduced during the titration test can lead to dis-equilibrium and result in more iodine being introduced than necessary.
    Important facts you should know about Karl Fischer Titrator Glassware:  
  1. The Karl Fischer Vessel and Glassware is composed of the following
    1. Vessel (coulometric and volumetric)
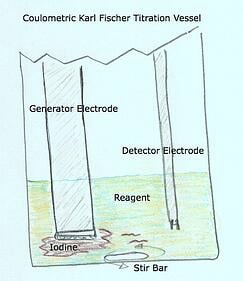
    2. Generator Electrode (coulometric only) - The Generator Electrode is a precision electrode designed to deliver an electrical current inside the vessel to the reagent – causing the reagent to produce iodine
    3. Titration nozzle (volumetric only) - The titration nozzle delivers precise amounts of iodine (composite or titrant) via a burette driven mechanism using a piston
    4. Detector Electrode (coulometric and volumetric) - The detector electrode has a sole purpose and probably the most important role in continuously monitoring and determining the conductivity levels within the titration vessel.
  So what are the causes that can lead to over-titration? 

✓ A damaged Detector Electrode

✓ A "Tricked" or "Fooled" Detector Electrode (no joke)

Since coulometric and volumetric Karl Fischer Titrators handle the delivery of iodine differently it’s worth describing the two methods separately.  

A Word About Coulometric Karl Fischer Titration:

In a coulometric system the reagent is a complete system where it is designed to release iodine when the generator electrode delivers an electrical current to it.  So what causes the generator electrode to deliver too much current causing the over production of iodine?  Another way to say it is, “who or what” is telling the generator electrode to continue to generate a current when it’s not needed?  

   
The detector electrode!  So why would the detector electrode do this?   describe the image
Without getting into too much of the electronics the detector electrode is designed to “detect” conductivity in the vessel.  Depending on the amount of conductivity detected the detector electrode will send a message to the titrator telling it to continue producing a current - enough to release the appropriate amount of iodine to counter and neutralize the water present in the vessel.  As long as this process is working during a titration an eventual endpoint will be found and a result will be produced.  


So it’s really a problem of misinformation. If the Karl Fischer Titrator is not getting the right information from the detector electrode then over-titration is possible. 

The problems we see that can effect the proper functioning of the detector electrode include:  
  1. The electrode cable.  If the cable becomes cracked or breaks it can cause a situation where the message to the titrator is to continue producing a current – continually.  In this case the vessel will become very dark and in most cases the titrator will not even know it is in an over-titration state.  The generator electrode will simply continue to produce a current, turning the vessel very dark.  There will be no other warning or notice from the titrator for the operator to see.
  2. Cracked electrode.  Sometimes mishandling or even a stirrer bar bouncing around inside the vessel can cause a tiny crack near the bottom of the detector electrode that cannot be seen with the naked eye.  These cracks can allow small amounts of reagent inside the electrode enough where errors in detection will begin to occur.  What ensues is an unstable drift that jumps around giving the titrator a misreading. The jumping around and unstable drift may be picked up by the titrator and an error stating “OVER TITRATION” may be seen on the screen of the titrator.
  3. Cable connectors.  Sometimes the connectors on the titrator itself can become dirty, wet and corroded.  Also, some electrodes use multi-plug designs that can also become dirty, wet and corroded.   These connectors if not clean and dry can lead to a similar misreading similar to a cracked electrode where the drift begins to jump around and become unstable.  The titrator may also state that there is “OVER TITRATION” when this occurs.

Find more Coulometric Karl Fischer Titrator information 

A "Tricked" or "Fooled" Detector Electrode you say?describe the image

If it’s determined that the problem is not the detector electrode then we need to look at the stirring action inside the vessel.  If the iodine being released is not mixing well because the stirrer is off or set too low, then the detector electrode will not realize there is iodine already released inside the vessel.  This will cause the detector electrode to continue telling the titrator to produce more current via the generator electrode up to the point where the detector electrode senses a reduction in the conductivity level inside the vessel.  Conductivity only reduces as the iodine interacts with the water.  So it is important for the detector electrode to sense the true and most accurate “mix or state” of iodine and water during the titration process.  If it does not know the true state of the mix it will be fooled into telling the titrator to keep going – causing OVER TITRATION.        

A Word About Volumetric Karl Fischer Titration:

   
describe the imageIn a volumetric system the reagent setup is different where a composite or titrant is introduced via a burette piston through a titration nozzle.  The amount of composite or titrant delivered is based upon the commands of the titrator.  The command from the titrator to the burette and piston that push out the “iodine” through the titration nozzle is, yes, given by the detector electrode.  For the purposes of this discussion the difference between the coulometric and volumetric setup is that the delivery of iodine is different.   But the same problem can occur where the iodine does not mix well and therefore trick the detector electrode in to thinking there is not enough iodine present inside the vessel to counter and neutralize the water.  Since both coulometric and volumetric Karl Fischer Titrators use detector electrodes the problems mentioned earlier about the detector electrode will hold true with volumetric titrators also.  

Learn more about Volumetric Karl Fischer Titration 


 7 Thoughts (DOs and DON'Ts) on Problem Solving and Prevention:  

1.  Don’t abuse the detector electrode!  Be very careful with the detector electrode and do not handle it unnecessarily.  Small bumps (clanks) here and there can lead to a crack.   Do you really need to remove the detector thinking dragonelectrode from the vessel all the time?
2.  Don’t turn up the titrator’s stirrer speed to high.  This will only cause the stirrer bar to bounce around uncontrollably and possibly hit and damage the detector electrode (crack).
3.  Do inspect all connections and connectors on the detector electrode cable and Karl Fischer Titrator to ensure they are dry and clean.
4.  Do be careful with the detector electrode cable.  Try not to bend it unnecessarily.
5.  Do make sure there is enough stirring action inside the vessel to mix the iodine around effectively.  A small vortex should be visible.  But not too fast to cause the stir bar to bounce around.
6.  Do introduce some moisture - Sometimes when you are in an over-titration situation and the vessel is already very dark you can introduce a little moisture to bring the vessel back to equilibrium.  This sometimes works and immediately the vessel turns from a dark burnt-red color to a light-yellow.
7.  Do have a spare detector electrode on hand.  This little electrode seems to get over looked but plays a huge role inside the Karl Fischer Titrator vessel.

Created on 05/02/12 at 18:10:44

Continue Reading

What are Karl Fischer Water Standards and what do the numbers mean?

By Hank Levi on Thu, Feb 09, 2012 @ 01:44 PM

Most everyone working with Karl Fischer Titration at some point ends up wanting to check their instrument for accuracy and overall operational readiness.  Karl Fischer Water Standards were made to assist operators with making these operational checks.  Sometimes however we find there is some confusion about the choice of water standards available and what the numbers mean.

Learn more about Karl Fischer Titration

Karl Fischer Titration Water Standard Video from Scientificgear on Vimeo.

Hydranal water standards provide a few popular choices for both coulometric and volumetric Karl Fischer Titrators:

  • Hydranal 0.1 (100PPM ±10% error acceptance)
  • Hydranal 1.0 (1,000PPM ±3% error acceptance)
  • Hydranal 10.0 (10,000PPM)

So what do the numbers mean?  0.1, 1.0, 10.0?

Simply put, these numbers tell us the amount of moisture (H2O) that is present in 1 gram of the water standard.  The amount of moisture (H2O) is expressed as milligrams on the packaging.  Using the Hydranal 1.0 for example we say there is 1.0 milligram of moisture (H2O) in 1 gram of the water standard.  Did you know there are 1,000 micrograms per 1.0 milligram?  Yes there is.  So instead of thinking in terms of 1 milligram per 1 gram of water standard, think in terms of 1,000 micrograms per 1 gram of water standard.  Why?

Karl Fischer Titrators count moisture in micrograms!

Since Karl Fischer Titrators count moisture in micrograms it's easier to think about the water standards in terms of micrograms.  Why?

Find more Coulometric Karl Fischer Titrator information

We evaluate our water standard test in PPM

For the Hydyanal 1.0 we are looking for results within ±3% of 1,000PPM (970PPM to 1030PPM).  For the Hydranal 0.1 we are looking for results within ±10% of 100PPM (90PPM to 110PPM).

 Learn more about Volumetric Karl Fischer Titration

Don't forget this formula!:

PPM = WATER DETECTED IN MICROGRAMS/SAMPLE SIZE IN GRAMS

(For those who don't know PPM stands for Parts Per Million)

We hope this information has been helpful.

 Created on 02/09/12 at 13:36:32 

Continue Reading

Karl Fischer Titration and Water Standard Presentation

By Hank Levi on Tue, Jun 28, 2011 @ 10:43 AM

Kf waterstandard presentation resized 600In this presentation we discuss the basic Karl Fischer Water Standards and talk about some of their uses for both Coulometric and Volumetric Karl Fischer Titration.  We also describe some of the related problems that can be identified and overcome by using Karl Fischer Water Standards.

Learn more about Karl Fischer Titration

Find more Coulometric Karl Fischer Titrator information

Learn more about Volumetric Karl Fischer Titration


Created on 06/28/11 at 10:48:28
Continue Reading

Karl Fisher Titration and the 20 Most Critical Questions

By Hank Levi on Sun, Jun 12, 2011 @ 12:27 PM

questionsAs a service provider of Karl Fisher testing apparatus, we see different moisture testing issues that many operators, managers, and even companies face. We have come to realize that helping operators become more knowledgeable about "the little things" can help boost confidence, improve performance and efficiency, and ensure accurate testing. 

Are you new to Karl Fisher Titration and just beginning to learn about moisture testing or has it just been a while since you had to pull the Karl Fisher Titrator out to run some tests?  Regardless of your reason we know how important it is to get up to speed quickly so you can be running tests and providing moisture test results to those who need them.

Learn more about Karl Fischer Titration

To help with this we have compiled a list of the 20 most critical questions to help operators navigate through the learning curve and gain a better understanding of Karl Fisher Titration.

Some examples of issues you will discover include:

1.  "Our Karl Fisher says 'OVER TITRATION' and the reagent is turning really dark. Why?”

2.  “Why won’t the instrument go into “Ready mode”?”

3.  “Results seem "all over the place", what should I do?”

4.  "We use a solids evaporator and we are getting ZERO moisture results. Why?"

5.  "How many tests can I run and when should I change out my reagents?"

 Find more Coulometric Karl Fischer Titrator information 

Avoid unnecessary surprises by getting a copy of the complete list of questions and learn what the issues are and why they are important.

Created on 06/11/11 at 08:00:22

Learn more about Volumetric Karl Fischer Titration

Continue Reading

Karl Fisher Titration and drift

By Hank Levi on Fri, Jun 03, 2011 @ 12:36 PM

karl fisher driftSimply put, drift is background moisture that the Karl Fisher titrator is detecting.  What is background moisture?  Well, it is moisture that the Karl Fisher titrator (specifically the detector electrode) is detecting inside the vessel -that’s not coming from your sample.  Drift or "background moisture" can be the result of having the titration vessel sitting idle for some time where moisture has slowly infiltrated and accumulated inside the vessel, or it may be the result of a leak that is allowing a small amount of moisture to enter the vessel continually.  Although we might like to think that the Karl Fisher titrator vessel is air-tight/moisture-tight, it is not.  Depending on how well the vessel is sealed there may be a little or there may be a lot of background moisture interference.  All Karl Fisher titrators deal with the drift issue.  Unfortunately drift cannot be completely eliminated but the good news is that it can be reduced, measured, isolated, and discarded from your test results.

Find more Coulometric Karl Fischer Titrator information

Before a single test is run on a Karl Fisher titrator it must go into a “ready” mode.   But before the titrator can go into a “ready” mode it most likely will go through a “pre-titration” mode.  During the “pre-titration” mode excess drift (moisture) is detected and removed by the reagent inside the vessel.  A “ready” mode ideally will occur when the drift being measured is low and steady/stable – usually below .1 micro grams per second.  Once the drift becomes low and stable the Karl Fisher Titrator records the drift level and goes into a “ready” mode and will allow the operator to introduce a sample into the vessel.  Upon completion of the test the Karl Fisher titrator adds up all of the moisture detected over the duration of the test and subtracts out the known drift level that was also measured during the test.  This process of knowing what the drift was before the test allows the Karl Fisher Titrator to then determine and backout the drift -leaving only the moisture detected from the sample as your result.

Learn more about Volumetric Karl Fischer Titration


 Created on 06/03/11 at 12:38:02

Continue Reading

Here are 6 Advantages Karl Fischer Titration offers when measuring moisture

By Hank Levi on Thu, Jun 02, 2011 @ 11:12 AM

Karl FisherThere are multiple methods of moisture determination, including loss on drying, Karl Fischer titration, piezoelectric sorption, spectroscopy, and chilled mirrors among others. However, it is advantageous to use Karl Fischer (KF) titration in moisture analysis for the following reasons:


  1. It is highly accurate and precise (Part Per Million Accuracy).
  2. KF is specific to water determination. This specification is different from the other popular moisture analysis method, loss on drying (LOD), because LOD can detect the loss of any volatile substance. However, this specification is advantageous because it allows KF titration to work independent from volatile substances present in the sample
  3. The process does not require large samples, which is typically truer with Loss on Drying where more sample is required to achieve higher accuracy and repeatability - which introduces another entirely different problem.
  4. It does not require much time to perform an analysis since the samples are easy to prepare and the analysis itself is short in duration.
  5. The method has a nearly unlimited measurement range (from 1ppm to 100%).
  6. Karl Fischer titration can determine the moisture content of a sample in any state, whether it is a solid, liquid, or gas.

We hope the above advantages show some of the benefits that Karl Fischer titrators can provide.  Even today with technological advancements Karl Fisher Titration remains very popular not only because of the advantages we mention, but also because it is widely accepted as a standard for moisture detection and measurement.  Learn more about Karl Fischer Titration

Continue Reading

Recent Posts