You can say we get this question all the time or we run into this situation or question all the time.
So you may be asking yourself these questions?:
- Why are there two types of Karl Fischer titration?
- How much moisture can a Karl Fischer Titrator measure?
- How much can a coulometric Karl Fischer measure?
- How much can a volumetric Karl Fischer measure?
- How does coulometric Karl Fischer Titration work?
- How does volumetric Karl Fischer Titration work?
- How do I decide which method to choose?
- What are the benefits of using volumetric Karl Fischer Titration?
- What are the benefits of using coulometric Karl Fischer Titration?
- What kind or reagents do coulometric Karl Fischer Titrators use?
- What kind of reagents do volumetric Karl Fischer Titrators use?
# Karl Fischer Titration: Coulometric vs. Volumetric
## Which method is right for your sample?
This is a common question in laboratories that perform moisture content measurement: Why are there two types of Karl Fischer titration, and how do you decide which one to use?
Both **Coulometric Karl Fischer** and **Volumetric Karl Fischer Titration** measure water through the same fundamental chemical reaction. The key difference is how the iodine required for that reaction is supplied. In volumetric titration, iodine is added from a calibrated burette. In coulometric titration, iodine is generated electrochemically inside the titration cell.
The appropriate method depends primarily on the expected moisture level, sample matrix, sample preparation requirements, and the chemical compatibility of the reagents with the sample.
## Why are there two types of Karl Fischer titration?
The two methods exist because samples can contain very different amounts of water.
A sample with trace moisture may contain only a few micrograms of water. A high-moisture sample may contain several grams of water or more. Using the same measurement approach for both situations would reduce efficiency and could affect accuracy.
Coulometric Karl Fischer is generally selected for low or trace moisture levels. Volumetric Karl Fischer is generally selected when water is present at a higher concentration. There is an overlap between the methods, so the final choice should be based on the validated operating range of the instrument and the requirements of the specific application.
## How much moisture can a Karl Fischer titrator measure?
Karl Fischer instruments can measure water from trace levels in the parts-per-million range to nearly 100%, depending on the technique, instrument configuration, sample size, sample preparation, and method validation.
As general guidance:
- **Coulometric Karl Fischer:** approximately 1 ppm to 5% water in many applications. It is commonly used for trace moisture, often around 0.001% to 1%.
- **Volumetric Karl Fischer Titration:** approximately 100 ppm to 100% water in many applications. It is commonly used for samples with moisture levels above the practical range of coulometry.
These are typical method ranges, not universal limits. A manufacturer may specify a different working range, and the usable range can change with the sample matrix, reagent capacity, sample weight, and sample preparation.
## How does Coulometric Karl Fischer work?
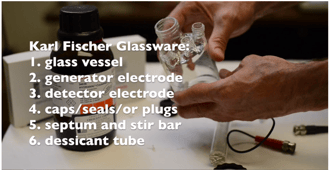
In Coulometric Karl Fischer analysis, the sample is introduced into an electrolyte solution inside a sealed titration cell. The instrument generates iodine electrochemically from iodide at the generator electrode.
The generated iodine reacts with the water in the sample. The instrument measures the electrical charge required to generate enough iodine to reach the endpoint. Because the amount of charge is directly related to the amount of iodine generated, the instrument calculates the water content from current and time. [cite-15808a]
Coulometric Karl Fischer is especially useful when the sample contains a small amount of water and a very sensitive measurement is required. It can also reduce the need to handle and standardize a separate iodine titrant because the iodine is produced inside the cell. However, the cell must be kept properly sealed and conditioned. Moisture from the surrounding air, poor stirring, contaminated electrodes, or unstable drift can affect the result.
## How does Volumetric Karl Fischer work?
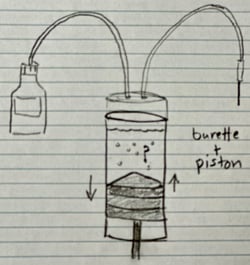
In Volumetric Karl Fischer Titration, the sample is added via a 10mL burette (usually) to a solvent in the titration vessel. A Karl Fischer composite or titrant containing iodine is then dispensed from a burette until the endpoint is detected.
The instrument calculates the water content from the volume of titrant used and the titrant concentration, commonly called the titer. The titer must be established and checked according to the laboratory’s procedure and the instrument manufacturer’s recommendations.
Volumetric Karl Fischer is well suited to samples with higher water content because the method can add a larger amount of iodine-containing titrant. It can also provide flexibility for liquids, solids, pastes, and samples that require extraction, dissolution, or other preparation steps.
## What are the benefits of Coulometric Karl Fischer?
Coulometric Karl Fischer offers several advantages for trace moisture analysis:
- **High sensitivity:** It is designed for measuring small amounts of water, including low parts-per-million levels.
- **Iodine generated on demand:** The instrument creates the iodine required for the reaction instead of dispensing a pre-made iodine titrant.
- **No routine titrant titer determination:** Because iodine is generated electrochemically, a separate volumetric titrant standardization is generally not required. The complete system should still be checked regularly with a certified water standard.
- **Small sample quantities:** Low-moisture samples can often be analyzed using relatively small sample quantities, depending on the required water mass and instrument specifications.
- **Useful for sealed-cell operation:** Keeping the titration cell closed helps limit the introduction of atmospheric moisture during analysis.
Coulometric Karl Fischer is often a strong choice for dry solvents, oils, chemicals, pharmaceuticals, and other materials where the expected moisture level is low. The sample must still be compatible with the electrolyte, and solids or pastes may require dissolution, extraction, or an oven-based sample introduction method.
## What are the benefits of Volumetric Karl Fischer?
Volumetric Karl Fischer Titration is often the better choice for higher-moisture samples and applications that require a broader sample-handling approach.
Key benefits include:
- **Broad moisture range:** Volumetry can measure samples from relatively low moisture levels through very high water concentrations.
- **Suitable for high water loads:** It is less likely to exceed the practical capacity of a coulometric electrolyte when the sample contains a substantial amount of water.
- **Flexible sample preparation:** Samples may be added directly or prepared through dilution, extraction, dissolution, or other validated procedures.
- **Useful for difficult matrices:** A suitable solvent, elevated temperature, homogenization, or an oven accessory may help address solubility and sample-release challenges.
- **Adaptable titrant strengths:** Volumetric reagents are available in different concentrations so the method can be matched to the expected water content.
Volumetric Karl Fischer may be appropriate for samples such as formulations, solvents, oils, chemicals, and other materials with moderate to high moisture content. As with any analytical method, representative sampling and complete water release are essential for reliable results.
## What kind of reagents do Coulometric Karl Fischer titrators use?
Coulometric Karl Fischer titrators use an electrolyte system that supports the electrochemical generation of iodine. Depending on the cell design, the system may use an anolyte and catholyte or a reagent designed for a diaphragm-free generator electrode.
Typical components may include an alcohol or other suitable solvent, sulfur dioxide, an organic base, and an iodide source. Specialized formulations are also available for particular sample types, including samples that may react with standard methanol-based reagents.
The correct reagent depends on the generator electrode, cell configuration, sample matrix, and application. Use only reagents recommended for the specific instrument and cell design. Commercial Karl Fischer reagent and water standard lines include formulations such as **Aquastar** and **Hydranal**, along with other application-specific products.
Common Anolytes (goes into the main titration cell) : Coulomat A, AG, AG-H, AG-Oil, AK
Common Catholytes (goes inside a 2-component inner burette if you are using one): Coulomat CG, CGK
See our list of coulometric Karl Fischer reagents here
## What kind of reagents do Volumetric Karl Fischer titrators use?
Volumetric systems generally use:
- An iodine-containing Karl Fischer titrant
- A solvent containing sulfur dioxide and an organic base
- A one-component reagent that combines the required ingredients, or a two-component system in which the titrant and solvent are supplied separately
- Special solvents or titrants for samples that react with methanol or create other side reactions
Methanol is commonly used in Karl Fischer chemistry, but it is not suitable for every sample. Aldehydes and ketones, for example, can react with methanol-based systems and produce additional water, which may cause an elevated or incorrect result. In these cases, a suitable methanol-free or otherwise specialized reagent system may be required.
Always review the reagent safety data, compatibility information, and manufacturer instructions before use. Karl Fischer reagents and solvents may be flammable, corrosive, or harmful if inhaled or absorbed through the skin. Use appropriate laboratory controls, personal protective equipment, ventilation, storage, and waste-disposal procedures.
Volumetric Karl Fischer Titrators work with these common reagents called "Composites", "Titrants",and "Solvents". It's worth noting that titrants work with "special solvents" designed only to work with the titrant.
Hydranal Composite 5,2, or 1 is delivered into the solvent from a burette. The number of the composite tells you the amount of H2O that the composite can neutralize. 5 means the composite with neutralize 5mg of H20 per mL of the composite. etc, etc, (So it is a measure of strength).
As an alternative to "Composites" you also use "Titrants". The main difference between Composites and Titrants is that the Titrants have removed some of the characteristics from their make up unlike the Composites. In this case, the Titrants have some of their chemical components inside a special "solvent". So in summary, Composite are complete and dose into regular solvent. Titrants are not complete chemical configurations where some of their chemical composition is located inside a special solvent. Why are titrants this way vs. composites? The answer is that by separating some of the chemical components in titrants extends the life of the titrant. By not mixing all the chemical components it delays the mixing and aging of the titrant.
Finally, when it comes to working with components and titrants you need to be aware that the strength of these will change over time so it is require and important to run what they call a "factor" check to update their strength. Yes, you have to input the strength of the composite or titrant into the titrator when you first start using them and then periodically check and update their strength.
See our list of Volumetric Karl Fischer reagents here
## How do you decide which method to choose?
Use the following questions as a starting point:
### 1. What is the expected moisture level?
Choose coulometry when the sample is expected to contain trace or low moisture. Choose volumetry when the sample contains a moderate or high concentration of water. If the expected level falls within the overlap, compare the instrument’s validated range, sample size, and required precision.
### 2. How much water will be introduced with each sample?
The total mass of water added to the cell matters, not only the percentage of water in the sample. A large sample with a low moisture percentage may introduce more water than a small sample with a higher percentage. The electrolyte or titrant capacity must be considered.
### 3. Does the sample dissolve completely?
Incomplete dissolution can prevent all of the sample’s water from reaching the reaction. Consider a suitable solvent, extraction, homogenization, heating, or an oven method when direct analysis is not appropriate.
### 4. Could the sample cause a side reaction?
Aldehydes, ketones, reducing substances, strongly acidic or basic materials, and other reactive matrices may interfere with Karl Fischer chemistry. Select a compatible reagent system and validate the procedure for the sample.
### 5. Can the laboratory control moisture contamination?
Dry glassware, syringes, solvents, sample containers, and titration cells are important for both techniques. Conditioning the cell, monitoring drift, maintaining effective stirring, and keeping the cell sealed when required are especially important for trace-level coulometric work.
## Coulometric or volumetric: a quick comparison
| Consideration | Coulometric Karl Fischer | Volumetric Karl Fischer Titration |
|---|---|---|
| Typical application | Trace and low moisture | Moderate to high moisture |
| Typical working range | About 1 ppm to 5%, depending on the system | About 100 ppm to 100%, depending on the system |
| Iodine source | Generated electrochemically | Added from a burette |
| Primary calculation | Electrical charge, based on current and time | Titrant volume and titer |
| Titrant standardization | Generally not required for generated iodine | Required for the iodine titrant |
| Sample handling | Often syringe addition into a sealed cell | Direct addition, extraction, dissolution, or other validated preparation |
| Main concern | Atmospheric moisture, drift, cell condition, and electrolyte capacity | Titrant stability, titer, sample preparation, and endpoint performance |
## Final considerations
Neither technique is automatically better for every sample. The best method is the one that matches the expected moisture content, sample chemistry, sample preparation requirements, instrument range, and laboratory quality system.
Accurate Moisture Measurement depends on more than selecting coulometric or volumetric analysis. Proper sampling, solvent choice, reagent selection, electrode condition, stirring, cell conditioning, drift control, and routine verification all contribute to dependable results.
Scientificgear provides Karl Fischer Titrators, Karl Fischer Reagents, Karl Fischer Water Standards, and technical support for moisture analysis applications. If you need help evaluating a method, selecting compatible equipment, or improving an existing Karl Fischer procedure, contact our team for technical guidance.