
Watch this video to learn more about the very capable DA-130N Portable Density Meter.
DA-130N Portable Density Meter Review
Topics:
Density Measurement
DA-130N
ASTM D777
ASTM D7777
Portable density meter
portable specific gravity meter
alcohol meter
DA-130N portable density meter
Portable brix meter
density meter
Continue Reading
How an oil evaporator works with a Karl Fischer Titrator
Evaporators configured for use with Karl Fischer moisture testers can provide added benefit when testing for moisture in samples that are not easily solubilized in the titration cell. In some cases even if it's possible to solubilize the sample in the titration cell you may find that it is better to use an evaporator to improve repeat testing by keeping the cell clean. While traditonal Karl Fischer moistutre testing is performed using a direct injection method where a syringe and needle is used to introduce the liquid sample into the titration cell, the use of evaporators follow a different approach.
Within the evaporator family there are SOLIDS EVAPORATORS that can range from 0 to 300 degree C as well as high heat solids evaporators that can range from 0 to 1,000 degree C.
A typical OIL EVAPORATOR will have a range from 0 to 300 degree C.
Solids evaporators will typically be used to measure moisture in these types of samples:
- plastic pellets (pte, etc)
- plastic parts (you can cut into smaller pieces with a pair of scissors)
- paper material (transformers)
- thick grease samples
- thick petroleum based samples like heavy paints, etc
- and the list goes on
Oil evaporators will generally be used when working with heavy crude oil samples with high turnover testing (keeping the cell clean).
In this video we will discuss and show how the oil evaporator works with a Karl Fischer Titrator.
Talking points include:
- Karl Fischer Titrator
- Oil Evaporator
- Base Oil
- Bubbler Tube
- Nitrogen Gas Source
- Regulator
- Thermocouple
Topics:
Moisture Testing
Karl Fischer Titration
Parts Per Million
Karl Fischer Water standards
Volumetric Karl Fischer Titration
Reagents
Coulometric Karl Fischer
Solids Evaporator for Karl Fischer
Continue Reading
The DA-130N portable density meter has twelve measurement modes and includes density of alcohol
Hand held density meters are very useful tools. You can take them with you and perform any of these 12 tasks.
| 1) | Density | 5) | API | 9) | Baume |
| 2) | Comp. Density | 6) | Brix | 10) | Plato |
| 3) | SG(t/t) | 7) | Alcohol | 11) | Proof |
| 4) | SG | 8) | H2SO4 | 12) | Conc. |
(1) Measurement of density
(2) Measurement of temperature compensated density
(3) Measurement of specific gravity; Measurement of true specific gravity at displayed measurement temperature
(4) Measurement of specific gravity temperature compensated; Measurement of true specific gravity at preset temperature
(5) Measurement of API degree; Measurement of density or API degree compensated in temperature to 15 degree C or 60 degree F for the product group A, B or D.
Selection of temperature, 15 degree C or 60 degree F, will be automatically made when setting the temperature unit. Product group A: Crude oil
[Measurement of density: API A (Density) Product group B: Fuel, Petroleum products
[Measurement of density: API B (Density) Product group D: Lubricant
[Measurement of density: API D (Density)
(6) Measurement of Brix concentration
Measurement of API degree: API A (Degree)] Measurement of API degree: API B (Degree)] Measurement of API degree: API D (Degree)]
Measurement of Brix concentration (sucrose concentration expressed in weight %) based on density at 20 degree C

(7) Measurement of Alcohol concentration
Measurement of alcohol concentration of Ethanol/Water mixed system in wt % or vol % at 15 degree C or 20 degree C calculated from the density at the measurement temperature. When setting of temperature unit is Fahrenheit
Measurement of alcohol concentration of Ethanol/Water mixed system in wt % or vol % at 60 degree F calculated from the density at the measurement temperature.
(8) Measurement of sulfuric acid concentration
Measurement of sulfuric acid concentration in weight % from density measured at 20 degree C
(9) Measurement of Baume degree
Measurement of Baume degree at converted temperature from density value measured at the measurement temperature
(10) Measurement of Plato degree
Measurement of Plato degree at 20 degree C from density obtained at measurement temperature
(11) Measurement of Proof degree
Measurement of Proof degree at 60 degree F from density obtained at measurement temperature Proof degree is one of the units for alcohol content, and there is US Proof and British Proof
Proof (US) : Measure in US Proof unit (100v/v%=200 US Proof)
Proof (IP) : Measure in UK Proof unit (100v/v%=175 British Proof)
(12) Concentration measurement by setting desired concentration conversion formula

Topics:
Surface Tension
Density Measurement
DA-130N
ASTM D7777
Portable density meter
portable specific gravity meter
alcohol meter
DA-130N portable density meter
Portable brix meter
density meter
Continue Reading
DA-130N portable density meter General Maintenance Guidelines
This is a quick guide to getting started and running your first test. We thought it would be helpful for those getting started and checking their first calibration before running tests with actual samples. We will also continue to explore and share more information about calibration options, general maintenance, and data export methods using the DA-130N portable density meter.
O.K. Let's install three 'AAA' batteries to get started.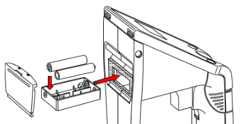
And then attach the sampling nozzle. 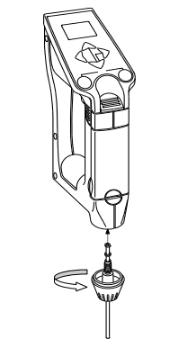
A few words about precautions when taking test measurements.
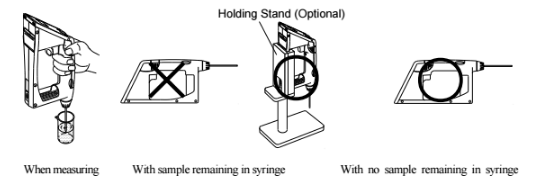
When measuring a sample make sure to hold the instrument so that the sampling nozzle is vertical to the ground. When laying down the instrument between or after measurements make sure to drain the remaining sample from the built-in syring (the built-in syringe is located inside the meter right above the sampling nozzle).
Now let's run a preliminary test using water.
Leave the temperature unit (Celsius), measurement unit (g/cm3) and mode (Field) as initial values. Sample pure water using the built-in syringe. After the measurement cell is filled with sample liquid make sure there are no air bubbles in the cell. If no air bubbles are visible then let's proceed.
Example procedure for running first test.
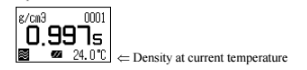
The display changes as above and after confirming it is in the automatic stability sense mode. Press [Meas.] key. When the displayed density is stabalized the value will automatically change reversed as below. Read the data at this point as well as the temperature degree.

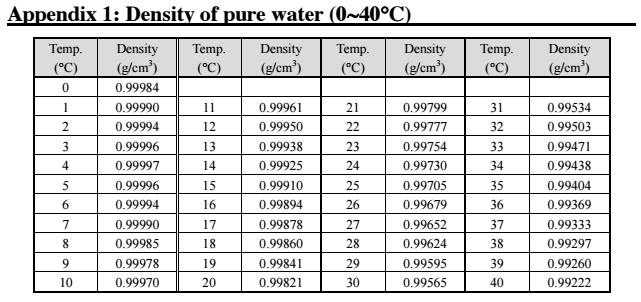
Look up to the pure water density table (appendix 1 in the manual). If the results agree within +-0.001g/cm3, you can proceed to making your sample measurements!
Note: If the results are not within the acceptable range then the measuring cell requires calibration.
Calibration of the measuring cell using pure water
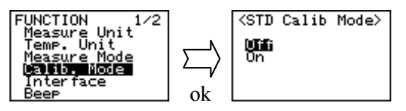
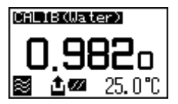
Set calibration mode to OFF. Press the [esc] key 2 times to return to the main menu. Sample pure water making sure no air bubbles are visible. The measuring cell with pure water can be calibrated automatically with the key entries as follows: Press [cal.] key for more than 2 seconds to show CALIB(Water) (inversed colo on the display) showing calibration with pure water in progress.
After calibration is over the deviation from the theoretical value will be shown so that you can check if the calibration has been successfully completed.

Note: if after attempting re-calibration of the measuring cell and results are still not within specifications it is possible the measuring cell itself is contaminated. In this case ensure to carefully clean the measuring cell and then re-calibrate again.
Note 1: You can also calibrate with a standard liquid that has a known density. Sometimes calibrating with a liquid that has a similar density to your test samples will help improve precision.
Note 2: You can also calibrate with air.
General maintenance - How to clean and dry the measuring cell and replace the built-in syringe
Step 1: Clean the measuring cell
You can thoroughly clean the measuring cell with just pure water. You can also improve the cleaning of the measuring cell by using Ethyl Alcohol. Ethyl Alcohol gets rid of dirt that cannot be removed with pure water and also reduces the amount of time to dry the measuring cell.
- Estimate 5 to 10 minutes for the measuring cell to dry after cleaning with pure water
- Estimate 3 to 5 minutes for the measuring cell to dry after cleaning with Ethyl Alcoho
Step 2: Purge air to dry the cell thoroughly and completely
option using an air pump:
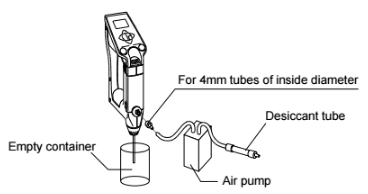
OR use the optional manual pump to dry the cell:
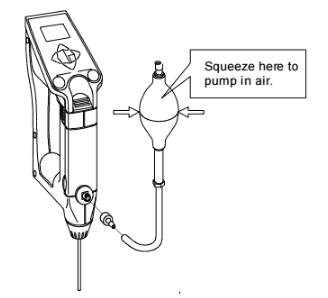
When using the optional manual pump to dry the cell make sure to clean the cell first and then press the sample discharging lever all the way down, and push the sample intake lever upward to lock it. With the adapter for the syringe attached connect the kit as illustrated above and feed air forcefully using the manual bulb.
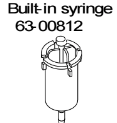
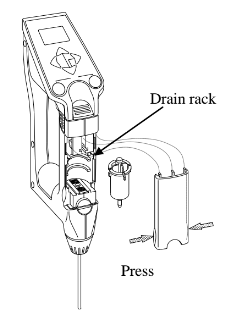
How to replace the built-in syringe.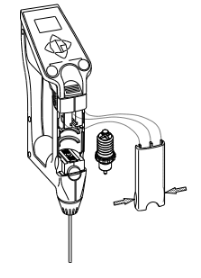
- Press down the sample discharging lever all the way and remove the syringe cover by pulling it toward you as illustrated.
- Turn the syringe 45degrees counter clockwise to release it from the o-ring.
- Slightly pull the sample drain-out lever toward you to pull out the syringe from the o-ring.
- Remove the syringe from the drain rack and replace it with a new one.
- Pull down the drain rack and insert the o-ring and turn it back clockwise until it stops.
- Place the syringe cover back on the unit.
Data Processing and Storage
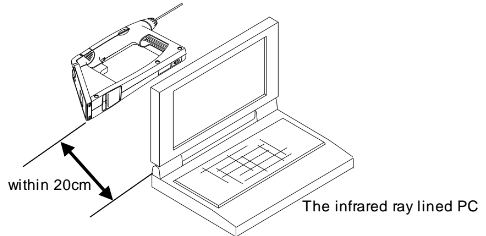
The maximum number of data which can be stored in the DA-130N memory is 1,100 samples. Data can be set to be saved automatically or manually after each test. You can recall stored measurement data on the DA-130N display again or output the data to a printer or PC.
Exporting data to a PC via Infrared:
Exporting data to a PC via RS-232
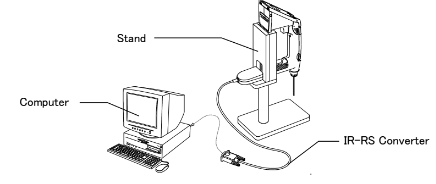
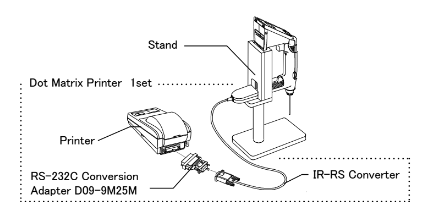
Sending data to a printer:
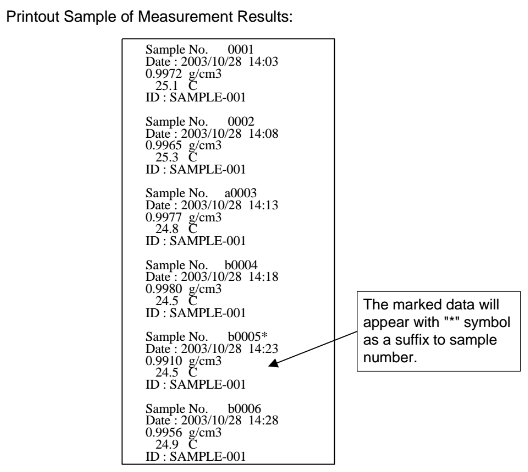
Example printout of data:
We hope this information about this particula density meter is helpful. If you need other capabilities beyond a traditional portable density meters refer to other bench top density meter models for increased accuracy.
Topics:
Density Measurement
Continue Reading
Q&A: AT-710 Burette piston won't move
Sometimes pressing a button and hearing a beep just drives you crazy. We know. Below we received some video of a problem where the operator could not move the piston burette up or down on their automatic titrator. We decided to replicate the problem and then show how to take corrective action. We hope you find the video informative even though it is raw footage. Send us your questions too. Video, audio, pictures, etc. We can use any format.
Topics:
Potentiometric Titration
Mercaptans
H2S
Hydrogen Sulfide
Titrator
Acid Titration
Titration
AT-700
bromine number
bromine index
Continue Reading
What happened to Hydranal Karl Fischer Reagents?
There has been some confusion in the market place when it comes to purchasing Karl Fischer reagents and water standards. Some of you who have traditionally ordered the Hydranal brand from Sigma Aldrich (and it's channel partners and dealers) are discovering now that the Karl Fischer reagents and waters standards are slightly different - If you order them from Sigma Aldrich. The names on the bottles are kind of the same, but not exactly.

Some background - what happened to Sigma Aldrich
As many people know Sigma Aldrich for many years handled the Hydranal line of Karl Fischer Reagents and water standards. Recently (within the past year and a half or so), a company called EMD who controls the other Karl Fisher reagent line called Aquastar purchased Sigma Aldrich. As a result of this transaction Sigma Aldrich is now part of another company and is referred to as MilliporeSigma.The Sigma Alrdrich you used to know no longer provides the Hydranal brand but intstead now offers the Aquastar line of Karl Fischer Reagents and water standards.
What happened to the Hydranal brand of Karl Fischer reagents?
 A well-known company called Honeywell purchased and now controls the Hydranal line of Karl Fischer Reagents. You can still order Hydranal brand coulometric Karl Fischer reagents and volumetric Karl Fischer reagents via Honeywell and it's channel partners and distributors.
What does this mean to you and how might this effect you?
As you can imagine this has triggered a lot of phone calls with questions from end-users to purchasing agents with questions like:
- Are these reagents the same?
- Can I use these reagents interchangeably?
- What are the differences?
- Hydranal vs. Aquastar?
Here's what we know
As a manufacturer and distributor of coulometric Karl Fischer titrators and volumetric Karl Fischer titrators for many years, we have worked with both the Aquastar and Hydranal brands extensively. We are not here to tell you one is better than the other. We can tell you that different model Karl Fischer titrators seem to work differently depending on the brand of Karl Fischer reagent used. It might simply be an operators familiarity with working with one brand vs. the other or it might be because a specific application just works better with a certain Karl Fischer reagent.
-While the design is that either of these brands should work we find subtle differences in chemistry-
Are there any real key chemical differences between Hydranal and Aquastar?
To be fair we have not reached out to Aquastar for their perspective yet (we will - and update this post). From the Hydranal technical center we have obtained some information about what they see as strengths in the Hydranal brand and some differences with the Aquastar brand. Here are a few notable points:
1. Different performance. Yes they do perform differently.
2. Different solvents are used. Example: Aquastar Combititrant is a copy of the old version of Hydranal Composite 5 where there was no 2-Methylimidazole. Without 2-Methylimidazole, you can have reagent crystalization and stability issues.
3. Co-solvents are optimized in Hydranal. Too much Chloroform can mess up the stoichiometry
4. Hydranal coulometric reagents are more unique
- Hydranal has more buffering capacity
- Larger volume of samples than Aquastar
5. Hydranal is very precise, convenient and consistent
As mentioned above we hope to get some additional information on the Aquastar line so we can share with you their strengths and differences. In the meantime we hope this information has been helpful.
If you have any questions or would like to compare the reagents you currently use with the "other" brand just let us know. We can provide a cross reference for all of the Karl Fischer reagents by brand and product.

As always, we hope this information is helpful.
Topics:
Karl Fischer Titration
Karl Fisher Reagents
Karl Fischer Water standards
Volumetric Karl Fischer Titration
Reagents
Coulometric Karl Fischer
Titer Value
Ketones
Continue Reading
Using the DA-130N portable density meter for the first time
This is a quick guide to getting started and running your first test. We thought it would be helpful for those getting started and checking their first calibration before running tests with actual samples. We will also continue to explore and share more information about calibration options, general maintenance, and data export methods using the DA-130N portable density meter in future posts.
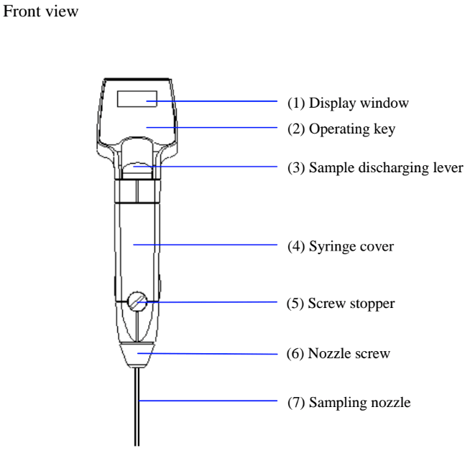
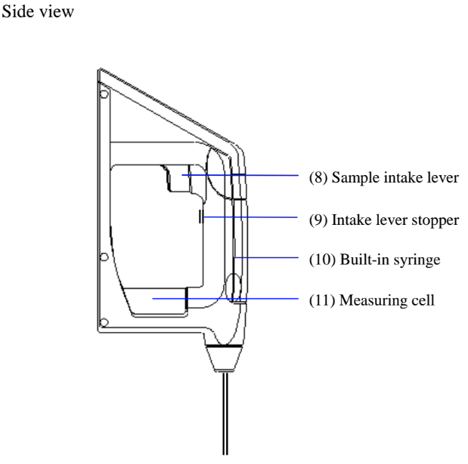
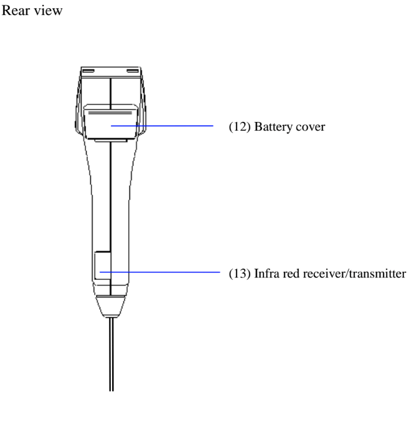
First, lets review and identify the parts of the DA-130N Portable Density Meter:

O.K. Now let's get started and install three 'AAA' batteries...
...And then attach the sampling nozzle.
A few words about precautions when taking test measurements.
When measuring a sample make sure to hold the instrument so that the sampling nozzle is vertical to the ground. When laying down the instrument between or after measurements make sure to drain the remaining sample from the built-in syring (the built-in syringe is located inside the meter right above the sampling nozzle).
Now let's run a preliminary test using water.
Leave the temperature unit (Celsius), measurement unit (g/cm3) and mode (Field) as initial values. Sample pure water using the built-in syringe. 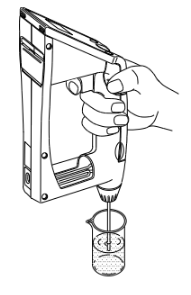
- Make sure the sample discharging lever is pushed down to the bottom.
- If not, slowly push it down with your thumb.
- Dip the sampling nozzle in the sample liquid.
- Slowly pull the sampling lever with the forefinger. When the cell is filled with sample, release your finger.
After the measurement cell is filled with sample liquid make sure there are no air bubbles in the cell. If no air bubbles are visible then let's proceed.
Example procedure for running first test.
The display changes as above and after confirming it is in the automatic stability sense mode. Press [Meas.] key. When the displayed density is stabalized the value will automatically change reversed as below. Read the data at this point as well as the temperature degree.
Look up to the pure water density table (appendix 1 in the manual). If the results agree within +-0.001g/cm3, you can proceed to making your sample measurements!
Note: If the results are not within the acceptable range then the measuring cell requires calibration.
Calibration of the measuring cell using pure water
Set calibration mode to OFF. Press the [esc] key 2 times to return to the main menu. Sample pure water making sure no air bubbles are visible. The measuring cell with pure water can be calibrated automatically with the key entries as follows: Press [cal.] key for more than 2 seconds to show CALIB(Water) (inversed colo on the display) showing calibration with pure water in progress.
After calibration is over the deviation from the theoretical value will be shown so that you can check if the calibration has been successfully completed.
Note: if after attempting re-calibration of the measuring cell and results are still not within specifications it is possible the measuring cell itself is contaminated. In this case ensure to carefully clean the measuring cell and then re-calibrate again.
Note 1: You can also calibrate with a standard liquid that has a known density. Sometimes calibrating with a liquid that has a similar density to your test samples will help improve precision.
Note 2: You can also calibrate with air.
Some other useful things to know when working with different types of samples:
For more viscous samples over 2,000mPa.s it's a good idea to use the optional syringe adapter set. Almost any commerciall available syringe (plastic works great) will work. You just need to order the female adapter to make it work (Adapter part number is 12-04428-02)

When working with samples under 2,000mPa.s of viscosity but where samples contain particles or grains that may crystallize when dry we suggest you use the supplied bellows pump (swap out the built-in syringe for this).
We hope this information has been helpful!
Topics:
Density Measurement
Continue Reading
Regular Bostwick Consistometer vs. Long Bostwick Consistometer
Many of us have used the CSC Bostwick  Consistometer and are familiar with it's operation. Pressing down the gate and loading the trigger is step one. Pouring in your sample and scraping off the top to a clean and even surface is important to getting repeatable results. With a stopwatch in one hand, "popping" the trigger and letting the sample flow out and down the trough comes next. Some tests are designed to see how far a sample will flow in say, 10 seconds. Another testing approach might be to time the movement of the sample until it reaches a pre-determined point (bostwick). If you have ever noticed in the bottom of the tray there are lines with numbers ranging from 0 to 24 (you really can't see a number 24 because the tray stops exactly at what would be 24). Over the years these lines with numbers have affectionatly become to be known as "bostwicks".
Most recently we have had requests to extend the length of the Bostwick Consistometer to accommodate samples that require more time and distance. Not every sample flows the same way so this seemed like a good idea. So to meet these needs we have now just started to offer a longer version of the Bostwick Consistometer! Don't worry we still have the regular length Bostwick Consistometer available.
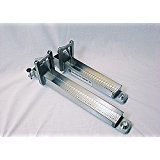
- The long version of the Bostwick Consistometer (part# 24925-000L) now extends from 0 to 32.
- The regular length Bostwick Consistometer (part# 24925-000) has a range of 0 to 24.

Topics:
Bostwick Consistometer
Continue Reading
What is water activity?
There is sometimes confusion about water activity and how it relates to water content. Water content is how much. Water activity (aw) tells us about the energy of the water. Both are measurable.
Water Content
We know a lot about water content and how to measure it using various popular methods including loss on drying, Karl Fischer titration, capacitance and more. Water content is typically expressed in % or Parts Per Million (PPM).
Water Activity
Water Activity is the amount of unbound water in a sample. Water that is not bound to the ingredients themselves can be used by unwanted microorganisms which could lead to one of the contributing factors for food spoilage. Water activity is a  thermodynamic measure of water expressed as the vapor pressure of water in a sample divided by vapor pressure of pure water at a given temperature.
Water Activity is based on a scale from 0.0 to 1.0

The more unbound water we have the more likelihood we have for microbial spoilage. Water Activity (aw) Meters measure the unbound water vapor pressures to determine microbial spoilage, chemical and physical stability.

Well documented and scientifically established guidelines that are also supported by FDA regulations outline these thresholds of microbial limits using a water activity (aw) range or scale. This water activity (aw) range provides the lowest rating for inhibition of microorganism and other degradative chemical and physical reactions that effect shelf life in foods (see chart below).

| Range of aw | Microorganisms generally inhibited by lowest aw in the range | Foods generally with this range |
| 1.00-0.95 | Pseudomonas,Escherichia,Proteus,Shigella,Klebsiella,Bacillus,Clostridium perfringens, some yeasts | Highly perishable foods and canned fruits, vegetables, meat, fish, milk, and beverages |
| 0.95-0.91 | Salmonella, Salmonella, Vibrio parahaemolyticus, C. botulinum, Serratia, Lactobacillus, Pediococcus, some molds, yeasts (Rhodotorula, Pichia) | Some cheeses (Cheddar, Swiss,Muenster, Provolone), cured meat (ham), bread, tortillas |
| 0.91-0.87 | Many yeasts (Candida, Torulopsis, Hansenula), Micrococcus | Fermented sausage (salami), sponge cakes, dry cheeses, margarine |
| 0.87-0.80 | Most molds (mycotoxigenic penicillia), Staphyloccocus aureus, most Saccharomyces (bailii) spp., Debaryomyces | Most fruit juice concentrates, sweetened condensed milk, syrups, jams, jellies, soft pet food |
| 0.80-0.75 | Most halophilic bacteria, mycotoxigenic aspergilli | Marmalade, marzipan, glacé fruits, beef jerky |
| 0.75-0.65 | Xerophilic molds (Aspergillus chevalieri, A. candidus, Wallemia sebi), Saccharomyces bisporus | Molasses, raw cane sugar, some dried fruits, nuts, snack bars, snack cakes |
| 0.65-0.60 | Osmophilic yeasts (Saccharomyces rouxii), few molds (Aspergillus echinulatus, Monascus bisporus) | Dried fruits containing 15-20% moisture; some toffees and caramels; honey, candies |
| 0.60-0.50 | No microbial proliferation | Dry pasta, spices, rice, confections, wheat |
| 0.50-0.40 | No microbial proliferation | Whole egg powder, chewing gum, flour, dry beans |
| 0.40-0.30 | No microbial proliferation | Cookies, crackers, bread crusts, breakfast cereals, dry pet food, peanut butter |
| 0.30-0.20 | No microbial proliferation | Whole milk powder, dried vegetables, freeze dried corn |
*Adapted from L.R. Beuchat, Cereal Foods World, 26:345 (1981)
Pure water that is unencumbered has more energy and therefore can be available and used to do bad things by microorganisms. As water comes in contact with a material substance the water's energy and water activity (aw) decrease. Water reacts differently with different material substances and can have a higher or lower water activity rating* (aw). A water activity (aw) number closer to the top of the chart closer to 1.00 has a higher water activity while those lower have less.
Understanding and documenting how water activity is effected by different material substances provides valuable information. Using this information provides a way for us to take proactive measures to lower water activity as we seek to improve microbial, chemical and structure stability of foods, pharmaceuticals, and other materials.

Packaging to improve shelf life
Equilibrium of ingredients to make foods last longer

Explore multi-ingredient products where water activity in each ingredient will seek to equilibrate and change the overall water activity (aw) result of the product. This can trick people who only look at water content of each ingredient and or even the water activity individually.
CONTACT US ABOUT------> 
Topics:
Water Activity
Continue Reading
How to find Bromine number and index with a Karl Fischer Titrator
WHY DO WE CARE ABOUT BROMINE NUMBER AND BROMINE INDEX ANYWAY?
The degree of unsaturated hydrogen carbide (Hydrocarbon) in oil and petroleum products is indicated by Bromine number or index. Hydrocarbons containing between 6 and 10 carbon molecules are the primary components of most fuels where the process of burning them produces energy. Saturated hydrocarbons are defined by molecular structure and are defined as Alkanes. Alkanes are the basis for petroleum fuels. Unsaturated hydrocarbons are also defined by their molecular structure and produce less energy when burned than do saturated hydrocarbons. Mathematically it therefore requires a greater quantity of unsaturated hydrocarbons to be burned to equal the same amount of energy produced by burning the same amount of saturated hydrocarbons. An un-friendly environmental side effect of burning hydrocarbons is the creation of carbon dioxide. So from an environmental standpoint you could say we prefer the lesser of two evils and prefer to burn saturated hydrocarbons vs. unsaturated hydrocarbons. For these reasons alone it would make sense that we would want to measure and quantify these hydrocarbons.
HYDROCARBONS AND SOME OF THEIR USES
| NAME | USES |
| Methane | Fuel in electrical generation |
| Ethane | Chemical applications |
| Propane | Heating and cooking |
| Butane | lighters and aerosol |
| Pentane | Lab & production of polystyrene |
| Hexane | Glue |
| Heptane & Octane | Major contributor to gasoline |
| Nonane |
Diesel fuel |
|
Decane |
Jet fuel, gasoline and diesel |
Although the test method ASTM2710 describes the use of an automatic potentiometric titrator the coulometric Karl Fischer method is easier to perform (see ASTMD1492-08e1).
<BROMINE NUMBER AND INDEX BY COULOMETRIC KARL FISCHER TITRATION>
Bromine number :The amount of bromine (unit: g/100) consumed in 100g sample.
Bromine index :The amount of bromine (unit: mg/100) consumed in 100g sample.
<PRINCIPAL OF MEASUREMENT>
The unsaturated hydrogen carbon reacts with bromine as follows: R-CH=CH-R+Br2→R-CHBr-CHBr-R- (Eq. #1)
In coulometric titration, bromine is generated by electrolysis of anolyte containing bromine ion: 2Br-Br2+2e- (Eq. #2)
When generated bromine is consumed according to Eq. (#1), the electrode detects bromine consumption, and continues generating bromine according to Eq. (#2).
Such bromine is generated in proportion to the electricity determined by Faraday’s Law. From Eq. (#1), Bromine reacts with coupled C=C evenly (1:1). ==>Thus, one mol of bromine(159.8g) is equivalent to 2 96500 coulomb, which means 1.2 coulomb/1mgBr2.
Based on the above principle, the electricity consumed in electrolysis is converted to the exiting bromine.
Special notes to obtain correct measurement results:
- Replace anolyte and catholyte reagent often (daily).
- When anolyte turns to white color replace it with new anolyte.
- Over use of anolyte and catholyte and not replacing it can cause results to be higher than expected.
- Do not share Bromine titration cell with a moisture titration cell
Step 1: Preparation of Reagents
Prepare the reagents and samples for measurement of bromine number and bromine index.
Use the following reagent for measurement of bromine number or index:
Anolyte Reagent: Mixture of Acetic acid (high grade) 600mL; Methanol (high grade) 260mL; 1M-Potassium bromide solution 140mL. Blend it well and use 100mL each time.
Catholyte Reagent: 0.2M-Potassium chloride solution. Use 5mL each time.
Check Solution: 0.05Wt-Cyclohexene toluene mixture (Approx. 93 ~ 102mgBr2/100g). Theoretical value is calculated by the below formula:
![]()
Step 2: Prepare Reagent for testing
Refer to the below chart for sample size:
| Bromine index (mg/100g) | Sample Size (g) |
|
Below 10 10 ~ 50 50 ~100 100 ~ 200 More than 200 |
10 ~ 15 5 ~ 10 3 ~ 5 1 ~ 3 ~ 1 |
For bromine number, a sample is diluted with toluene to Bromine number 0.2 (g/100g), and approximately 1g is used for measurement. Calculate the toluene to be used for diluting to Bromine number 0.2 (g/100g) with the following equation:
![]()
Obtain the dilution coefficient in advance according to the following equation:

Step 3: Measurement Procedure
Measure Bromine Number and Bromine Index
-
Discharge 20 100μL check solution into the electrolysis cell, and press [Pre-titr.*] key.
-
After pre-titration is finished, press [Sample*] key to enter sample name, its ID and size, and enter the dilution coefficient (D) .
Press [MENU/HOME*] to Main display. -
Press [Start] key, and discharge the sample into the cell. Again press [Start*] key for titration to start.
-
After titration is over, the measurement results appear on display with printout when a printer is connected.
*Note that different Karl Fischer Titrator Models will have different button commands. The MKC-710 series coulometric Karl Fischer titrators come standard with pre-programmed setup for running Bromine and follow the above button commands.
We hope this information helps you get started. If you have any questions or would like some help please contact us by clicking on the button below.
