
<img src="https://secure.leadforensics.com/124134.png" style="display:none;">

What is water activity?

By Hank Levi on Mon, Nov 14, 2016 @ 03:16 PM

There is sometimes confusion about water activity and how it relates to water content.  Water content is how much.  Water activity (aw) tells us about the energy of the water.  Both are measurable.  

Water Content

We know a lot about water content and how to measure it using various popular methods including loss on drying, Karl Fischer titration, capacitance and more.  Water content is typically expressed in % or Parts Per Million (PPM).

Water Activity

Water Activity is the amount of unbound water in a sample.  Water that is not bound to the ingredients themselves can be used by unwanted microorganisms which could lead to one of the contributing factors for food spoilage.  Water activity is a vaporpressure.pngthermodynamic measure of water expressed as the vapor pressure of water in a sample divided by vapor pressure of pure water at a given temperature.  
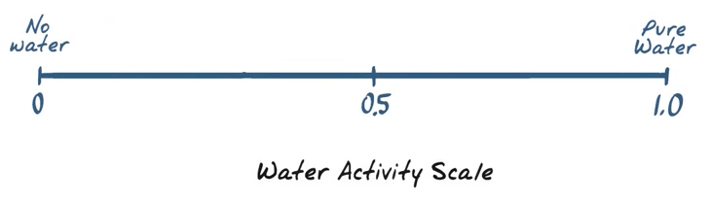
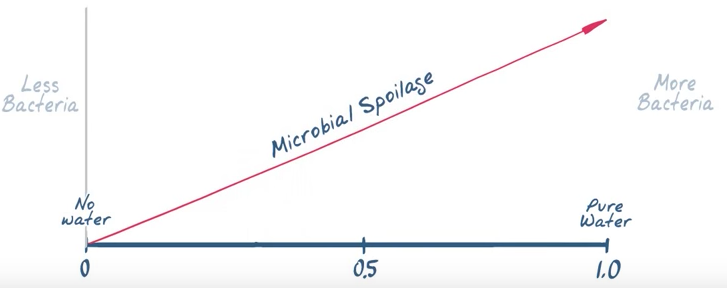
Water Activity is based on a scale from 0.0 to 1.0 

WaterActivityScale.png

The more unbound water we have the more likelihood we have for microbial spoilage. Water Activity (aw) Meters measure the unbound water vapor pressures to determine microbial spoilage, chemical and physical stability. 

wateractivityscale2.png

Well documented and scientifically established guidelines that are also supported by FDA regulations outline these thresholds of microbial limits using a water activity (aw) range or scale.  This water activity (aw) range provides the lowest rating for inhibition of microorganism and other degradative chemical and physical reactions that effect shelf life in foods (see chart below).  

                                     Get more Water Activity information


Water Activity & Growth of Microorganisms in Food

Range of aw Microorganisms generally inhibited by lowest aw in the range Foods generally with this range
1.00-0.95 Pseudomonas,Escherichia,Proteus,Shigella,Klebsiella,Bacillus,Clostridium perfringens, some yeasts Highly perishable foods and canned fruits, vegetables, meat, fish, milk, and beverages
0.95-0.91 Salmonella, Salmonella, Vibrio parahaemolyticus, C. botulinum, Serratia, Lactobacillus, Pediococcus, some molds, yeasts (Rhodotorula, Pichia) Some cheeses (Cheddar, Swiss,Muenster, Provolone), cured meat (ham), bread, tortillas
0.91-0.87 Many yeasts (Candida, Torulopsis, Hansenula), Micrococcus Fermented sausage (salami),
sponge cakes, dry cheeses,
margarine
0.87-0.80 Most molds (mycotoxigenic penicillia), Staphyloccocus aureus, most Saccharomyces (bailii) spp., Debaryomyces Most fruit juice concentrates,
sweetened condensed milk,
syrups, jams, jellies, soft pet food
0.80-0.75 Most halophilic bacteria, mycotoxigenic aspergilli Marmalade, marzipan, glacé fruits, beef jerky
0.75-0.65 Xerophilic molds (Aspergillus chevalieri, A. candidus, Wallemia sebi), Saccharomyces bisporus Molasses, raw cane sugar, some dried fruits, nuts, snack bars, snack cakes
0.65-0.60 Osmophilic yeasts (Saccharomyces rouxii), few molds (Aspergillus echinulatus, Monascus bisporus) Dried fruits containing 15-20% moisture; some toffees and caramels; honey, candies
0.60-0.50 No microbial proliferation Dry pasta, spices, rice, confections, wheat
0.50-0.40 No microbial proliferation Whole egg powder, chewing
gum, flour, dry beans
0.40-0.30 No microbial proliferation  Cookies, crackers, bread crusts, breakfast cereals, dry pet food, peanut butter
 0.30-0.20  No microbial proliferation  Whole milk powder, dried
vegetables, freeze dried corn

*Adapted from L.R. Beuchat, Cereal Foods World, 26:345 (1981) 


Pure water that is unencumbered has more energy and therefore can be available and used to do bad things by microorganisms.  As water comes in contact with a material substance the water's energy and water activity (aw) decrease. Water reacts differently with different material substances and can have a higher or lower water activity rating* (aw).  A water activity (aw) number closer to the top of the chart closer to 1.00 has a higher water activity while those lower have less.

Understanding and documenting how water activity is effected by different material substances provides valuable information.   Using this information provides a way for us to take proactive measures to lower water activity as we seek to improve microbial, chemical and structure stability of foods, pharmaceuticals, and other materials. 

FoodPackaging.jpg

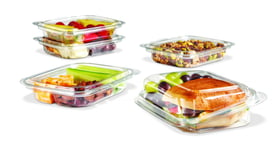
Packaging to improve shelf life


Equilibrium of ingredients to make foods last longer

cookie.jpeg

Explore multi-ingredient products where water activity in each ingredient will seek to equilibrate and change the overall water activity (aw) result of the product.  This can trick people who only look at water content of each ingredient and or even the water activity individually.

      CONTACT US ABOUT------>   Water Activity (aw) 

Continue Reading

How to find Bromine number and index with a Karl Fischer Titrator

By Hank Levi on Sun, Apr 10, 2016 @ 08:47 AM


WHY DO WE CARE ABOUT BROMINE NUMBER AND BROMINE INDEX ANYWAY?

The degree of unsaturated hydrogen carbide (Hydrocarbon) in oil and petroleum products is indicated by Bromine number or index. Hydrocarbons containing between 6 and 10 carbon molecules are the primary components of most fuels where the process of burning them produces energy. Saturated hydrocarbons are defined by molecular structure and are defined as Alkanes.  Alkanes are the basis for petroleum fuels.  Unsaturated hydrocarbons are also defined by their molecular structure and produce less energy when burned than do saturated hydrocarbons.  Mathematically it therefore requires a greater quantity of unsaturated hydrocarbons to be burned to equal the same amount of energy produced by burning the same amount of saturated hydrocarbons.  An un-friendly environmental side effect of burning hydrocarbons is the creation of carbon dioxide.  So from an environmental standpoint you could say we prefer the lesser of two evils and prefer to burn saturated hydrocarbons vs. unsaturated hydrocarbons. For these reasons alone it would make sense that we would want to measure and quantify these hydrocarbons. 


HYDROCARBONS AND SOME OF THEIR USES

NAME USES
Methane Fuel in electrical generation
Ethane Chemical applications
Propane Heating and cooking
Butane lighters and aerosol
Pentane Lab & production of polystyrene
Hexane Glue
Heptane & Octane Major contributor to gasoline
Nonane

Diesel fuel

Decane

Jet fuel, gasoline and diesel


Although the test method ASTM2710 describes the use of an automatic potentiometric titrator the coulometric Karl Fischer method is easier to perform (see ASTMD1492-08e1).  


<BROMINE NUMBER AND INDEX BY COULOMETRIC KARL FISCHER TITRATION>

Bromine number :The amount of bromine (unit: g/100) consumed in 100g sample.

Bromine index :The amount of bromine (unit: mg/100) consumed in 100g sample.


<PRINCIPAL OF MEASUREMENT>

The unsaturated hydrogen carbon reacts with bromine as follows: R-CH=CH-R+Br2R-CHBr-CHBr-R- (Eq. #1)

In coulometric titration, bromine is generated by electrolysis of anolyte containing bromine ion:  2Br-Br2+2e- (Eq. #2)


When generated bromine is consumed according to Eq. (#1), the electrode detects bromine consumption, and continues generating bromine according to Eq. (#2).

Such bromine is generated in proportion to the electricity determined by Faraday’s Law. From Eq. (#1), Bromine reacts with coupled C=C evenly (1:1). ==>Thus, one mol of bromine(159.8g) is equivalent to 2 96500 coulomb, which means 1.2 coulomb/1mgBr2.

Based on the above principle, the electricity consumed in electrolysis is converted to the exiting bromine.


Special notes to obtain correct measurement results:

  1. Replace anolyte and catholyte reagent often (daily).
  2. When anolyte turns to white color replace it with new anolyte.
  3. Over use of anolyte and catholyte and not replacing it can cause results to be higher than expected.
  4. Do not share Bromine titration cell with a moisture titration cell

 Download a copy of this method

Step 1: Preparation of Reagents

Prepare the reagents and samples for measurement of bromine number and bromine index.

Use the following reagent for measurement of bromine number or index:

Anolyte Reagent: Mixture of Acetic acid (high grade) 600mL; Methanol (high grade) 260mL; 1M-Potassium bromide solution 140mL. Blend it well and use 100mL each time.

Catholyte Reagent: 0.2M-Potassium chloride solution. Use 5mL each time.

Check Solution:  0.05Wt-Cyclohexene toluene mixture (Approx. 93 ~ 102mgBr2/100g). Theoretical value is calculated by the below formula:

theoreticalbrominevalue.png


Step 2: Prepare Reagent for testing

Refer to the below chart for sample size:

Bromine index (mg/100g)  Sample Size (g) 

 Below 10

10 ~ 50

50 ~100

100 ~ 200

More than 200

 10 ~ 15

5 ~ 10

3 ~ 5

1 ~ 3

~ 1

For bromine number, a sample is diluted with toluene to Bromine number 0.2 (g/100g), and approximately 1g is used for measurement. Calculate the toluene to be used for diluting to Bromine number 0.2 (g/100g) with the following equation:

anotherbromineformula.png

Obtain the dilution coefficient in advance according to the following equation:

Brominedilutioncoefficient.png


Step 3: Measurement Procedure

Measure Bromine Number and Bromine Index

  1. Discharge 20 100μL check solution into the electrolysis cell, and press [Pre-titr.*] key.

  2. After pre-titration is finished, press [Sample*] key to enter sample name, its ID and size, and enter the dilution coefficient (D) .
    Press [MENU/HOME*] to Main display.

  3. Press [Start] key, and discharge the sample into the cell. Again press [Start*] key for titration to start.

  4. After titration is over, the measurement results appear on display with printout when a printer is connected.

*Note that different Karl Fischer Titrator Models will have different button commands.  The MKC-710 series coulometric Karl Fischer titrators come standard with pre-programmed setup for running Bromine and follow the above button commands.

We hope this information helps you get started.  If you have any questions or would like some help please contact us by clicking on the button below.

Download a copy of this method 


Continue Reading

How to Clean Karl Fischer Titrator Electrodes

By Hank Levi on Wed, Mar 30, 2016 @ 03:31 PM

How to Clean Karl Fischer Electrodes:

A Karl Fischer Titrator uses two electrodes.  The Inner burette (aka Generator Electrode) and the Detector Electrode.  We hope this information is helpful in giving some guidance on cleaing and caring for these Karl Fischer Titrator electrodes.


Twin platinum reference "Karl Fischer Detector Electrode" K103-M713/ K103-M714 or any other model

If the electrode is heavily stained and the potential is unstable and measurement reading fluctuates clean with nitric acid. After cleaning use methanol and wipe off with clean gauze.

Cleanelectrode.png

Single or Dual Inner burette K443-0006/ K103-0002 or any other model (aka Generator Electrode)

Periodic cleaning of the inner burette is recommended if the inner burette is stained and the electrolysis reaction will not run smoothly.  A faulty Inner Burette may cause a longer length of time in the measuring process with measurement results being recorded at higher than theoretical values.


Cleaning with alcohol: general method

  1. Turn off all power
  2. Disconnect the electrodes from their ports.
  3. Take out both anolyte and catholyte.
  4. Wipe off grease around sliding area with methanol.
  5. Rinse the inner burette with methanol, and fill it with approximately 10mL of methanol and then put it in a beaker. Fill the beaker with methanol up to the level of methanol inside the inner burette, and leave it for about 30 minutes.
  6. After the above 5), dry the inner burette.


Cleaning with nitric acid (boiling): If the color of inner burette or diaphragm does not disappear

When there is a deposition of iodine on the diaphragm or the electrode surface, clean with 1mol nitric acid (boiling):

  1. Immerse the diaphragm or the electrode surface in nitric acid, and boil with a hot stirrer.
  2. Drain out the chromate inside the cell, and rinse it with pure water for 2 to 3 times until yellowish color disappears.
  3. Clean the inner burette with methanol or with alcohol.
  4. Repeat the above steps several times when dirt does not come off.

nictricacidwarning.png


Cleaning with chromic acid mixture : When dirt does not come off

If foreign objects are observed on diaphragm and platinum surface, use chromic acid mixture instead of methanol for cleaning.

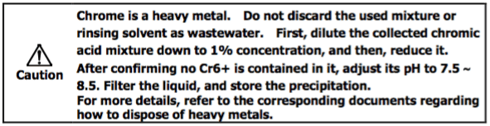
Chromic acid mixture:  1.5g approx. potassium dichromate dissolved in 100mL of concentrated sulfuric acid

Chromicacidwarning.png


  1. Follow the same steps as above for methanol.
  2. Drain out the chromate inside the cell, and rinse it with pure water for 5 to 6 times until yellowish color disappears.
  3. Clean the inner burette with methanol or with alcohol.

Chromewarning.png


How to dry the inner burette and diaphragm

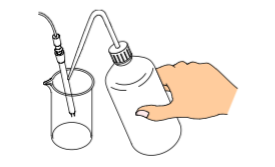
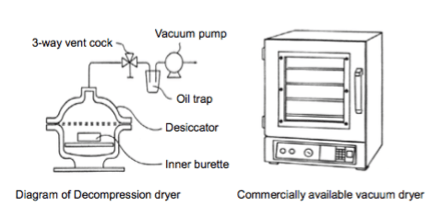
Dry it in a decompression dryer for more than 2 hours.  Below sketch shows an example of commercially sold drying under reduced pressure.

 howtodryinnerburette.png


NOTE:  Dry the inner burette itself only after removed from the titration cell in order to avoid possible breakage of inside ceramic diaphragm.

SUGGESTION: Use a hair dryer if a compression dryer is not available. With a hair dryer, dry the inner burette well enough as long as for more than 10 minutes, especially dry the diaphragm until it is really dried. Any residue of moisture will cause high drift level.

CAUTION: Set the temperature of the constant temperature drying oven at 65°C or below.  When drying with a hair dryer, make sure not to overheat its cable and connector. Overheating may result in malfunction.


Find more Coulometric Karl Fischer Titrator information

Continue Reading

Electrode Shower Cleaning for Auto Titrator Sample Changers

By Hank Levi on Thu, Feb 25, 2016 @ 12:04 PM


ELECTRODE RINSE WITH SHOWER ACCESSORY:

Sample changers that are connected with automatic titrators generally are there for a reason.  Efficiency. From an operators point of view getting multiple tests done quickly while being able to take on other tasks in the lab is a key productivity booster.  Sample changers offer various sizes ranging from as few as 6 positions for samples up to some of the largest exceeding 50 sample positions.  Sample changers either have rotating carousels or an arm that moves electrodes and nozzles from sample to sample.  Each time a sample test is completed the electrode must be cleaned before moving on to the next test.  Many sample changers offer as standard a dip rinse between sample testing and as the name suggests it's really nothing more then dipping the electrode in clean water or solution.  For some samples this process is sufficent but for others it is not enough to effectively clean the electrode before the next test.  Luckily most manufacturers of sample changers offer additional cleaning power with the use of a shower rinse system.   Below is a video showing how a shower rinse process works.   Water is stored in a container and then is flushd and rinsed in one of the sample positions designated as the cleaning station.  Water is evacuated via tubes to a drain or sink.  


Continue Reading

Automatic Tensiometer vs. Manual Tensiometer

By Hank Levi on Mon, Jan 11, 2016 @ 11:56 AM

Ever wonder what a tensiometer looked like?   

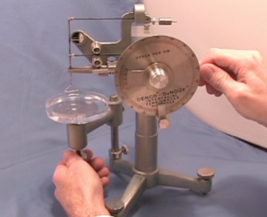
There are MANUAL TENSIOMETERS that look like this:

 manual_tensiometer-resized-600.jpg
 

PROS:

  • >Great for hands-on learning
  • >Can use virtually anywhere (does not require electricity)
  • >Easy to learn how to use
  • >Less expensive

CONS:

  • >It's manual.  You have to twist the dials by hand
  • >There is a technique to getting repeatable results
  • >Human error potential is higher
  • >Need to record results by hand


VIDEO DEMONSTRATION FOR MANUAL TENSIOMETER


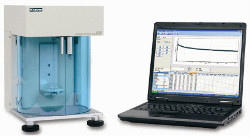
There are AUTOMATIC TENSIOMETERS that look like this.

DY-300small.jpg
 

PROS:

  • >Easy to operate.  Press a button and walk away
  • >Run more tests quickly with high repeatability
  • >Ability to record and report data results (store historical data too)
  • >Dynamic testing features including time tests and Lamella length and more
  • >Most handle both DuNouy Ring and Wilhelmy Plate

CONS:

  • >More Expensive
  • >Some models require a computer (some don't)

VIDEO DEMONSTRATION FOR AUTOMATIC TENSIOMETER


To help prospective users evaluate and compare the different types of models available in the market we have prepared a reference document we call the: 

                    "Tensiometer Selection Matrix"

This matrix is not necessarily brand specific as it was designed to help those seeking to compare capabilities and prices among popular manual Tensiometer models vs. popular Automatic or "digital" Tensiometer models. 

We hope you find the Tensiometer Selection Matrix helpful in your search and evaluation of Tensiometers.


                        Created on 09/22/11 at 12:43:16

Click here to go to the platinum page


Continue Reading

How to test for moisture in Jet Fuel Oil using a Karl Fischer titrator

By Hank Levi on Mon, Sep 21, 2015 @ 03:15 PM


From start to finish watch this short video to see how a sample of Jet Fuel Oil is tested for water content using a karl Fischer Titrator. For this training video we use:

  1. The Aquapal III coulometric Karl Fischer Titrator (setup as a dual reagent configuration)
  2. Reagents; Anolyte is coulomat AG and the catholyte is coulomat CG
  3. A 4-place analytical balance SA-210
  4. And a disposable syringe and disposable needle

In this video you will see the steps for running a test successfully including how to:

  1. Extract your sample into the syringe
  2. How to weigh your sample and tare the balance
  3. How to inject a sample properly
  4. How to input the sample weight and obtain a final result


Find out more about the Aquapal III

We hope you found the video helpful and informative!  If you think a colleague could benefit from this please share it with them!  Click on the twitter button to automatically share this video!

Tweet: How to test for moisture in Jet Fuel Oil using a Karl Fischer Titrator http://bit.ly/1NJ8If4"How to test for moisture in Jet Fuel Oil using a Karl Fischer titrator"


Thanks for Watching!
Continue Reading

Karl Fischer Glassware and reagents 101

By Hank Levi on Mon, Sep 21, 2015 @ 01:53 PM

Many people use coulometric Karl Fischer Titrators to measure low level moisture at the part per million (PPM) level.  When it's time to start testing it's critical to have an understanding of how to:

  1. Properly identify the glassware components
  2. Assemble the glassware
  3. Identify the reagents  (anolytes and catholytes)
  4. Introduce the reagents required by the instrument and the sample being tested 

Once you have these concepts down you will have a strong working knowledge of how a Karl Fischer Titrator works and how to trouble shoot future problems.  Watch this short training video to learn more.

Find out more about the Aquapal III

If you found this information helpful please share this with your colleagues!  Just click on the tweet this button.

 Tweet: Karl Fischer glassware & reagents 101: properly identify glassware components, assemble glassware & identify reagents http://bit.ly/1Qvwv1v "Karl Fischer Glassware and reagents 101: Properly identify the glassware components, Assemble the glassware and Identify the reagents"


We hope you find the training video helpful!
Thanks for Watching!


Continue Reading

Karl Fischer Glassware and Reagents 101: How to setup.

By Hank Levi on Wed, Jun 17, 2015 @ 10:53 PM

Karl Fischer Glassware and Reagents 101:  How to setup.

 Screen_Shot_2015-06-17_at_11.16.04_PM

It seems sometimes we overlook the obvious and forget to explain some of the most basic concepts.  Sorry about that.  So we thought it might be a good idea to show how Karl Fischer Glassware is setup and how we introduce or "charge" the vessel with reagents.  We hope you enjoy this short video tutorial!


 Find out more about the Aquapal III

Continue Reading

Review of KEM's new titration line

By Hank Levi on Tue, Jun 09, 2015 @ 04:11 PM


Review of KEM's new titration line 

AT-710S_M Automatic Titrator

I don't know about you but I have to admit that I enjoy learning about new technology.  Whether it's smart phones, cars, or kitchen appliances I think it's fun to find out about how a product has changed (hopefully for the better). For the most part a lot of consumer products see a change or upgrade about once every year. This is not really the case for titrators where maybe it's only every 6 to 8 years before we see a new generation unveiled.  I guess that's why I thought maybe it would be a good idea to take a look at this new 710 series that came out in February 2015.  I haven't actually ever written a "review" before so I decided to start by comparing what I know about some of the current titrator models and identify the things that pop out with the new titration line.   Here are my observations and comments.


1. There are now three model levels; entry, mid-level, and flagship within each category (volumetric Karl Fischer, coulometric Karl Fischer, and automatic potentiometric titrator) 

Find more Coulometric Karl Fischer Titrator information

My comment: I like the scale of the models as it can be helpful for those with varied budgets and needs.  I like the concept that you can start with getting only the basic model at first and then later bring in the flagship model and tie them all together into one system.  It will be interesting to see how people approach these options and whether the ability to expand a system is desirable or not.
710_series_titrator_with_2_burettes

2. All of the automatic titrators now can accommodate two burette drives

 AT-710 AutomaticTitrator information

My comment: The automatic titrators come with one burette drive but being able to add a second burette drive allows an operator to run two separate titrations (titrants) without having to use an automatic piston burette.  Historically most titrator manufacturers offered only a single burette drive but it seems like this is changing.  It's kind of a big deal for those who run two different titrations and don't want to purchase an automatic piston burette.  I like this new capability.

3.  A new burette design for the automatic titrators and volumetric Karl Fischer titrators.

SmartBuretteUnit

My comment: The burettes appear they will be easier to store and swap as the titrant bottle, burette and nozzles all go together as one smaller unit.   The burettes are now "smart" burettes and can store all of the reagent information within the head of the burette.  I like this.

Learn more about Volumetric Karl Fischer Titration

4.  More Input/Output options for operators to move  and store data.  I/O options include LAN connectivity/URL, USB hubs, USB thumb drive ports, .CSV file format, .PDF file format, barcode readers, foot switches, and keyboards.710seriesUSB

My comment:  More technology is built into these units. I think it was overdue so I am glad to see it finally arrive.

AT710_w_propeller_or_magnetic_stirrer

5.  Automatic Titrators now come with a propeller stirrer by default but can swap for a magnetic stirrer instead.

My comment: I like the option to do both but I think maybe the magnetic stirrer should have been the default and the propeller as the option.


6.  A new Wireless/ Wired 8.4 inch color touch panel controller (MCU).

MCU_screen_view_with_multiple_units

My comment: This only comes with the mid-range and the flagship models.  The controller can sit next to the titrator or be carried around like a clipboard.  Operators can control the titrator through protective glass if necessary.  I'm not sure how many people will elect to use the wireless vs. the wired connection but it's nice to have the added capability.  Nice.

7.  Multi-titrator integration.  The wireless/wired MCU can control up to 4 different titrators simultaneously (any combination of Karl Fischer or automatic titrator) 

MCU_controller for 710 series titrators

My comment: This feature is reserved for the flagship model.  I can see this being useful for those needing to run both moisture and acid for example.  Unfortunately the mid-level model MCU cannot be upgraded to the MCU flagship model so if you think you might expand later don't go with the S model.  Your better off getting the basic "B" model and then later tying them all together from the flagship model.

 710seriesmulticontrol

8.  Free method making software.

My comment:  All of the titrators now come with a CD that allows you to create methods on your PC and then transfer methods to the titrator.  You can also pull methods off of the titrator and edit it in the PC.  The software also comes with various popular methods pre-loaded to help get methods setup quicker.  I'm not so sure how robust this software is but free is nice.

CDstoredmethods


CONCLUSION:

Well I hope this was helpful in finding out quickly what the updates are for the new 710 series.  At this point since it's so new we will have to wait to evaluate how customers feel about their user experience and get their feedback on what they liked most and what they liked least.  If you have any questions or comments you can email me at info@scientificgear.com


Continue Reading

5 ways we use liquid density information

By Hank Levi on Fri, Mar 20, 2015 @ 09:18 AM


5 ways we use liquid density information

ScreenShot2015-03-01at2.46.39PM

Some background:

Simply put density is a physical property of matter. Density is expressed as a ratio of
mass to a given volume mathematically as Density = Mass / Volume. For our industrial
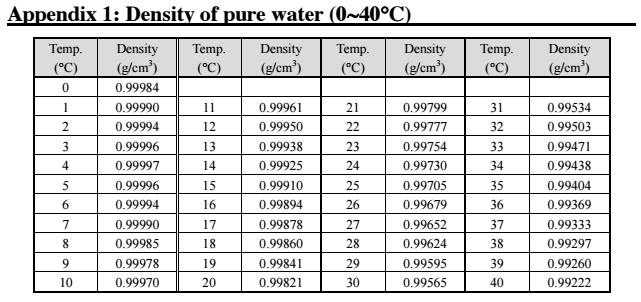
purposes and earth’s known gravitational pull we will define Mass as weight.  For liquids, temperature is an important factor that can affect a liquids density.  Therefore we generally will always describe density at a given temperature for comparison purposes. In general, as liquid temperature increases, density decreases.
Knowing the density of a liquid serves numerous purposes and can provide valuable information for making decisions. Understanding what density is, what affects density, and how density affects other physical properties is important in using and translating this information into an everyday useful tool.  We can use either a hand-held density meter or benchtop density meter to evaluate a liquids density or specific gravity.


1. We live in a physical world

Earth

We live in a physical world and so it would make sense that we would want to be able
to define these physical properties around us. Having a way to define these physical
properties is helpful to those who need to use the information.
  • >How much space does it take up?
  • >How heavy is it?
  • >How much of this can we put into that?
  • >What is it?
  • >Many everyday products are packaged by volume but sold by weight.
  • >Predictive correlations can be made if you know the density.
  • >If we change some of the ingredients that make up the fluid property will it change the weight?

The neat thing about understanding liquid density is that it can answer not only the three basic questions;

  • beverage>What is the mass of the liquid?,
  • >what is the volume of the liquid?
  • >What is the density of the liquid?

But also, What is the liquid?

2. You can use a liquids density to predict 

Fluid properties are probably even more telling where predictive
correlations can be made with density measurement information. Liquid
density changes as ingredients change. A soft-drink containing more sugar for example will have a different (higher) density than a diet soft-drink. Yes,
sugar not only increases a liquid’s density but can also be inversely measured
by knowing the liquids density in a given liquid solution. Understanding these
correlations provides useful information in the production of many beverages.
 

3. Density helps us better understand how to transport fluids

Moving fluids from point A to point B. Knowing the volume and the density
helps determine the best way of transporting those fluids. The answer might
be a bigger tanker truck, or for a pipeline it may be a larger transfer pump.
Transportation

4. Density helps set petroleum prices

gaspumpPetroleum is used mostly by volume for the production of fuel, gasoline and
other energy sources. Density is used in petroleum production to give an
estimation of the gasoline or kerosene present thereby helping to determine
the price of the gasoline, for example.
 
In the oil industry quantities of crude oil are measured in metric tons.
Understanding the density allows one to calculate using API gravity the
number of barrels per metric ton –a common term of measure in the industry.
 Learn more about instruments that measure liquid density

5. Density as it relates to gravitygravity

To further explore and expand the usefulness of density measurement we focus our attention on two types of gravity.

Specific gravity

Specific gravity is another way of saying density relative to a given reference material.
In this case we usually mean relative density with respect to water. Water has a
density of 1,000 kg/m cubed at 4 degrees C. We say that water therefore has a specific
gravity of 1 (1,000/1,000). Specific gravity is the heaviness of a substance compared
to that of water. Have you ever noticed how common everyday automotive oil floats
on top of water? Automotive oil has an average density of 905 kg/m cubed at 15
wineglass
degrees C. We can calculate the specific gravity of the automotive oil by dividing 905
by 1,000 = 0.905. You can see that the number 0.905 is less than 1.0 and therefore is 
lighter than water and is why this oil floats.
Looking at specific gravity another way, for those working in the production of wine, the density of
wine increases as you add sugar but falls as the yeast eats the sugar- finished wine should
have a specific gravity somewhere between .99 and 1.01.  Who knew?

API gravity

The American Petroleum Institute (API) came up with their own gravity term referred
to as API gravity. API gravity is simply a measure of how heavy or light a petroleum
liquid is compared to water. By definition, if the petroleum’s API gravity is greater
than 10 then it is lighter than water and will float on water. If the API gravity is less
than 10 then it is heavier than water and will sink. The API gravity scale does not
have a unit of measure per say but is referred to in “degrees” with a scale from 10 to
70. This API gravity scale allows relative densities of petroleum liquids to be
compared. Why is this important? Why do we want to be able to compare petroleum
liquids? Well, the answer has to do with classifying the petroleum by quality. In the
oil industry crude oil is classified as either light, medium or heavy, according to it’s
measured API gravity! The measured API gravity will determine the class of oil and
therefore determine the value of the product.
 
crudeoil
Light crude oil has an API gravity higher than 31.1 degrees API
Medium oil has an API gravity between 22.3 degrees API and 31.1 degrees API
Heavy oil has an API gravity below 22.3 degree API
Extra Heavy oil has an API gravity less than 10 degree API


CONCLUSION:

It is not always easy to understand how density may apply to a given circumstance but
you can hopefully see from this brief introduction that it plays a very important role in
many or our industrial and production processes.


Learn more about instruments that measure liquid density
Continue Reading

Recent Posts